Colour Popping with Style – Creative Lightroom 8

CL-final-8This weeks episode of Creative Lightroom is all about selective colour, also known as colour popping. Now before you say this is a repeat of Creative Lightroom Episode 3 then let’s be clear how this is different. In episode 3 we used selective saturation to leave just one tone of colour (just the reds for example). Colour popping is more about keeping one area in colour even if the area has a mixed bunch of tones.

Where most photographers fail in this technique is by leaving the colours over saturated. That may be OK with a single colour but with mixed colours the end result can be very jarring on the eye.

So in this video I’ll show both how to colour pop and then how to control the popped colours,

As always it’s worth mentioning that if you’re a Photoshop user rather then Lightroom user, EVERYTHING I show in the video is the same as Adobe Camera RAW in Photoshop CC, CS6, CS5 and CS4.

[youtube]http://www.youtube.com/watch?v=ODidMT5Lm6g[/youtube]

Can’t see the video? Click here: http://youtu.be/ODidMT5Lm6g

Squared edged border action

Square-Edge-LargeThis weeks Friday Freebie is a work in progress from my next action set. The new set won’t be ready just yet but once completed it will be the successor to my hugely popular Amazing Borders Set 1.  A good border can really set off a photo but making an action that adds a reasonably border to pretty much any photo you can find is tougher then you might image!

You can download the action here:
Squared edged border action

This action makes a eroded edge border that has a blocky, square edge feel. Personally I blame Minecraft for making blocks fashionable once again 😉 The Action makes a copy of your photo so the original will be untouched. It also flattens the photo at the end, so if you wish to modify the border press CTRL+Z to undo that step.

The action will work with Photoshop CC, CS6, CS4, CS4, CS3, CS2 etc and will work with Elements11 and older versions, if you can jump through the hoops that older Elements put in place to add actions.

If you create a great photo with my action then feel free to link to it by leaving a comment below.

Usage rules
The action is copyright Gavin Hoey 2013. Use is limited to any personal, non-commercial purposes. Please share the Friday Freebie by linking back to this page. Do not redistribute the original action without my permission.

Download instructions
The direct link to download the actions is https://www.gavtrain.com/free/square-border-gavtrain.zip

No support is provided with the Friday Freebies. If you need help Google or YouTube the question and you’ll almost certainly find the answer 🙂

Industrial Template

Red-Bolts-FF-FinalThis weeks Friday Freebie is an industrial style border and texture which has a wonderful 3D feel. The standout feature must be the rectangle of red bolts. There’s no Photoshop here’s that’s exactly as I found them.

Click Here To Download the industrial template

With those bright red bolts and the metal texture the sort of photo that’s likely to work best is something with an industrial feel. I found mono images worked well but don’t let that limit your imagination. If the red bolts are a bit too bright then reduce the templates saturation value to suit your taste.

The sample image here was simply placed above the template, resized to fit and the layer blending mode was changed to Overlay. Other blending modes will also work so experiment away.

If you create a photo using the Friday Freebie then let me (and everyone else) know by leaving the link in the comments below.

Usage rules
The template is copyright Gavin Hoey 2013. Use is limited to any personal, non-commercial purposes. Please share the Friday Freebie by linking back to this page. Do not redistribute the original image without my permission

Bringing back Photoshop’s missing filters

Missing-Filters-1When Adobe moved from Photoshop CS5 to Photoshop CS6 they gave the interface a long overdue facelift. The most obvious change is the new default dark interface but to make that happen the Photoshop engineers had to remake 1000’s of buttons, icons and panels from scratch.

As if that wasn’t enough Adobe decided that now was also good time to do a spot of Photoshop spring cleaning and one place where that’s most obvious is in the filter menu. In fact at first glance you might well think that half the filters have been removed.

Take a quick glance down the filter list of Photoshop CS6 and Photoshop CC and you won’t find the Artistic, Brush Strokes, Sketch, Stylize or Texture filters listed. They’re still in the Filter Gallery, just not on the filer group list.

So how do you get the full list back? The answer is hidden away in the preferences.

The option to switch on the full filter list is under:
PC Users  Edit – Preferences – Plug-Ins
Mac Users  Photoshop – Preferences – Plug-Ins 

Tick the box marked Show all Filter Gallery groups and names, then restart Photoshop. Your complete list of filters will now be back.Missing-Filters-2

Vintage Texture

FF-vintagesThis weeks Friday Freebie is a vintage texture which is simple to use and gives amazing results. It’s a warm tone texture that combines patchy tones, a light weave texture and a hint of writing.

Full download instructions are below but you can also
Click Here To Download the vintage texture

As with all textures it works best with photos that have large areas of bright tones such as this one which has loads of bright sky. All you need to do is paste your photo above the texture and set the blending mode. There are loads of different layer blending modes and they’ll all give a different look, some you’ll like and others less so but experimentation is the key to success.

Jump down to the end of this post to see three different looks for the same image.

If you create a photo using the Friday Freebie then let me (and everyone else) know by leaving the link in the comments below.

Usage rules
The image is copyright Gavin Hoey 2013. Use is limited to any personal, non-commercial purposes. Please share the Friday Freebie by linking back to this page. Do not redistribute the original image without my permission.

Download instructions
Click the link https://drive.google.com/file/d/0B_Mmmm3K1utNRHZqZzdYMmFrODg/view?usp=sharing

1. Click the Download button download_icon

2. The download should start automatically


FF-vintage-modes


Instant Triptych Action

Basic - Landscape

This weeks Friday Freebie is a Triptych Photoshop action.  If you’re new to the art of the triptych, it’s simply three images in one picture and this action will make one with a single click.

You can download the action here: Triptych Sample

The action I’m sharing today takes an open photo in Photoshop and makes the basic triptych effect.

The action will split your photo into three panels and add a wide border. You’ll need a landscape format (wide) image to get the best from the action. I’ve left all three panels as layers at the end of the action, which means you’re free to alter, adjust and tweak the effect to your hearts content.

The action will work with Photoshop CC, CS6, CS4, CS4, CS3 but sadly not with Elements.

If you create a great photo with my action then feel free to link to it by leaving a comment below.

Usage rules
The action is copyright Gavin Hoey 2013. Use is limited to any personal, non-commercial purposes. Please share the Friday Freebie by linking back to this page. Do not redistribute the original action without my permission.

Download instructions
The direct link to download the actions is www.gavtrain.com/free/triptych-sample-gavtrain.zip

No support is provided with the Friday Freebies. If you need help Google or YouTube the question and you’ll almost certainly find the answer 🙂

35mm Film Template

35mm-film-finalI found this weeks Friday Freebie whilst sorting through a pile of old slides I had gathering dust in my office. I’d used this one during the ’90’s in what was known at the time as a “slide sandwich” and was simply two slides pressed together to create a new third image when projected.

Full download instructions are below but you can also
Click Here To Download the 35mm film template

Although the days of the slide sandwich are far behind me, the technique of combining two (or more) images together is alive and well in Photoshop in the form of layers. To make life a little easier I’ve created a template from the 35mm film complete with a note of where your own photo should be added, a blending mode that should work with most photos and a grungy layer mask for if you need to reduce the texture from the centre of the film. Of course you can also change everything if you want.

At 5000 pixels on the longest edge and with lots of fine textured detail, this weeks Friday Freebie PSD template comes in at around 70mb. If you’re not on a fast internet connection if might take a few minutes to download.

As always, if you create a photo using the Friday Freebie then let me (and everyone else) know by leaving the link in the comments below.

Usage rules
The image/template is copyright Gavin Hoey 2013. Use is limited to any personal, non-commercial purposes. Please share the Friday Freebie by linking back to this page. Do not redistribute the original image/template without my permission.

Download instructions
Click the link https://drive.google.com/file/d/0B_Mmmm3K1utNNXpONGJGTk9WUkU/view?usp=sharing

1. Click the Download button download_icon

2. The download should start automatically

3. Save the template to your hard drive

4. Open in Photoshop or Photoshop Elements

5. Paste your photo BELOW the 35mm layer

5 Questions about Photoshop CC

PS_cc

I very much doubt you missed the recent announcement from Adobe about the new version of Photoshop coming in June. To recap the next version will be called Photoshop CC and comes with some nice new features.

Adobe has also changed the way we purchase Photoshop (along lots of its other software titles) to a subscription only system that it calls Creative Cloud. This seems to be sending shockwaves rippling around the internet and as is so often the case not everything you read is true.

As someone who’s used Creative Cloud for the past year I’m well placed to give my impressions of the experience, so here are my answers the top 5 questions (in particular order) I keep hearing.

Please take a deep breath and read the whole post before commenting as I will be actively moderating them.

I’m happy with current version of Photoshop. Will that keep working once Photoshop CC comes out?
If you’re happy with your current version of Photoshop and either don’t want or need the new features of Photoshop CC then absolutely nothing will change for you. In fact I’d suggest you stop reading this now and get back to the more enjoyable things in life.

I’ve been told I must be online in order for Photoshop CC to work.
My PC is permanently online but my laptop is rarely online. Photoshop is installed on both machines and both work in exactly the same way. In fact unless I told you I was a Creative Cloud user, you’d never know the difference.  Photoshop needs to running whilst you’re online once every 90 days otherwise it might stop.

I don’t like the idea of all my files being in the cloud.
Neither do I and neither do Adobe. The cloud bit of “Creative Cloud” is where you download the software from and where you can choose to save work too. I keep all my photo, files, videos etc firmly on my PC. However I do use my Creative Cloud space to share things with clients, friends and with you. Check out my Friday Freebies to see that in action.

At the end of my subscription I’ll be left with nothing
I suppose that’s true. If you stop subscribing you’ll be left with whatever you used before you started using Photoshop CC. I look at it like this. Every year I pay a small fortune for insurance on my photo gear and at the end of the year I get nothing in return… assuming I haven’t made a claim. At least with Photoshop you get something back whilst you’re subscribed.

If  I stop subscribing will I loose access to my files?
If they’re on your hard drive then they’re not going anywhere. If you’ve used a new feature of Photoshop CC such as Camera Raw as a smart object layer then it will not be editable in older versions of Photoshop but it’ll still be there and your file will still open. You can also open PSD files in Photoshop Elements and a dozen other software packages from companies other then Adobe.

Photoshop CC won’t be everyone’s cup of tea and that’s fine. If you want the latest and greatest offering from Adobe or like me you need Photoshop and Premiere Pro the Creative Cloud is the perfect fit.

One more thing. If it wasn’t for Adobe’s Creative Cloud then there would have been a lot less Friday Freebies on gavtrain over the past year… just saying 😉

How to sharpen in Photoshop

Smart-SharpenSharpening your photos is one of the least exciting things you can do in Photoshop but also one of the most important things too. It’s also right at the top of the frequently asked questions I get whilst teaching photo post processing.

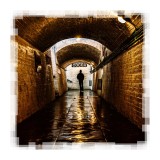
Let’s start by clearing up a few misconceptions. You don’t need to sharpen every photo and you don’t need to sharpen a whole photo the same amount. For example if you’ve taken a dreamy soft portrait you may want to sharpen just the eyes or you may want to sharpen nothing at all… It’s ultimately your choice.

When to sharpen
In this post I’m only looking at sharpening in Photoshop and I’m assuming you’re starting with a photo that’s basically in focus where it should be. Many people will make the fundamental mistake of sharpening just after they’ve applied their Photoshop effect, whatever that may be. WRONG!

For me sharpening is the very last thing you do moments before the image leaves your computer and goes to your printer, blog, Facebook page etc. In other words don’t sharpen your image and then resize it, always resize it first and then sharpen.

Smart-Sharpen-1

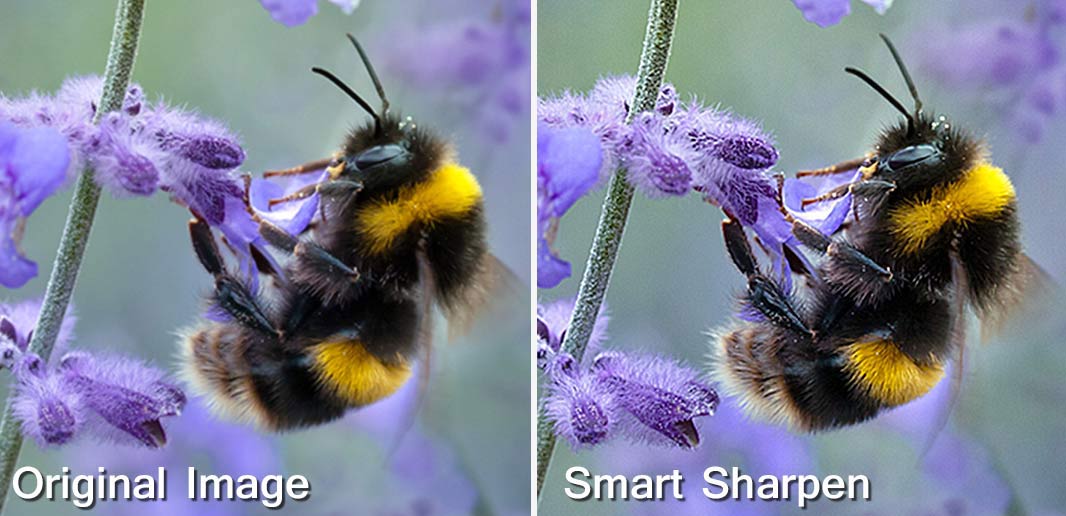
Unsharp Mask vs Smart Sharpen
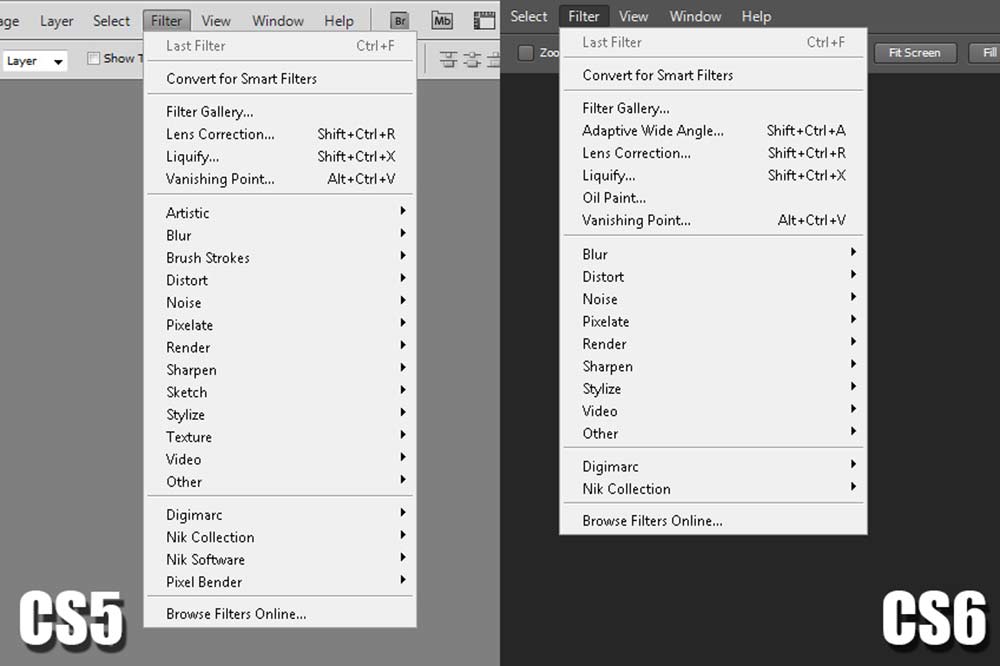
For years I’ve used Unsharp Mask as my “go to” sharpen tool but no more. Photoshop has a raft of sharpening options but the Smart Sharpen filter has a couple of features that make it the best sharpening filter in Photoshop.

The Smart Sharpen Filter has three type options. “Gaussian Blur”” is in effect the same sharpening as Unsharp Mask. “Lens Blur” is my usual setting and “Motion Blur” try’s (and usually fails) to reduce blur from moving subjects.Smart-Sharpen-2

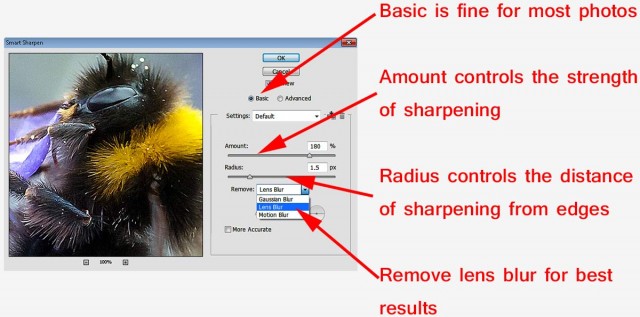
To get the best from Smart Sharpen set the amount to 500% and the radius to around 20 and you’ll notice a bunch of halos around edges in the photo. Slowly reduce the radius until the halos are all but gone. That’s the radius set for that image. Finally, reduce the amount slider to get the sharpen effect you desire.

Obviously there’s no magic number that works for all images so be prepared to experiment a little.

Local Sharpening
Smart-Sharpen-3Good as Smart Sharpening is you do have to remember that it’s a global effect which effects all the pixels in the image and whilst that’s usually exactly what you want there are times when it’s not. For example perhaps you have a shallow depth of field image, you don’t always want to sharpen the out of focus areas.

One way to do this is to make a duplicate layer of the image, sharpen the duplicate layer and use a layer mask to limit the sharpened layer to just the bits you wanted to sharpen.

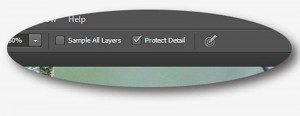
However for users of Photoshop CS5 and CS6 the best way to do this is with the Sharpen Brush which had a radical overhaul in CS5 onwards and is the best sharpening tool in any part of Photoshop as long as “Protect Detail” is turned on in the tool option bar. It’s as simple to use as any brush in Photoshop, all you do is paint where you want to sharpen and the more you paint the sharper thing become. Gone to far? CTRL+Z will undo the last click and CTRL+ALT+Z will keep going back one histrory step at at time.

So remember…

  • Only sharpen AFTER you resize your photo
  • Use Smart Sharpen for Global Sharpening
  • Paint with The Sharpen Brush for local sharpening