White Painted Border

Painted-edge---final
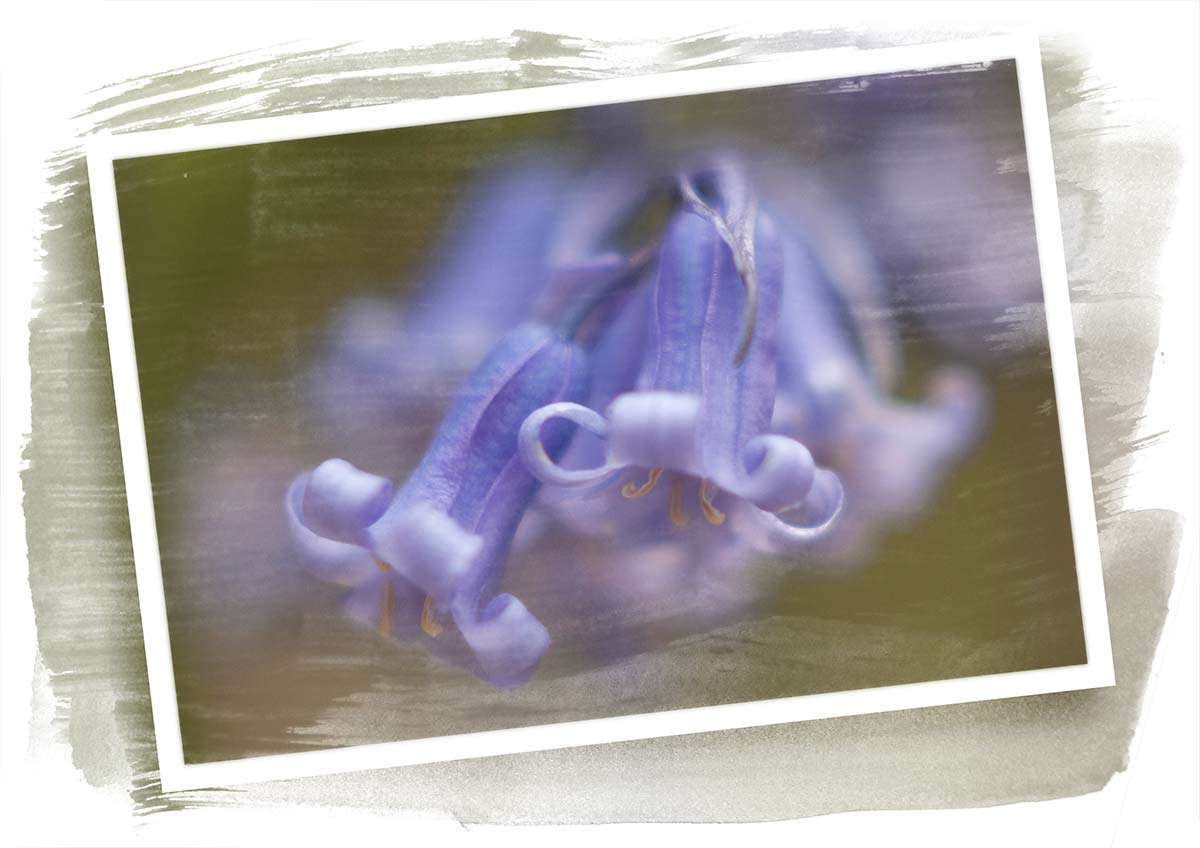
This was fun to make and not just because things got a bit too messy! This Friday Freebie was lovingly hand crafted from nothing but the finest kids paints, most of which seemed to end up on my desk and not the paper. There is a reason that happened and it’s not just because I’m rubbish at painting.

Over the years I’ve made many borders with paint but not always with paint brushes and this is a perfect example. To get the distressed edge effect I “painted” with the rubber edge of an old ice scraper that had been rolling around in the boot of my car for a few winters. I then photographed the edge and straightened in up in Photoshop.

Full download instructions are below but you can also
Click Here To Download the white painted border

Using the border is as simple as changing the layer blending mode to Screen. For the less advanced users that’s done like this…

Download the Friday Freebie and open it in Photoshop or Photoshop Elements, then open the photo you wish to add to the frame. Flatten any layers (Layer – Flatten Layers) and then press CTRL+A to select it all, followed by CTRL+C to copy. Jump over to the frame and press CTRL+V to paste the image on to the frame.

You’ll need to resize the image with Free Transform (CTRL+T). Use the corner handles to drag the image into the photo area and when done press Enter. Finally change the layer blending mode from Normal to Screen to blend the photo with the template.

If you create a photo using the Friday Freebie then let me (and everyone else) know by leaving the link in the comments below.

Usage rules
The image is copyright Gavin Hoey 2013. Use is limited to any personal but non-commercial purposes. Please share the Friday Freebie by linking back to this page. Do not redistribute the original image without my permission.

Download instructions
Click the link https://drive.google.com/file/d/0B_Mmmm3K1utNZnZxWnQxUGc0dHc/view?usp=sharing
1. Click the Download button download_icon

2. The download should start automatically


Paint Drip Brushes

Paint-brushes-ffThis weeks Friday Freebie is a set of four high resolution Photoshop brushes. Following on from the coffee ring brushes I shared a few weeks back, these brushes can be made to look like drips and drops of liquid such as paint or in my case, tea.

Click Here To Download the Drip Brushes

These brushes were hand crafted in my studio by dropping splats of paint onto white paper. Once I had a few good ones I photographed the results and then defined them as a brush. It’s a great wet weather project that you can try yourself.

Once downloaded, the brushes will need to be unzipped before they are installed. The brush set is compatible with all versions of Photoshop and Photoshop Elements. If you need help installing them then remember to search on Google and YouTube for the answers.

If you create a photo using the Friday Freebie then let me (and everyone else) know by leaving the link in the comments below.

Usage rules
The brushes are copyright Gavin Hoey 2013. Use is limited to any personal, non-commercial purposes. Please share the Friday Freebie by linking back to this page. Do not redistribute the original image without my permission

How to sharpen in Photoshop

Smart-Sharpen
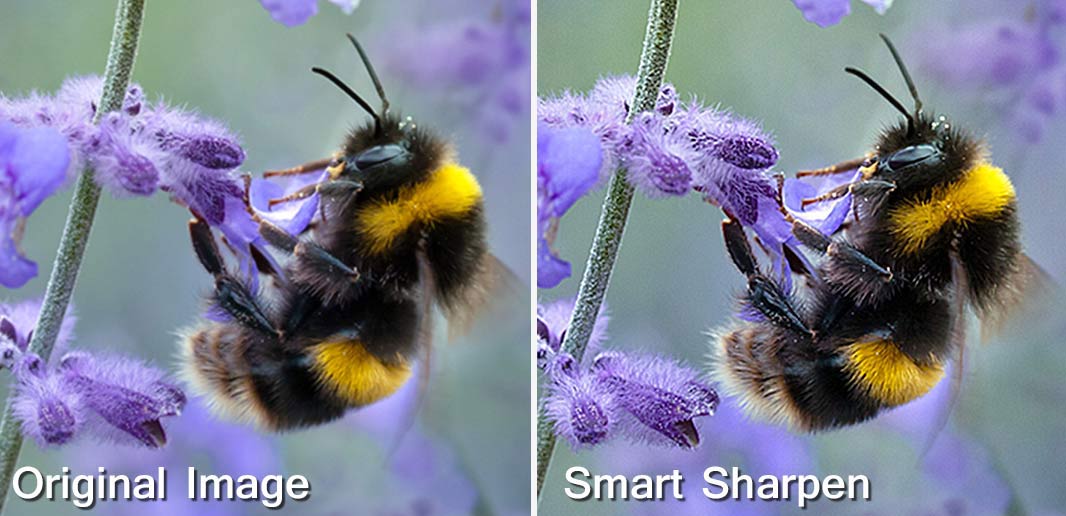
Sharpening your photos is one of the least exciting things you can do in Photoshop but also one of the most important things too. It’s also right at the top of the frequently asked questions I get whilst teaching photo post processing.

Let’s start by clearing up a few misconceptions. You don’t need to sharpen every photo and you don’t need to sharpen a whole photo the same amount. For example if you’ve taken a dreamy soft portrait you may want to sharpen just the eyes or you may want to sharpen nothing at all… It’s ultimately your choice.

When to sharpen
In this post I’m only looking at sharpening in Photoshop and I’m assuming you’re starting with a photo that’s basically in focus where it should be. Many people will make the fundamental mistake of sharpening just after they’ve applied their Photoshop effect, whatever that may be. WRONG!

For me sharpening is the very last thing you do moments before the image leaves your computer and goes to your printer, blog, Facebook page etc. In other words don’t sharpen your image and then resize it, always resize it first and then sharpen.

Smart-Sharpen-1

Unsharp Mask vs Smart Sharpen
For years I’ve used Unsharp Mask as my “go to” sharpen tool but no more. Photoshop has a raft of sharpening options but the Smart Sharpen filter has a couple of features that make it the best sharpening filter in Photoshop.

The Smart Sharpen Filter has three type options. “Gaussian Blur”” is in effect the same sharpening as Unsharp Mask. “Lens Blur” is my usual setting and “Motion Blur” try’s (and usually fails) to reduce blur from moving subjects.Smart-Sharpen-2

To get the best from Smart Sharpen set the amount to 500% and the radius to around 20 and you’ll notice a bunch of halos around edges in the photo. Slowly reduce the radius until the halos are all but gone. That’s the radius set for that image. Finally, reduce the amount slider to get the sharpen effect you desire.

Obviously there’s no magic number that works for all images so be prepared to experiment a little.

Local Sharpening
Smart-Sharpen-3Good as Smart Sharpening is you do have to remember that it’s a global effect which effects all the pixels in the image and whilst that’s usually exactly what you want there are times when it’s not. For example perhaps you have a shallow depth of field image, you don’t always want to sharpen the out of focus areas.

One way to do this is to make a duplicate layer of the image, sharpen the duplicate layer and use a layer mask to limit the sharpened layer to just the bits you wanted to sharpen.

However for users of Photoshop CS5 and CS6 the best way to do this is with the Sharpen Brush which had a radical overhaul in CS5 onwards and is the best sharpening tool in any part of Photoshop as long as “Protect Detail” is turned on in the tool option bar. It’s as simple to use as any brush in Photoshop, all you do is paint where you want to sharpen and the more you paint the sharper thing become. Gone to far? CTRL+Z will undo the last click and CTRL+ALT+Z will keep going back one histrory step at at time.

So remember…

  • Only sharpen AFTER you resize your photo
  • Use Smart Sharpen for Global Sharpening
  • Paint with The Sharpen Brush for local sharpening

Painted Frame Template

Painted-Frame-FinalHere’s a great Friday freebie for anyone who loves creating painterly effects.

The template is a simple JPG file which you can adjust to your own needs. For example you may wish to adjust the brightness using Levels or add a splash of colour with the Colorize option in Hue/Saturation. All you need to do is add your own photo over the whole image or just the framed area, then change the layer blending mode from Normal to Screen. Although the Screen blending mode will usually give you the best results, experimenting with other blending modes can yield some unexpected results which may be even better.

If you’ve had success with the template and you’d like to share your image with others, please pop a link in the comments section.

Download the Painted Frame Template

Usage rules
The image is copyright Gavin Hoey 2013. Use is limited to any personal, non-commercial purposes. Please share the Friday Freebie by linking back to this page. Do not redistribute the original image without my permission.

Download instructions
Click the link https://drive.google.com/file/d/0B_Mmmm3K1utNVnd4a2twTmNacW8/view?usp=sharing

1. Click the Download button download_icon

2. The download should start automatically