5 Top Tether Tips (into Lightroom)

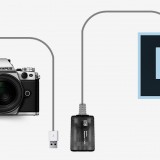
There’s plenty of reasons why tethering your camera to your computer is a really great idea, I do it all the time for my live demos and workshops. Having your photos appear on a large screen is a great way to show them off to a group or simply to check the sharpness and colour on a screen that’s bigger and better than the one on your camera. You don’t even have to be a studio photographer to find tethering useful for example, I hook up to a 10” Windows tablet during my location workshops.

So here are my top five tips for tethering into Lightroom.

1 Already supported
Ever since Lightroom 3 there’s been a built in way to tether a camera and Lightroom. It’s quick, simple and reliable. You’ll find it under File-Tethered Capture-Start Tethered Capture. Fill in the setting boxes and away you go.Tether-1

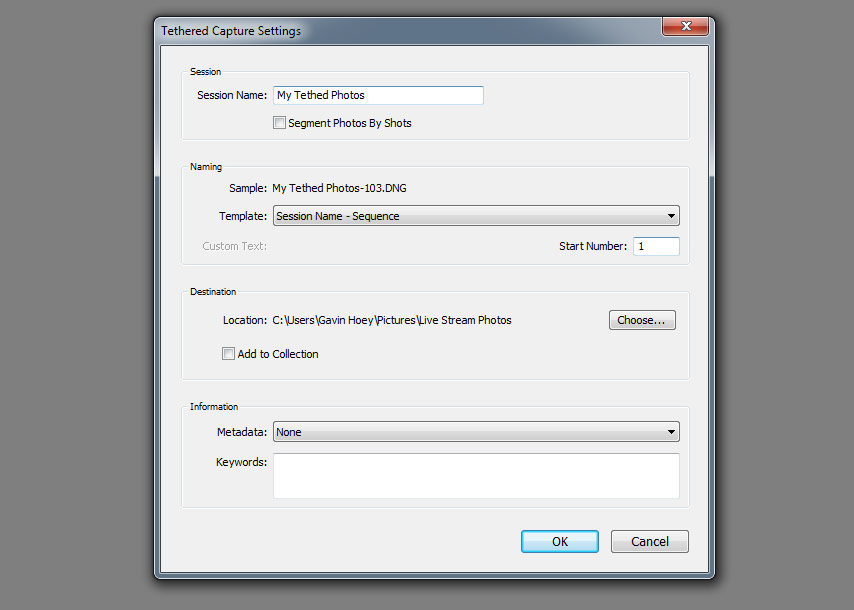
The bad news is it only works for a selected number of cameras from Canon, Nikon and Leica. You can see the full list here https://helpx.adobe.com/lightroom/kb/tethered-camera-support.html

Basically if you’re camera body isn’t supported you can’t use it but all is not lost. Jump down to section 5 for help.

2 Right Cable
OK so you have a camera that’s supported by your version of Lightroom, it’s all hooked up and the camera’s USB setting are correct. But for some reason Lightroom just won’t recognise it and insists that “No Camera Detected”Tether-2

What USB cable are you using? Is it the one that camera with your camera or a cable you found stuffed away in a drawer? The problem is not all USB cables are the same, despite how they may appear and Lightroom (or rather your computer) is fussy.

Some USB cables are charging cables, some are data cables, some are both and all of them look the same. If Lightroom won’t talk to your camera it may well be the cable that’s faulty or simply doesn’t support data. Swap the cable for a known good one and try again.

3 Go long
Unless you intend to shoot with your computer less than a metre from your camera (and some photographers do) you’ll want a USB extension cable. The longer the cable the less likely I am to trip over it and the more mobile I can work. However there’s a problem. If your total cable length goes beyond about 5 meters the USB signal will be intermittent or just plain stop.

The solution is to buy something called an Active USB Extension also known as a USB Repeater Cable. It’ll have either a thicker connection at the female end or a little bump in the cable which houses a signal booster and that’s what gets you past the 5 metre limit.
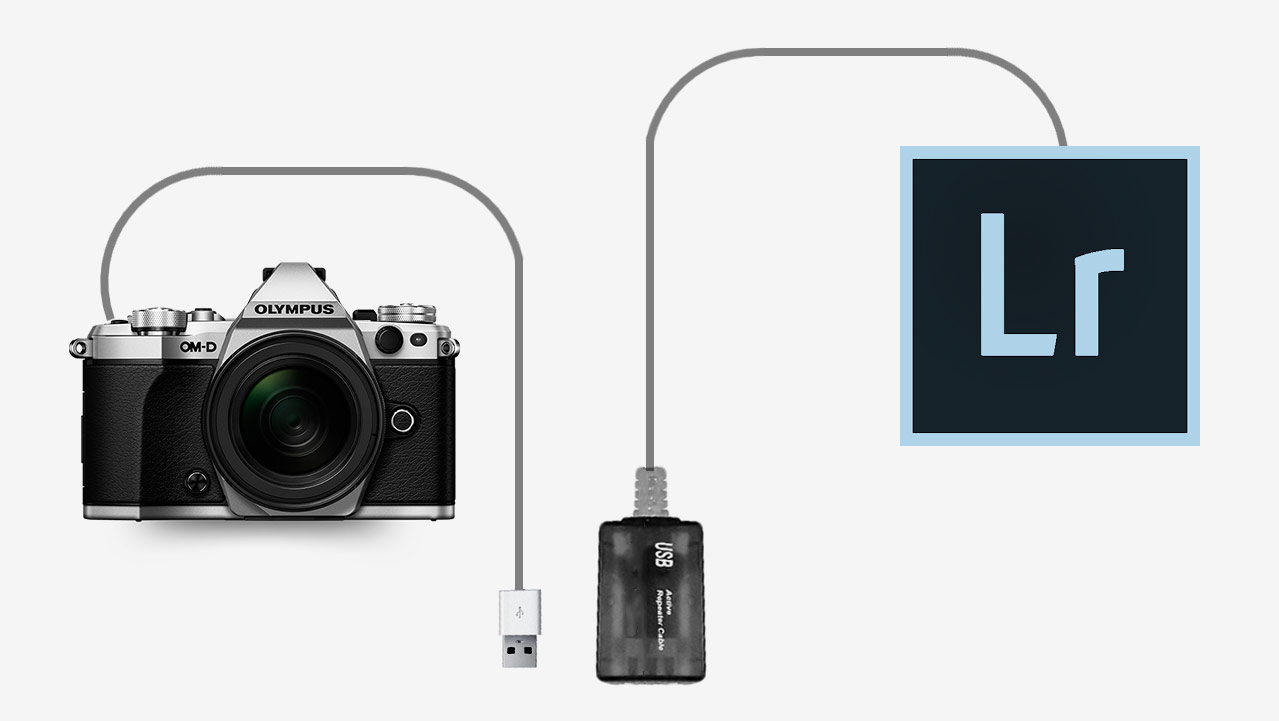
Tether-3

4 Shrink the bar
Once everything is set up, Lightroom will auto import you images whenever you press the camera shutter button, plus it has some basic camera controls such as remote firing the shutter and… well, actually that’s it but it will show you a bunch of useful camera information like ISO and aperture.

Of course you may not need to see all that extra info, so to hide it hold the ALT key and click on the – icon in the Tether tools bar’s top right corner. You’ll be left with a single button which you can drag out of the way.Tether-4

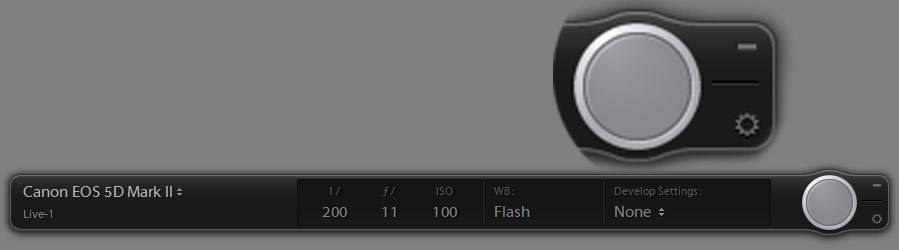
5 Not supported, not a problem
Moving from Canon to Olympus caused me a few headaches when it came to tethering into Lightroom. Like most cameras manufactures, Olympus makes its own software for tethering and gives it away for free but it lacks things I need (like full screen reviews or any sort of image editing).  What it does do is auto import photos to a chosen folder on my hard drive which I can then set as a watched folder in Lightoom. Here’s how it works.

With the camera software importing to a preselected folder (how this is done varies from brand to brand) I then go to Lightroom and click File-Auto Import-Auto Import Settings and put a tick in the Enable Auto Import box. Set the watched Folder to be the same folder on my hard drive that I selected in the camera manufacturers software and do the same with the destination folder.Tether-5

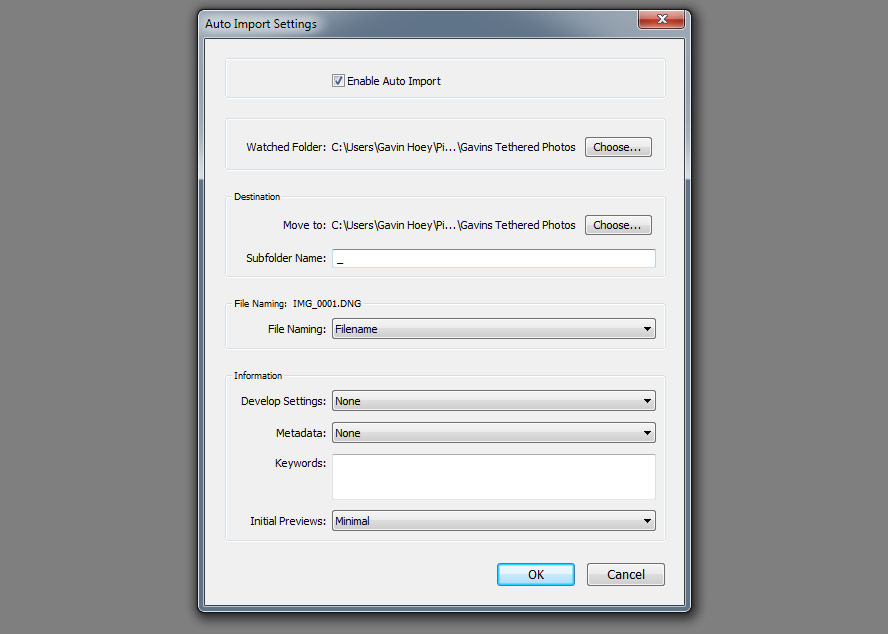
And that’s it, Lightroom will auto import any images that land in the watched folder and they appear on screen about five seconds after I take the shot. Best of all Lightroom remembers these settings, so it’s a “set and forget” process too!

Bluebell 15 Minute Photo Challenge

I’m a sucker for bluebells, so when I got the chance to shoot some at a local wood I grabbed it. The bluebell season can be very short but there’s still something to be said for waiting for the right light and shooting at the right time of day. For me that meant late afternoon when the sun was low but not so low that it would make the woods very dark.

Bluebells, like many flowers, are a bit top heavy so as well as picking the right light I wanted to avoid shooting on a windy day. Luckily everything came together so I packed my camera and by 24-105mm lens and set off to do another 15 minute photo challenge.

[youtube]https://www.youtube.com/watch?v=2b0trjfaRok[/youtube]

Bluebell-1jpgBluebell-2Bluebell-Pano

My Photography Show 2015 Schedule

There’s only two weeks to go until The Photography Show opens its doors at the N.E.C. in Birmingham and I can’t wait. Running from the 21st – 24th March, it’s the UK’s biggest and busiest photography show and it’s packed to the roof with major photographic suppliers and small independent retailers.

TPS-LOGO

But this isn’t just another trade show, there’s also loads of things to see and do. There’s a constant stream of live demos and talks from some of the best photographers in the UK and beyond, there’s also hands on workshops and masterclasses.

I’ll be there for the whole four days giving various talks and demos on Photoshop, Lighting and Photography. If you’re coming along it would be great to meet you and the best place to find me is at one of my talks either in the Adobe theatre, the Guild of Photographers “speakers corner” or in the Behind the lens theatre.

Saturday

10.15 am Adobe theatre Video Editing In Photoshop
1.00 pm Behind the lens Take & Make Great Photos
2.30pm Guild of Photographers J75 Fearless Flash Photography
3.30 pm Adobe Theatre Make your photos look amazing with Photoshop

Sunday

10.15am Adobe theatre Video Editing In Photoshop
2.30 pm Guild of Photographers J75 Fearless Flash Photography
3.30 pm Adobe Theatre Make your photos look amazing with Photoshop

 Monday

10.15 am Adobe theatre Make your photos look amazing with Photoshop
12.30 pm Adobe theatre Hidden gems in Photoshop for photographers
2.30 pm Guild of Photographers J75 Fearless Flash Photography

 Tuesday

11:00 pm Adobe theatre Make your photos look amazing with Photoshop
1.15 pm Adobe theatre Hidden gems in Photoshop for photographers
2 pm Adobe theatre Video Editing In Photoshop
3 pm Guild of Photographers J75 Fearless Flash Photography

All my demos are free and available on a first come first served basis. There’s no need to book but as the Adobe theatre in particular has limited seating I’d recommend getting there early!

Show tickets are free for professional photographers and the trade (if booked in advance) and £13.95 for enthusiasts (£18.00 on the door)

How to make a DSLR time-laspe

A few years ago I made a video about shooting a time-lapse sequence with a DSLR and then making a video from the images. Most of the information is still as valid today as it was in 2011 but it’s amazing haw fast technology changes the way we shoot and edit. Back then very few cameras had a built in intervalometer and you needed a custom made slideshow preset for Lightroom if you wanted to create the time-lapse video in your photo editing software.

Timelapse-NYC-THUMBS

Skip forward 3 years and although my Canon DSLR’s still don’t have timelaspse out of the box I can use my smart phone to control my camera and take the photos. Plus Photoshop CS6 and CC can both create video from stills in just a few clicks of the mouse.

[youtube]https://www.youtube.com/watch?v=J5Bwpm8_5XM[/youtube]
Can’t see the video? Click here http://youtu.be/J5Bwpm8_5XM

Equipment used in this video (Links to Adorama)

Canon 60D 

Sigma 10mm-20mm

ioShutter release cable 

Vanguard 284 CB100 Tripod  

7 Questions About Soft Light

softlight-portrait-2In the studio there’s two types of light that photographers use to define their subject, hard light and soft light. Both have their place but usually in the studio I use soft light when shooting portraits. Getting the light from your studio flash or speedlite can be done in several ways. You can use one light or multiple lights, a softbox or umbrella and in this video I look at them all.

In total I cover seven questions you should know about soft light and how it’s different to hard light.

The final images you see here have had a little bit of Photoshop applied. How much Photoshop? Surprisingly little and I show you exactly how it’s done towards the end of the video too.

[youtube]http://www.youtube.com/watch?v=MfBmNfMb7WA&feature=c4-overview&list=UU8Pksdbj37CdE00kmE7Z1dw[/youtube]
Can’t see the video? Click here http://youtu.be/MfBmNfMb7WA

Gear used in the video (links to the Adorama store)
Canon EOS 60D Digital SLR Camera
Canon EF 24-105mm f/4L IS USM
Lastolite Collapsible Background (Washington/Dakota) 
Lastolite Hot Shoe Ezy-box Softbox 24×24″ 
Flashpoint Triple Shoe Mount Bracket 
Adorama 33″ Translucent Umbrella

softlight-portrait-1

Shooting a slide show

RBpro1What do you do with all the 1000’s or may be 10,000’s of photos you take every year? There’s only so many pictures you can put on Facebook and tweeting to many photos, to often, is a sure fire way to loose followers.

Of course there’s no shortage of photo sharing sites like Flickr and the excellent 500px and uploading the best of your photos to these sites is a great idea.

In this video I have another way to show off lots of your photos in an amazing way, by making a slide show. It’s a great way to show off the photos you’ve already taken but you can also take photos specifically for use in a slide show. That’s exactly what I do in this video and I get to pass on some shooting tips along the way.

Once you’ve chosen which photos you’d like to use in your slide show, you’re ready to start putting the show together. I used Photoshop Elements to do the job but there are plenty of alternatives out there (such as Lightroom) which is good news if you’re on a Mac as frustratingly the slide show part of Elements is a Windows only feature.

[youtube]http://www.youtube.com/watch?v=vmXh9poFRhI&feature=c4-overview&list=UU8Pksdbj37CdE00kmE7Z1dw[/youtube]

Need royalty free music? YouTube has you covered with thier brand new audio library, which is where I downloaded the mp3 file used in this video.

Here’s the final slide show
[youtube]http://www.youtube.com/watch?v=onUsQsKHALw[/youtube]

Vintage Camera Effect – Creative Lightroom Episode 10

CL-final-10In this weeks episode of Creative Lightroom I take at one of my favourite ways to give my images a retro look in Lightroom. Now I could probably do another 10 videos on all the different styles of vintage style post processing you can do in Lightroom ranging from the very subtle to the over the top effects. This one falls towards the middle of that list.

For me there are a few essential things that make a vintage camera style image. First it need a cross processed colour scheme, in other words the colour need to be just the right side of wrong. Next it needs to lack contrast and finally a spot of vignetting is a nice touch. This technique has all that and more.

As always it’s worth mentioning that if you’re a Photoshop user rather then Lightroom user, EVERYTHING I show in the video is the same as Adobe Camera RAW in Photoshop CC, CS6, CS5 and CS4.

[youtube]http://www.youtube.com/watch?v=oGAOqby364k[/youtube]

Can’t see the video? Click here: http://youtu.be/oGAOqby364k

Infrared Mono – Creative Lightroom Episode 9

CL-final-9In this weeks episode of Creative Lightroom I take a deep dive into creating stylish infrared style images in Lightroom. I first made mono infrared images way back in my film days, back then it was a tricky business requiring the film to be loaded in complete darkness. Today things are a lot easier, espeically if you’ve had your camera converted to capture near IR.

This technique forms the basis of my favourite way to process ordinary colour photos into stylish mono. It also adds a touch of the classic IR film feel with a slight glow and a touch of grain.

As always it’s worth mentioning that if you’re a Photoshop user rather then Lightroom user, EVERYTHING I show in the video is the same as Adobe Camera RAW in Photoshop CC, CS6, CS5 and CS4.

[youtube]http://www.youtube.com/watch?v=c6_8AQaNhzs&feature=youtu.be[/youtube]

Can’t see the video? Click here: http://youtu.be/c6_8AQaNhzs

Colour Popping with Style – Creative Lightroom 8

CL-final-8This weeks episode of Creative Lightroom is all about selective colour, also known as colour popping. Now before you say this is a repeat of Creative Lightroom Episode 3 then let’s be clear how this is different. In episode 3 we used selective saturation to leave just one tone of colour (just the reds for example). Colour popping is more about keeping one area in colour even if the area has a mixed bunch of tones.

Where most photographers fail in this technique is by leaving the colours over saturated. That may be OK with a single colour but with mixed colours the end result can be very jarring on the eye.

So in this video I’ll show both how to colour pop and then how to control the popped colours,

As always it’s worth mentioning that if you’re a Photoshop user rather then Lightroom user, EVERYTHING I show in the video is the same as Adobe Camera RAW in Photoshop CC, CS6, CS5 and CS4.

[youtube]http://www.youtube.com/watch?v=ODidMT5Lm6g[/youtube]

Can’t see the video? Click here: http://youtu.be/ODidMT5Lm6g

Split Tone Mono – Creative Lightroom Episode 7

CL-final-6-SplittoneThis weeks episode of Creative Lightroom is all about going mono with a twist.

Black and white is great but sometimes you want to add a bit of general colour and toning the image. Sepia and blue tone are popular choices. Split toning takes the traditinal toning effect a step further by adding a different tones to the shadows and highlights.

In the video I show you how to use Lightroom split tone sliders to create the perfect colour balance.

This tutorial is compatible with all versions of Lightroom.

As always it’s worth mentioning that if you’re a Photoshop user rather then Lightroom user, EVERYTHING I show in the video is the same as Adobe Camera RAW in Photoshop CC, CS6, CS5, CS4  and Photoshop CS3.

[youtube]http://www.youtube.com/watch?v=8c8DUjquXPQ&feature=youtu.be[/youtube]

Can’t see the video? Click here: http://youtu.be/8c8DUjquXPQ