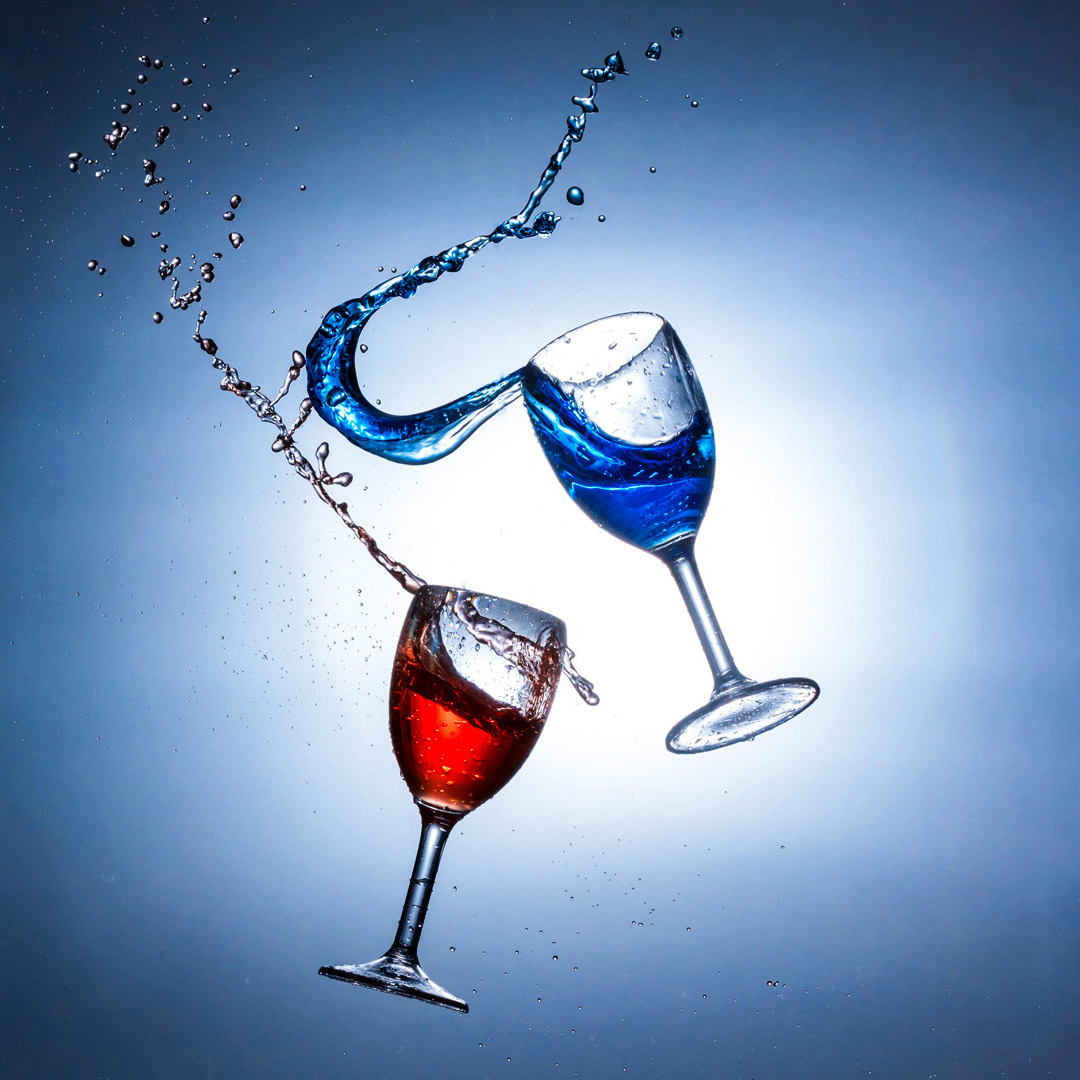
Flash Duration To Freeze Action

One of the many amazing things you can do with flash is use it to stop fast moving things in their tracks. Unlike working with a continuous light it’s not the shutter speed that freezes the action, it’s the tiny amount of time that the flash lasts… its duration.

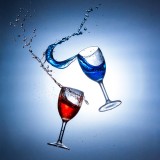
Flash-Duiration-Final

Basically it works like this. The more light you need the longer the flash duration, so reducing the flash power shortens the flash duration and increases it’s freezing power.

Different flashes produce very different flash durations and older design studio heads worked in a very different fashion but if you take a standard speedlight as an example, it will have a flash duration of around 1/200th second at full power and 1/10,000 sec at minimum power.

In the video below I put the theory into practice by bumping two wine glasses together and photographing the results with different flash powers

[youtube]https://www.youtube.com/watch?v=WwcFbRUfHkk[/youtube]

In case you’re wondering, the wine glasses are made of plastic and I drilled two tiny holes in each to attach them to the fishing line.

Gear used in this video (Links to Adorama)

Canon EOS 60D Digital SLR Camera Body Kit

Canon EF 24-105mm f/4L IS USM AutoFocus Wide Angle Telephoto Zoom Lens

Flashpoint Zoom Li-on Manual On-Camera Flash

Vanguard Alta Pro 284 Carbon Tripod

Universal Swivel Holder

Flashpoint Pro Air Cushioned Heavy Duty Light Stand

Controlling reflections in glasses

So you’ve got the lights, you have your model and you’re ready to shoot. Then you take a test photo and all you see is huge white reflections. It’s a problem that happens all too often but fortunately there are a couple of solutions that are quick, easy and effective.

Let’s start with the simplest solution. Get your subject to remove their glasses. It sounds obvious but it’s surprising how many photographers don’t have the nerve to ask. Whilst this can work wonders with occasional spec wearers, anyone who wears glasses full time will look most weird without their specs on. It’s also not going to work with the cool crowd who wear sunglasses all year round.

If you’re using flash or continuous light the chances are the reflections are likely to be from your lights and where you position the lights will affect the reflections you see in the photo.
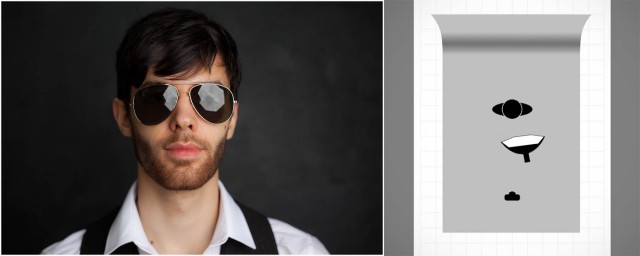
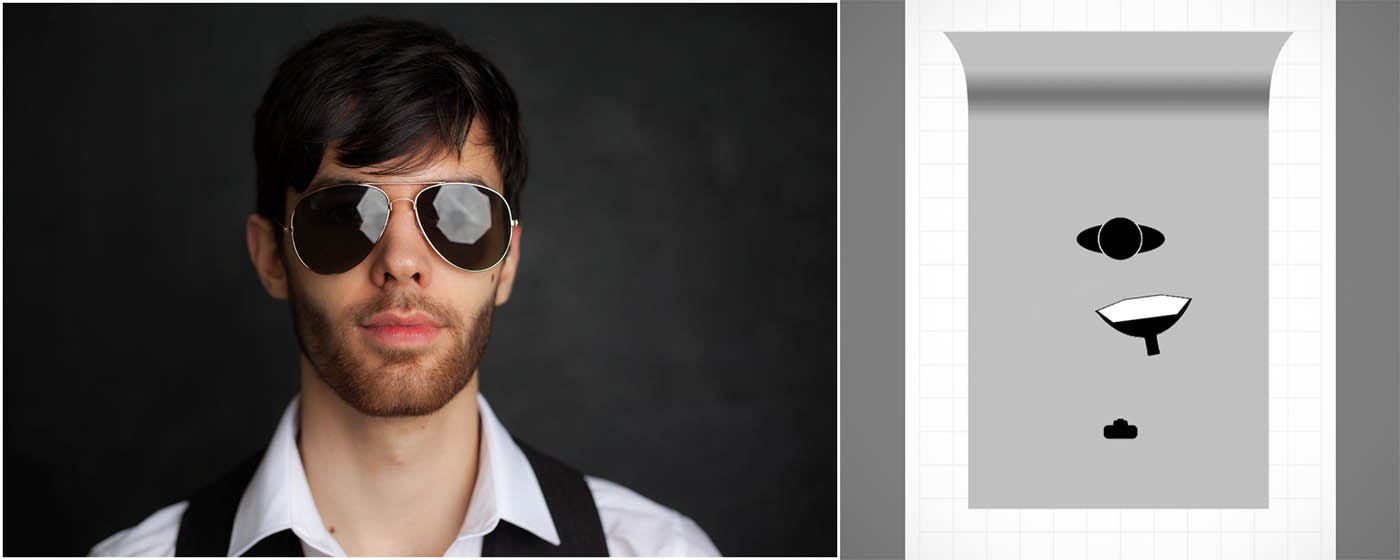
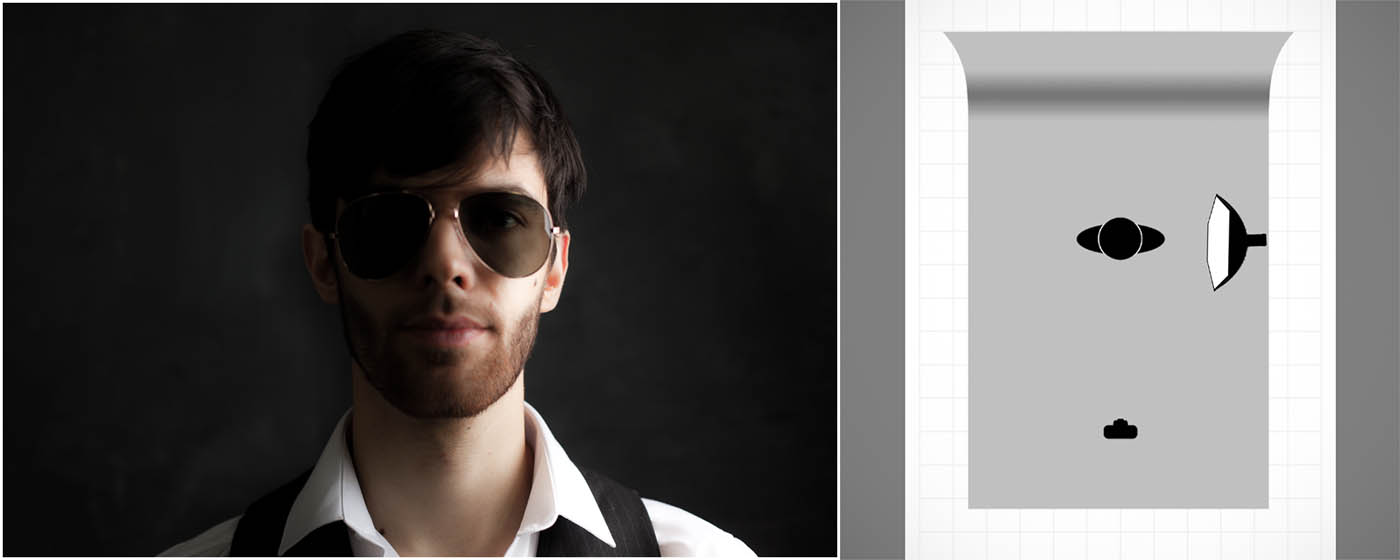
photo-1Light from the front (including on camera flash) will produce the biggest, brightest and least attractive reflections. Because light travels in straight lines it’s going to hit the front of the spectacle lenses and bounce right back in to the camera. This really is one lighting position to avoid.
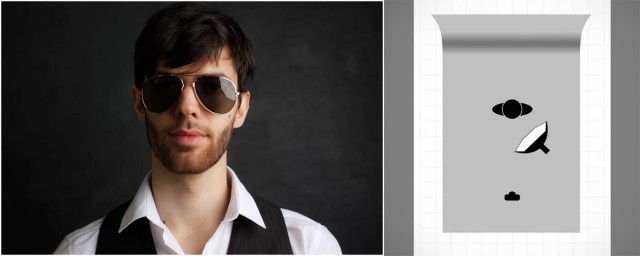
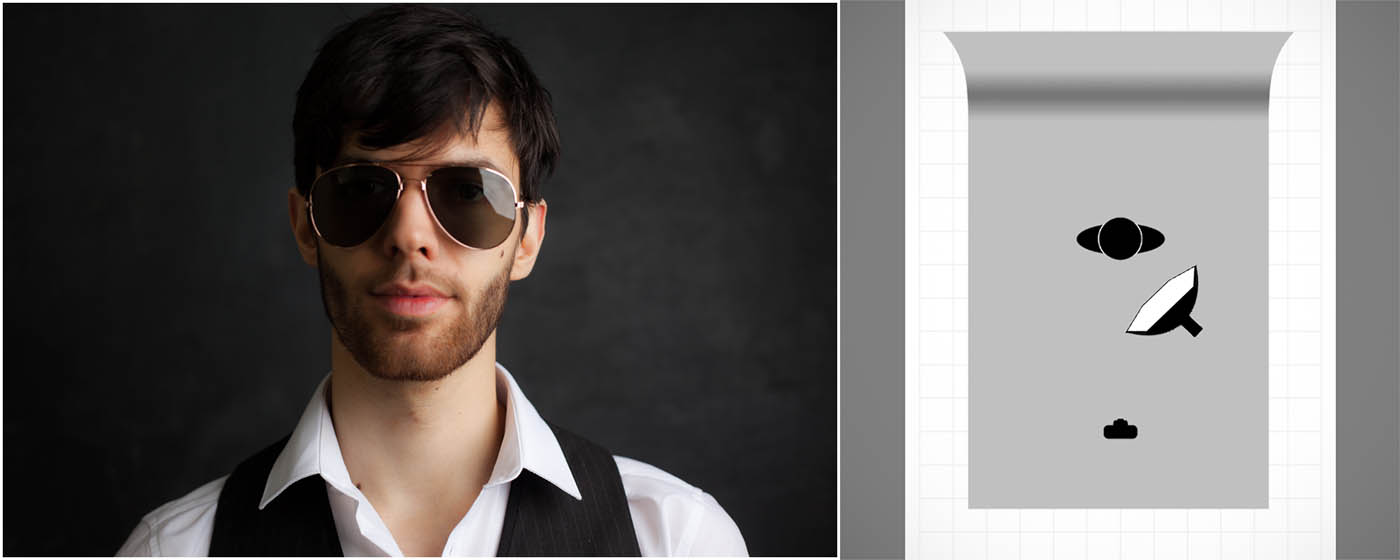
photo-2Knowing that light travels in straight lines means that moving the light source to the side will move reflection. Here the light is at about 45 degrees and the result is a reflection that’s much reduced in size.
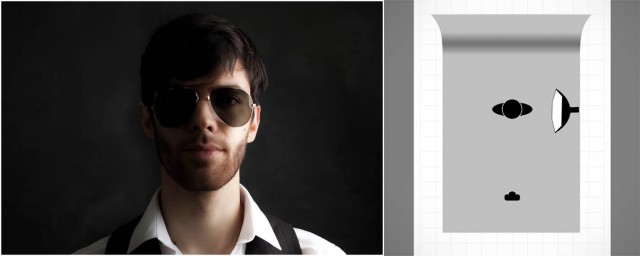
photo-3Taking the idea a bit further, if the light is fully 90 degrees to the glasses results in a tiny reflection but also produces a split light effect which might not be the look you’re after. If you look really close you’ll still see a slight reflection. Why? Well the surface of glasses isn’t flat like a window, it’s curved so you’re never at a 90 degree angle across the whole surface of the lens.
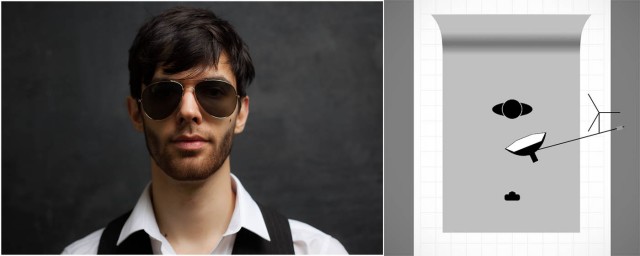
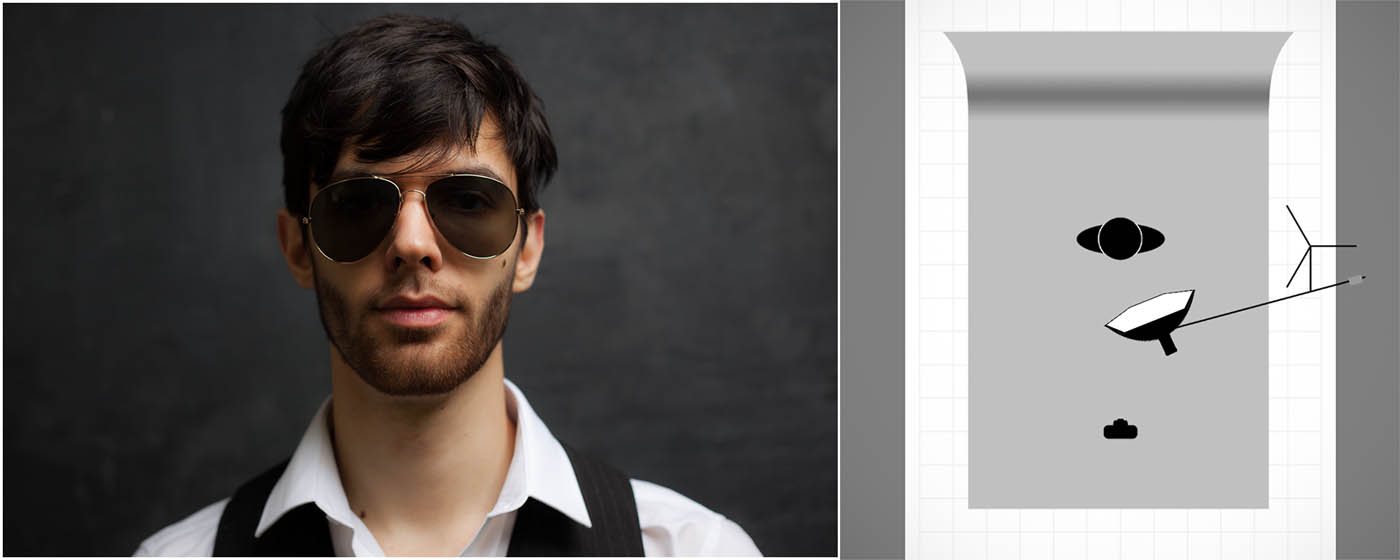
photo-5To minimise and remove reflections the best position for the light is up high. By elevating the light the reflections will disappear and the lighting pattern remains flattering too. Asking the model to drop their chin or slightly angle the glasses down can have a similar effect.

In the video below I go through all of the tips in this post in more detail and even give you some tips on how to add a reflection of your own choosing.

[youtube]http://youtu.be/kOzPWkkmZPE[/youtube]

Gear used in this video

Canon 5D Mark III www.adorama.com/ICA5DM3.html?KBID=67338

Canon 50mm f/1.8 II www.adorama.com/CA5018AFU.html?KBID=67338

Flashpoint Light Stand www.adorama.com/FPLS9.html?KBID=67338

Black Rapid RS-7 Strap www.adorama.com/BRRS7.html?KBID=67338

Flashpoint StreakLight 360 Ws Creative Collection www.adorama.com/FPLFSL360K2.html?KBID=67338

Sekonic L-308S Flashmate www.adorama.com/SKL308S.html?KBID=67338

Westcott Rapid Box 26″ Octa Softbox www.adorama.com/WERB26OM.html?KBID=67338
Softbox Size vs Soft Light

One of the primary uses of a softbox is to give soft lighting, but with so many sizes available, which one should you use?

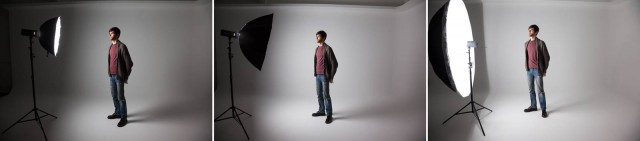
The answer in part comes from the classic rule with soft lighting which is this. The bigger the light source (relative to the subject) the softer the light produced. In other words bigger softboxes give softer light and as long as your softbox is close to your subject that holds true. To test it out I got my 28″ Parapop softbox from Adorama, a medium sized softbox and borrowed a giant 7′ Westcott umbrella softbox.

soft-1

You can see this in action in the three photos above. In each shot the distance from light to the model was 1 meter and the light was metered at f/8. Notice how the shadows blend in with the highlights as the softbox size increases and that’s soft light in action.

Now remember I said the softness of light is also relative to the subject size. Well here’s what happens if you zoom out and shoot a larger, full length portrait. Once again the distance and settings are the same in all shots.soft-2

Look at the shadow behind the model. With the small and medium sized softboxes you’ll see a sharper, harder edge to the shadow then the big softbox. You’ll also see that the smaller softbox gives a smaller spread of light compared to the more even illumination of the large softbox.

So if you want to shoot full length portraits with soft light then an oversized softbox is one answer but it has another use to. Unless you want to spend time in Photoshop cloning out the light you’ll need to back it up. Moving the light away from the subject makes it that much smaller and therefore harder. Oversized softboxes allow you to get soft light without the source being in the scene.

Take a look at this video where I cover all of this and more.
[youtube]https://www.youtube.com/watch?v=a-rAnxVX9kE[/youtube]
Of course there are a few downsizes to large softboxes, one of which is the lack of directional control. In the video above I add some control using Photoshop but in the next video I’ll add it to the light.

Gear used in this video

Flashpoint RoveLight 600 http://www.adorama.com/FPLFRL600.html?KBID=67338
Glow ParaPop 28″ R Softbox http://www.adorama.com/GLSBSM28PPFP.html?KBID=67338
Westcott 7′ Silver Parabolic Umbrella http://www.adorama.com/WEUSLP7.html?KBID=67338
Westcott diffusing cover for 7′ Umbrella http://www.adorama.com/WE4631D.html?KBID=67338
Canon 5D Mark 2 http://www.adorama.com/ICA5DM3.html?KBID=67338
Canon 24-105L http://www.adorama.com/CA24105AFU.html?KBID=67338
Black rapid RS-7 Strap http://www.adorama.com/BRRS7.html?KBID=67338
Sekonic L-308S Flashmate http://www.adorama.com/SKL308S.html?KBID=67338

Home Studio Essentials Episodes 1-10

If you’ve been watching my recent videos over on Adorama TV you’ll have noticed a pattern forming. Over the past months the majority of the videos have focused on shooting with flash in a small, home studio and judging by the feedback it seems to have gone down very well indeed. I think part of the reason for their popularity is the way each video builds on the previous skills learned, at least that was the idea I had when I originally planned them.

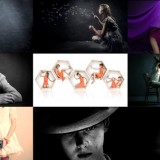
HSE-MontageGear is always a big part of photography but none of the videos need a specific brand of equipment to complete. I used my trusty Canon 5D2 and 24-105mm lens. My flash gear is supplied by Adorama and is their amazing Streaklight flashes. If you want to know more then you can read my review.

To save you digging through my blog / YouTube to find them all I’ve added them all here.

Episode1: One bare flash
[youtube]http://youtu.be/hR4DW7dXOsk[/youtube]

Episode 2: One flash with an umbrella
[youtube]https://www.youtube.com/watch?v=ur58XNQwMXA&list=PL821B7D720DEA39FA&index=11[/youtube]
Episode 3:One flash and a softbox
[youtube]https://www.youtube.com/watch?v=z0MTQFYnvQA&list=PL821B7D720DEA39FA&index=10[/youtube] 
Episode 4: One flash and a reflector
[youtube]https://www.youtube.com/watch?v=TYQh9MNC3Is&list=PL821B7D720DEA39FA&index=9[/youtube] 
Episode 5: Adding a second light
[youtube]https://www.youtube.com/watch?v=FcQg0cBncHs&list=PL821B7D720DEA39FA&index=7[/youtube] 
Episode 6: Using honeycomb grids
[youtube]https://www.youtube.com/watch?v=K-C9xgTCLfM&list=PL821B7D720DEA39FA&index=6[/youtube] 
Episode 7: Using coloured gels
[youtube]https://www.youtube.com/watch?v=sR0wu9Sy6GM&list=PL821B7D720DEA39FA&index=5[/youtube] 
Episode 8: Getting a white background
[youtube]https://www.youtube.com/watch?v=RP4IixDOP5M&list=PL821B7D720DEA39FA&index=4[/youtube] 
Episode 9: Softbox as a white background
[youtube]https://www.youtube.com/watch?v=wy0VZEhwtSU&list=PL821B7D720DEA39FA&index=3[/youtube] 
Episode 10: Hair / seperation light
[youtube]https://www.youtube.com/watch?v=PaDUIqdQpPM&list=PL821B7D720DEA39FA&index=2[/youtube] 

My Adorama Streaklight Bundles

After a bit of arm twisting Adorama has just released the “Gavin Hoey Recommends…” Streaklight Essentials Bundle and the Streaklight Twin Kit Bundle.

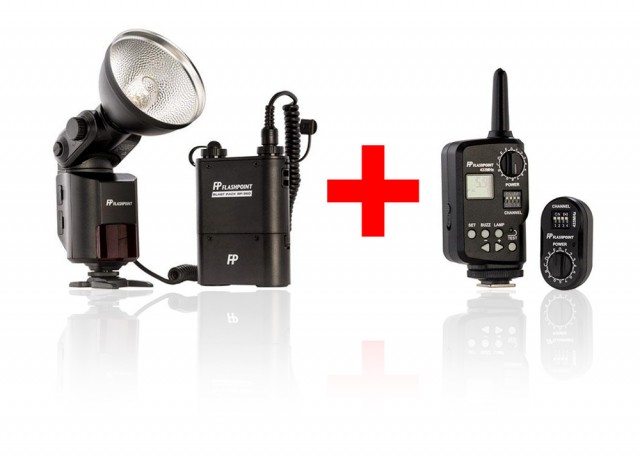
If you’ve been watching any of my recent videos you’ll have seen me shooting with one or two Streaklight flashes.You can checkout my review of the Streaklight 360ws here but if you just want the headline reasons I use the streaklights it’s the amazing power (equivalent to six speedlights), battery powered and incredibly small. In fact I loved it so much I ordered a second Streaklight, the lower powered 180ws. It’s a bit less powerful but also a bit cheaper, perfect for someone like me who’s outside the US and has to factor in shipping & tax.

Streaklight-1My essentials bundle contains the Streaklight 360ws, blastpack battery and a remote trigger that doubles up as a full remote control and you’ll save $20 USD along the way.

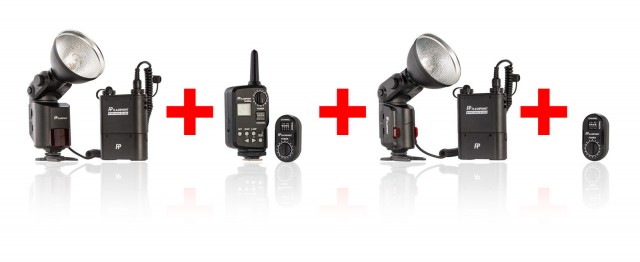
Streaklight-2

My twin light kit consists of a Streaklight 360ws, Streaklight 180ws, two blastpack batteries, a Remote control and a second remote receiver. It’s everything I use day to day in my small home studio and bags you a saving of $100USD off the list price.

If you’re looking for the power of a studio light but with the wireless convenience of a speedlight the Streaklights are hard to beat in my book.

Drama With Grids – Home Studio Essentials – PT 6

For almost all of my studio works, soft light is what I want but every now and then it’s great to break that mold and do something with a bit more edge with grids or snoots. Fortunately my Adorama Streaklights have  purpose designed tools to do the job.

In the studio grids are an essential tool, they help me light small areas with maximum precision and control. Usually I use grids in combination with a softbox as the key light but occasionally I’ll just use the grids for some dramatic effects.

[youtube]https://www.youtube.com/watch?v=K-C9xgTCLfM&list=PL821B7D720DEA39FA[/youtube]

One of the downsides of a small studio is just how easy it is to accidentally bounce light off a wall or ceiling, ruining the effect you hope to achieve. With their tighter beam of light, grids and snoots might just be the answer you’re looking for if you want to get moody lighting in your small home studio space. HSE-EP6-Final
Gear used in this video (Links back to Adorama)
Flashpoint StreakLight 360 Ws Flash (Includes flash and battery)
Flashpoint Streaklight 180 WS Streaklight
Grid/Gel Set
Streaklight Beauty Dish/Grid Set
Canon 5D Mark 2 
Canon 24-105L 

Using two lights – Home Studio Essentials – Part 5

There are many ways you can use a single flash to take great portraits but sooner or later the limitations of a single flash will be reached. Adding a second flash can be a great way to open up new and creative photo opportunities.

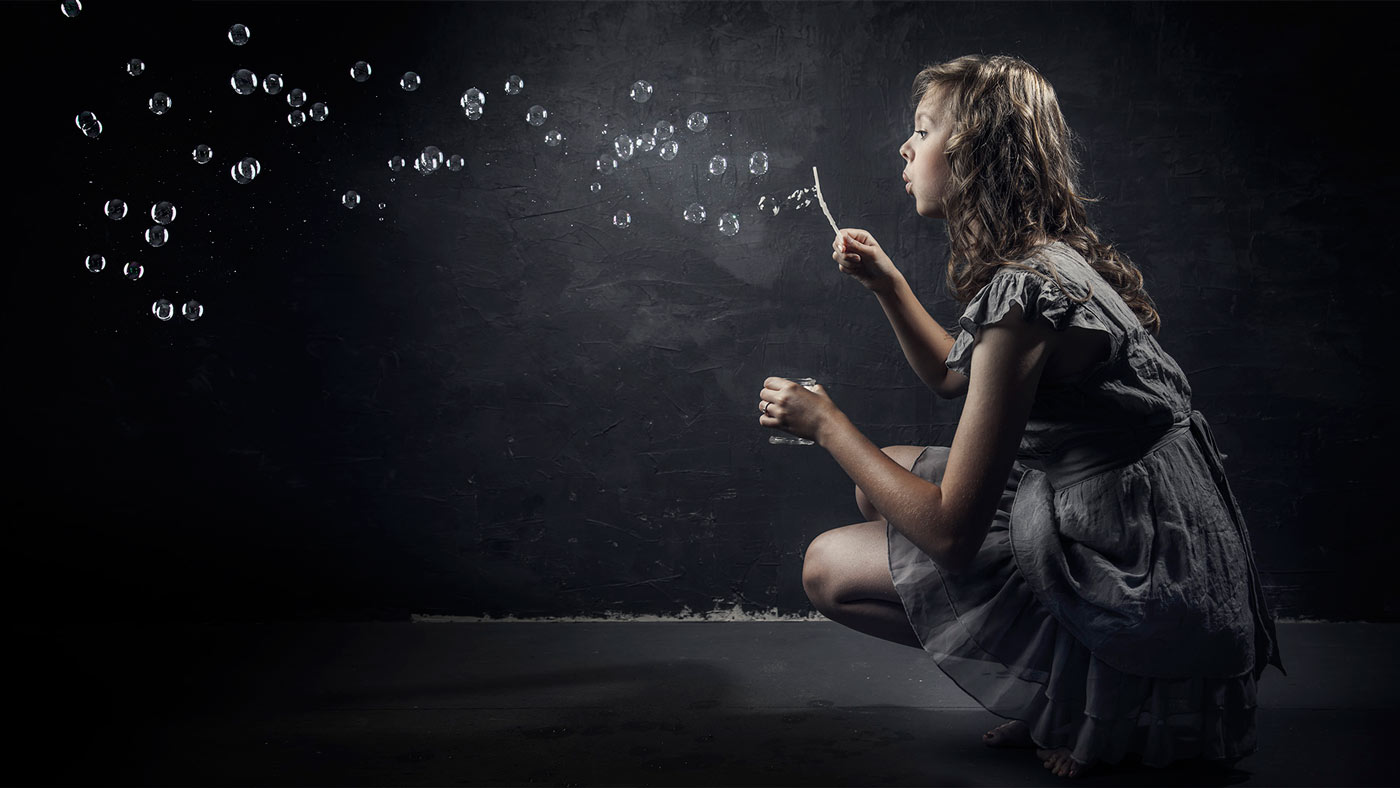
In this video I fire up a second light to act as a hair light and separate the model from a dark background. Then in the final shoot I add a few bubbles to create something a bit special.

[youtube]https://www.youtube.com/watch?v=FcQg0cBncHs&list=UU8Pksdbj37CdE00kmE7Z1dw[/youtube]

More lights means more complexity but my advice is to treat each light separately and meter accordingly. Turning them both on and trying to balance them at the same time sounds easier but trust me it’s not!

Bubbles-Studio

Gear used in this video (Links back to Adorama)

Flashpoint StreakLight 360 Ws Creative Collection (Includes flash, battery, trigger, boom etc)

Flashpoint Streaklight 180 WS

Westcott Apollo Orb Softbox

Canon 5D Mark 2 

Canon 24-105L 

The Softbox – Home Studio Essentials – Episode 3

There’s a reason why the softbox is my “go to” light modifier in my small home studio and it’s all to do with one of the biggest challenges photographers face when shooting in small spaces. With lots of wall close to the light source small studios can become one big reflector with light bouncing all over the place. Whilst that can be great for evenly lit shots it’s a disaster if you want moody lighting or even just basic control of the light direction. Softboxes like the Westcott Apollo Orb I’m using for this shoot, focus the light forward and cut out light spilling behind and to the sides. The upshot is beautiful soft light that has direction even in a small studio.

In this video I use 1 meter wide round softbox to give just the right amount of light on the model to achieve the effect I want. Of course in the real world of studio portraits getting the light right never happens first time so run through a couple of different light positions to see what works as well as cover the Photoshop processing to enhance the vintage feel.

[youtube]http://www.youtube.com/watch?v=z0MTQFYnvQA&list=UU8Pksdbj37CdE00kmE7Z1dw[/youtube]

For this series of videos I want you to do more then just watch it, I’m hoping you’ll get your camera and take a photo based on the ideas you see in the video. That might be the lighting set up, the models pose or the Photoshop post processing. If you do (and you’re on Facebook) then please add them to Adorama’s Facebook page. I’ll be checking it regularly and giving constructive feedback on as many as possible

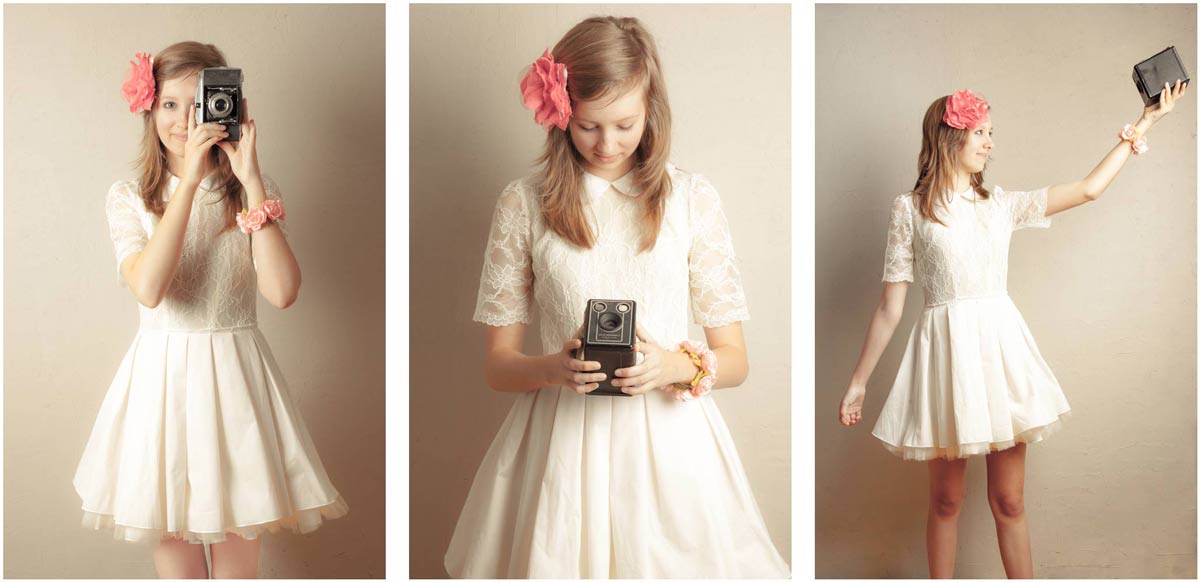
Softbox-demo-retro

Gear used in this video (Links back to Adorama)

Flashpoint StreakLight 360 Ws Creative Collection (Includes flash, battery, trigger, boom etc)

Westcott Apollo Orb Softbox

Canon 5D Mark 2 

Canon 24-105L 

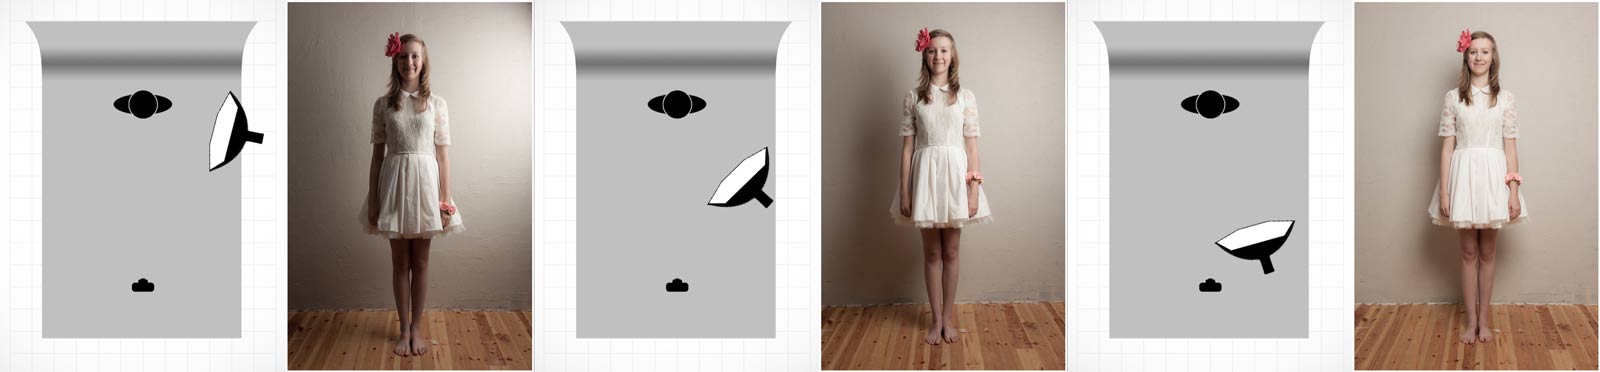
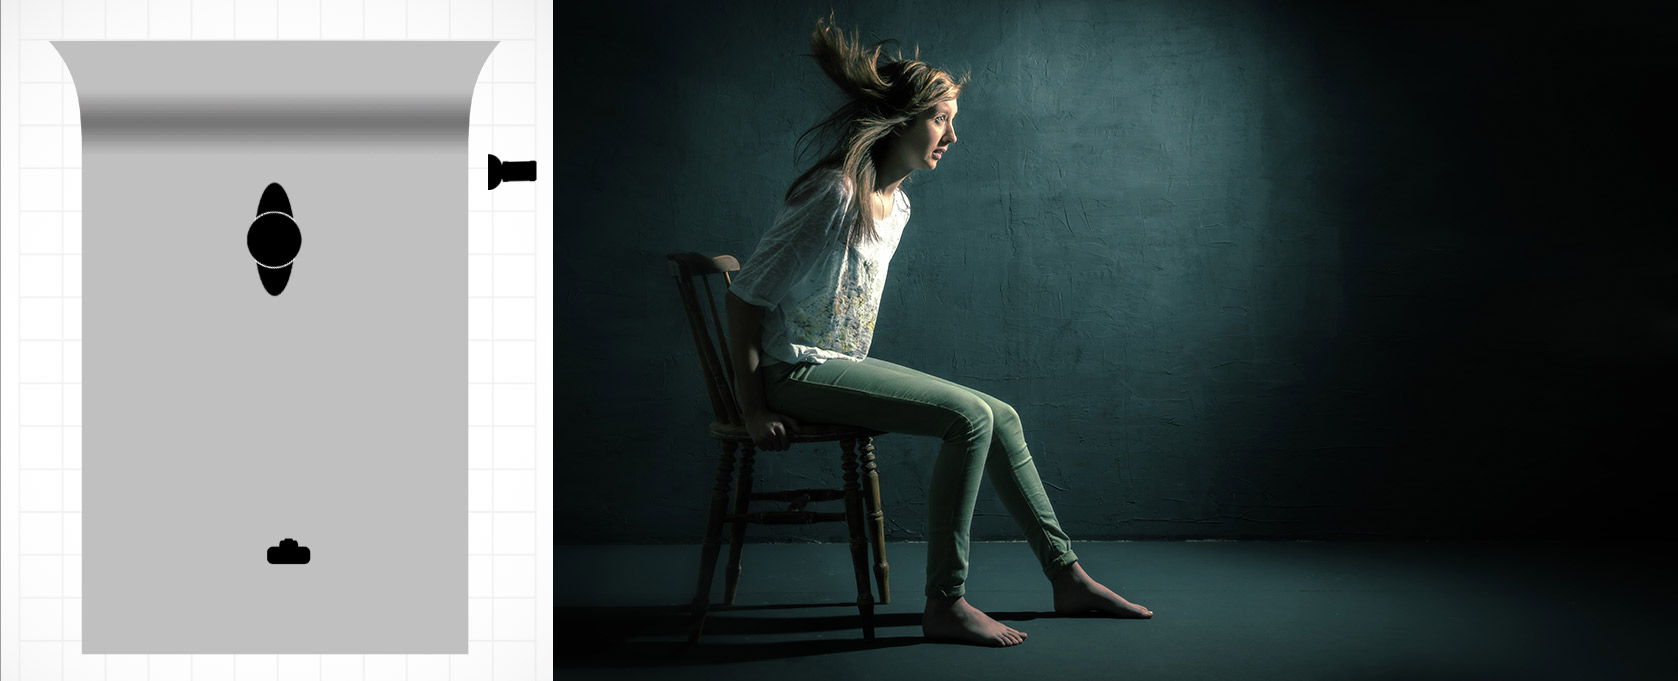
If like me you like to keep a visual record of you’re lighting set ups then this image should come in very handy.

Softbox-lighting-diagram-onelight

Home Studio Essentials – Episode 2

Speedlites and flash units are great but after a while the hard light they produce can become a bit limiting. In part 1 of my home studio essential skills I used a bare flash but now it’s time to add an umbrella. It’s almost certainly the first light modifier you’ll buy and for good reason.  They’re very versatile, quick to set up and fold down nice and small which makes them perfect for mobile and small home studio set ups.

Umbrellas come in two basic types, ones you bounce light into (reflective) and translucent umbrellas that you shoot light through. Whichever you use they soften the light by increasing the size of the light relative to the size of the subject. In other words, the bigger the umbrella the softer the light and the closer you get it to your subject the softer the light.

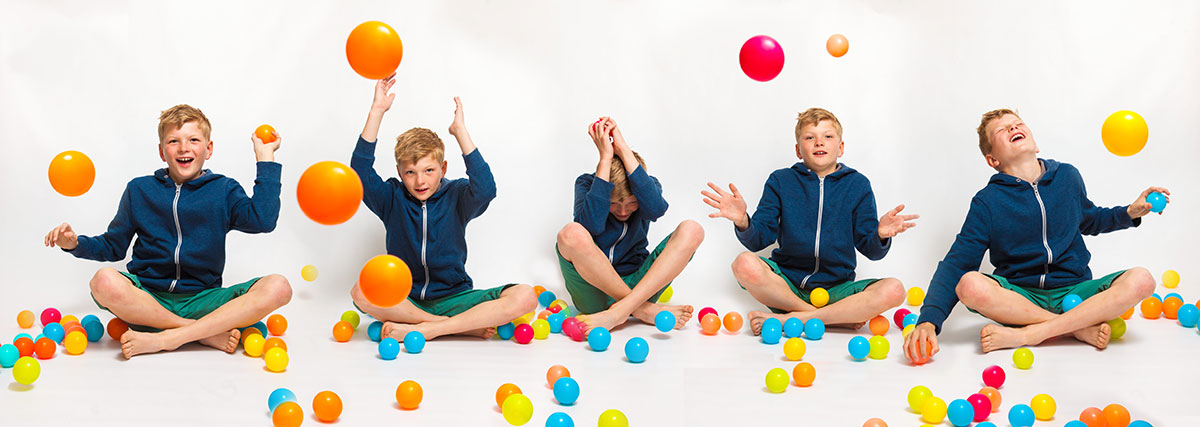
In this video I use a shoot through umbrella to create two very different looks. The first is a moody low key shot but it’s the second, more evenly lit shot that I love and it took lots of balls to make… about 50 colourful plastic balls to be precise!

[youtube]https://www.youtube.com/watch?v=ur58XNQwMXA&list=UU8Pksdbj37CdE00kmE7Z1dw[/youtube]

For this series of videos I want you to do more then just watch it, I’m hoping you’ll get your camera and take a photo based on the ideas you see in the video. That might be the lighting set up, the models pose or the Photoshop post processing. If you do (and you’re on Facebook) then please add them to Adorama’s Facebook page. I’ll be checking it regularly and giving constructive feedback on as many as possible

Joel-Joel-Joel-Joel-Joel

Gear used in this video (Links back to Adorama)

Flashpoint StreakLight 360 Ws Creative Collection (Includes flash, battery, trigger, boom etc)

Canon 5D Mark 2 

Canon 24-105L 

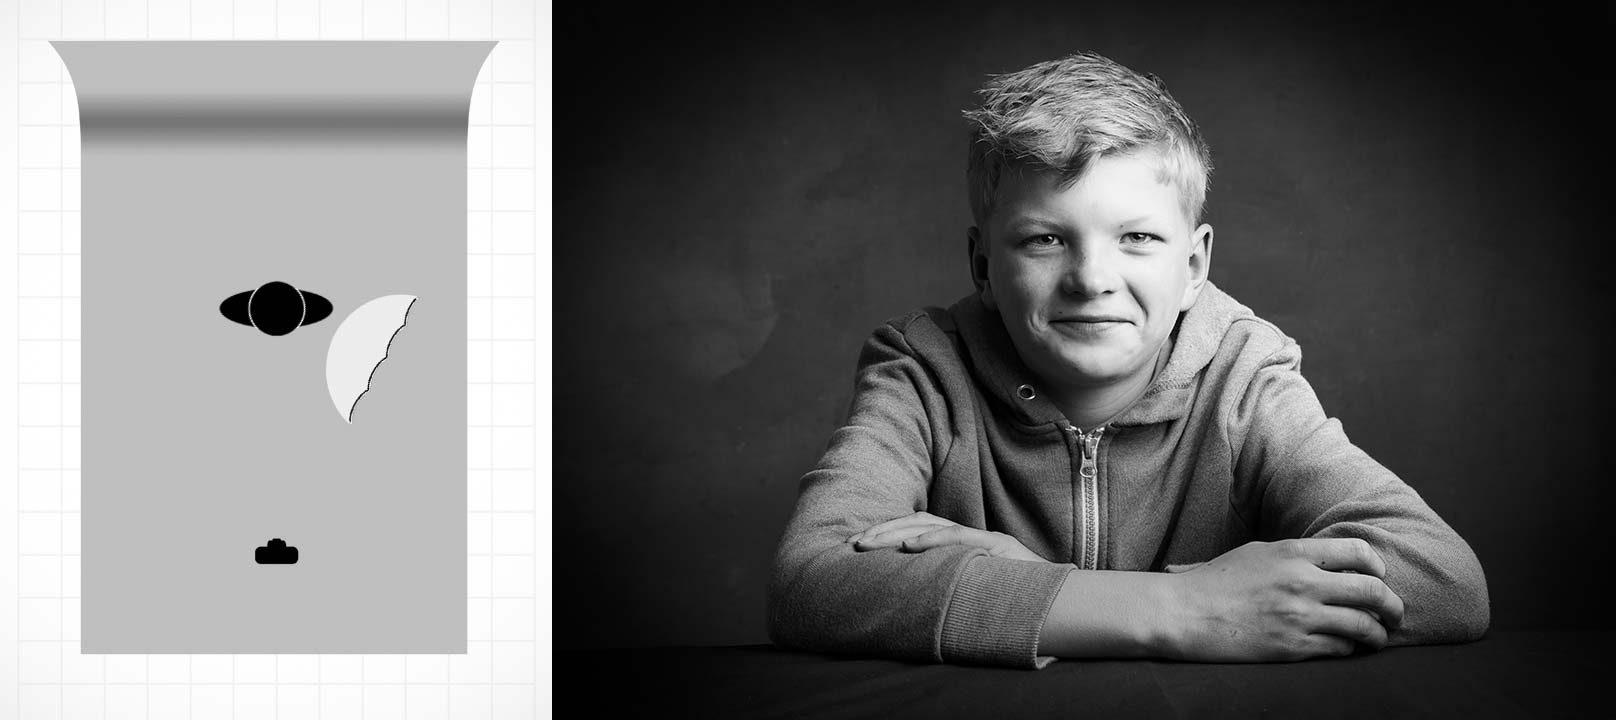
If like me you like to keep a visual record of you’re lighting set ups then this image should come in very handy.

Joel-Lighting-Diagram

Home Studio Essentials – Episode 1

Very few photographers have access to a professional studio but lots of us enjoy shooting portraits and so all over the world spare bedrooms, garages and front rooms are regularly converted from their intended use into makeshift small studios.

These small spaces can produce stunning photos but they come with their own unique set of problems and challenges. More often then not the home studio photographer may also feel restricted by owning a small range of lighting gear and using friends or family as models but truth be told that’s not the handicap it might at first appear.

[youtube]https://www.youtube.com/watch?v=hR4DW7dXOsk&list=UU8Pksdbj37CdE00kmE7Z1dw[/youtube]

This is the first of a mini series of videos I’ve made for Adorama TV in which I work within the limitations of a small home studio. Over the coming weeks I’ll be dealing with the challenge of controlling light in a small space, working with amateur models and in this video, shooting without light modifiers.

For this series of videos I want you to do more then just watch it, I’m hoping you’ll get your camera and take a photo based on the ideas you see in the video. That might be the lighting set up, the models pose or the Photoshop post processing. If you do (and you’re on Facebook) then please add them to Adorama’s Facebook page. I’ll be checking it regularly and giving constructive feedback on as many as possible

Adorama-HSE-1

Gear used in this video (Links back to Adorama)

Flashpoint StreakLight 360 Ws Creative Collection (Includes flash, battery, trigger, boom etc)

Canon 5D Mark 2 

Canon 24-105L 

Frio Cold Shoe  

Black rapid RS-7 Strap 

If like me you like to keep a visual record of you’re lighting set ups then this image should come in very handy.

Lighting-Diagram---Bare-Flash