Free Smoke Textures

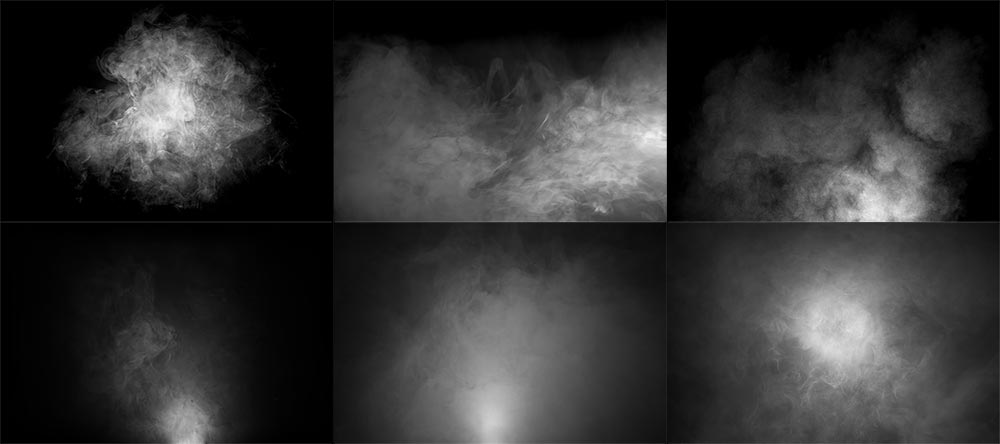
Recently I’ve run a couple of workshops that used smoke effects, the Music and Magic workshop was a great example. During the workshops I’ve mentioned that the volume of smoke can easily be enhanced with a little help from Photoshop. All you need is a shot of smoke against a black background and you’re good to go. Of course there’s smoke and then there’s smoke, so what you actually need is a library of various smoke patterns in order to match it to your scene.

To kick off your smoke collection I’m sharing 6 of my smoke shots as a Friday Freebie. You can download them from here:
https://drive.google.com/open?id=0B_Mmmm3K1utNam9wUk9yUFpVdEk
Please read the usage rules below.

How To Add Smoke
There’s a several ways to use my smoke textures but first you need to download and unzip them. In Photoshop simply open a smoke image and select it (CTRL+A). Then copy it (CTRL+C) and go to the image that needs smoke and paste it in (CTRL+V). To blend the smoke into the photo go to the Layers Panel and change the Layer Blending mode from Normal to Screen. Of course it’s unlikely that the smoke will be in the right place or even the right size, so press CTRL+T and use the Free Transform handles to resize the smoke and then drag it around as you need.

How you use the smoke in your photography is up to you but you. It can be used as realistic smoke by following the advice above or it can be more mist like by lowering the opacity and applying some Gaussian Blur. Alternatively you could add it to the whole image and use it as a texture, may be add some colour with CTRL+U (Hue/Saturation) or try different blending modes for interesting and unexpected results.

If you create a photo using the Friday Freebie then let me (and everyone else) know by leaving the link in the comments below.

Usage rules
The images are copyright Gavin Hoey 2017. Use is limited to any personal but non-commercial purposes. Please share the Friday Freebie by linking back to this page. Do not redistribute the original images without my permission.

Download instructions
       1. Click on the correct download link below (no sign up is needed)
https://drive.google.com/open?id=0B_Mmmm3K1utNam9wUk9yUFpVdEk

  1. Click the Download button download_icon
  2. The download should start automatically
  3. Once downloaded you’ll need to Extract or Unzip the file to access the images
  4. No support is provided with the Friday Freebies. If you need help Google or YouTube the question and you’ll almost certainly find the answer

Vintage Bookshelf – Friday Freebie


Recently IBook-Background-GAVTRAIN did a shoot which required a background made up of vintage books (video coming soon) and as luck would have it, I found 40 old books at a local boot sale for a bargain price. The books looked brilliant in the shoot but at the end of it I was left with a box full of slightly damaged Reader Digest books which I no longer needed.

So what do you do with 40 unloved books? Well the answer is obvious. I made them into a Friday Freebie to share on my blog. The more eagle eyed will notice there’s a few more books here than the 40 I started out with. You can thank the, magic of Photoshop for that.

You can download the book background here:
https://drive.google.com/file/d/0B_Mmmm3K1utNeVFyV0s4WUo0aVE/view?usp=sharing

This isn’t a template or a texture, it’s a stock image for you to use as you see fit (subject to the usage rules below).

BTS-Books-FF

As you can see from the behind the scenes shot above, I shot the books on a wooden bench in my studio. I then randomised the book order a couple of times and took some more shots. In Photoshop I did a quick cut and paste job to create the illusion of book case stacked high with books. You’ll also notice that you only see the pages of the book and not the spine. That’s a deliberate choice on my part for a couple of reasons but mostly because the pages are the bit with all the texture.

If you create a photo using the Friday Freebie then let me (and everyone else) know by leaving the link in the comments below.

Usage rules
The image is copyright Gavin Hoey 2016. Use is limited to any personal but non-commercial purposes. Please share the Friday Freebie by linking back to this page. Do not redistribute the original image without my permission.

Download instructions
1. Click on the correct download link below (no sign up is needed)
https://drive.google.com/file/d/0B_Mmmm3K1utNeVFyV0s4WUo0aVE/view?usp=sharing

  1. Click the Download button download_icon
  2. The download should start automatically
  3. No support is provided with the Friday Freebies. If you need help Google or YouTube the question and you’ll almost certainly find the answer

Gatwick Aviation Museum Re-Opening

I’ve been to the Gatwick Aviation Museum more times than I can remember but for the past year it’s doors have been closed to visitors as it underwent major alterations. The great news is the new hanger has been completed, the planes have been moved inside and it’s ready to re-open its doors to aviation enthusiasts and photographers alike.

To celebrate the re-opening, the museum is holding a special four day event over the Easter weekend. As well as their usual displays, they’ll be joined by some special guests. More details can be found on their website www.gatwick-aviation-museum.co.uk

Gatwick Pano NEW

I’ll be at the Gatwick Aviation Museum on Saturday 26th March from around 11:30am until mid afternoon. If you fancy coming along I’ll be on hand to offer some photo advice whilst you get up close to some classic British aircraft.

The Gatwick Aviation Museum always had a reputation of being extremely welcoming and accommodating to photographers. So even if you can’t make it along this weekend you’ll find the volunteers at the museum will be delighted to show you round most Fridays, Saturdays and Sundays.

easterposter

Bokeh – Friday Freebie

Recently I visited the historic city of Winchester which was decked out with wonderful Christmas lights. Not surprisingly I couldn’t resist grabbing a few shots, especially around the pretty little Christmas market.

But I didn’t just stick to the usual type of photos, I also shot some bokeh images that might come in handy as backgrounds or textures for other photos. You can download them here:
https://drive.google.com/file/d/0B_Mmmm3K1utNMkRIWHhUUnFlMW8/view?usp=sharing

BOKEH-FF

The shooting technique is simple enough. I used a wide open f/2.8 aperture and manually focused to 20cm. I then pointed my camera at the Christmas lights and zoomed in or out to adjust the size of the bokeh circles.

I’ve shared three of my favourite bokeh patterns in this Friday Freebie, I hope you find them useful.

If you create a photo using the Friday Freebie then let me (and everyone else) know by leaving the link in the comments below.

Usage rules
The image is copyright Gavin Hoey 2015. Use is limited to any personal but non-commercial purposes. Please share the Friday Freebie by linking back to this page. Do not redistribute the original image without my permission.

Download instructions
1. Click on the correct download link below (no sign up is needed)
https://drive.google.com/file/d/0B_Mmmm3K1utNMkRIWHhUUnFlMW8/view?usp=sharing

  1. Click the Download button download_icon
  2. The download should start automatically
  3. No support is provided with the Friday Freebies. If you need helpGoogle or YouTube the question and you’ll almost certainly find the answer

Curtain Action – Friday Freebie

It’s been a while since I’ve done a Friday freebie so lets put that right with a Photoshop action.

This Action creates a set of beautiful curtains in a theatrical style with a single click of your mouse. There’s four colours to choose from and it’s a brilliant way to frame your vintage style images. The curtains are created from scratch using standard Photoshop filters and effects and to add an extra touch of realism they have a ragged edge and a gentle bow.

Full download instructions are below but you can also Download the Curtain Action

Basic-Curtains

Once downloaded just unzip and install the action into Photoshop. Unfortunately this action is unsuitable for  Photoshop Elements

To use the action, start with the photo you wish to use already open in Photoshop and then play one of the four actions in this set. The first thing it does is make a copy of your photo so the original will be untouched and safe. There’s a lot of things for Photoshop to do with this action so it may take a minute or two to run through.
DO NOT switch to another image whilst running the action.

There are no options or controls for this action but at the end you may need to use Free Transform (CTRL+T) to re-size and re-positing your photo under the curtains

The action will work with Photoshop CC2014, CC, CS6, CS5 and CS4

If you create a photo using the Friday Freebie then let me (and everyone else) know by leaving the link in the comments below.

all-curtains

Usage rules
The action is copyright Gavin Hoey 2015. Use is limited to any personal but non-commercial purposes. Please share the Friday Freebie by linking back to this page. Do not redistribute the original image without my permission.

Download instructions

he direct link to download the actions is https://www.gavtrain.com/wp-content/uploads/2015/05/Cutains-Gavtrain.zip

You must UNZIP the action before installing it in Photoshop

No support is provided with the Friday Freebies. If you need help Google or YouTube the question and you’ll almost certainly find the answer :-)

Fractured Paint Brush – Friday Freebie

Back in 2011 I made a video on how to create a fractures or shattered image using Photoshop. I’ve added it to this post in case you missed it. To create the effect I made some fractured paint brushes which I uploaded to the Adobe Exchange website and shared for free. Three and a half years is a long time in the fast moving world of the internet and the Adobe Exchange (as I remember it) is no more, so I’m sharing them again here.

Spatter-copy

Full download instructions are below but you can also
Download the Paint Spatter brushes

Once downloaded just unzip and install the brushes into Photoshop or Photoshop Elements and your ready to go. The video below should give you some ideas of how to use the brushes.
[youtube]https://www.youtube.com/watch?v=JUjXJ5ZPO5M[/youtube]

If you create a photo using the Friday Freebie then let me (and everyone else) know by leaving the link in the comments below.

Usage rules
The brushes are copyright Gavin Hoey 2015. Use is limited to any personal but non-commercial purposes. Please share the Friday Freebie by linking back to this page. Do not redistribute the original image without my permission.

Download instructions
1. Click on the correct download link below (no sign up is needed)
https://drive.google.com/file/d/0B_Mmmm3K1utNcjlPYWRvekRYanc/view?usp=sharing

2. Click the Download button

3. The download should start automatically

4. No support is provided with the Friday Freebies. If you need help Google or YouTube the question and you’ll almost certainly find the answer :-)

Bokeh Background – Friday Freebie

At this time of year there’s the potential for bokeh shots all over the place. With the right lens, twinkling Christmas lights can make great bokeh photos and that’s exactly what I used to create this Friday Freebie background / texture.

Bokeh-SNOWQUEEN-SAMPLE

Full download instructions are below but you can also
Download the Bokeh Background Here

Once downloaded just open the bokeh image and your photo. Copy and paste the bokeh onto your photo and use Free Transform (CTRL+T) to make the bokeh fill the image. Next you’ll need to blend the two images together. For this shot I changed the Layer Blending Mode from Normal to Screen but as all the blending modes create a different look try them all.

The bokeh will most likely need masking or erasing away to reveal your main subject. Another thing to try is duplicating the bokeh layer to deepen the effect.


Bokeh-SNOWQUEEN-B4

If you create a photo using the Friday Freebie then let me (and everyone else) know by leaving the link in the comments below.

Usage rules
The image is copyright Gavin Hoey 2014. Use is limited to any personal but non-commercial purposes. Please share the Friday Freebie by linking back to this page. Do not redistribute the original image without my permission.

Download instructions
1. Click on the correct download link below (no sign up is needed)
https://drive.google.com/open?id=0B_Mmmm3K1utNZHVCSldJS2REMzQ&authuser=0

2. Click the Download button download_icon

3. The download should start automatically

4. No support is provided with the Friday Freebies. If you need help Google or YouTube the question and you’ll almost certainly find the answer :-)

Painted Corner Brushes – Friday Freebie

Here’s a painted border effect with a neat twist. First up these are paint brushes rather then a template and that means you can change the colour, opacity and use them with the Brush or Eraser tools. There’s four brushes in this set so you get one for each corners or mix and match to vary the effect.

You can download the brushes here: Painted Corners – GAVTRAIN

Painted-CornersThe brushes will work with all versions of Photoshop and Photoshop Elements however users of Photoshop CS6, CC and beyond will have the advantage of being able to increase the brush size to a maximum of 5000 pixels and getting bigger borders.

I’ve made a short video as a guide to installing the brushes and a few tips on how to use them. I hope it helps.

[youtube]https://www.youtube.com/watch?v=dkr4rmZef9E&feature=youtu.be[/youtube]

Usage rules
The brush set is copyright Gavin Hoey 2014. Use is limited to any personal, non-commercial purposes. Please share the Friday Freebie by linking back to this page. Do not redistribute the original action without my permission.

Download instructions
The direct link to download the actions is https://www.gavtrain.com/wp-content/uploads/2014/08/Painted-Corners-GAVTRAIN.zip

You must UNZIP the action before installing it in Photoshop / PS Elements

No support is provided with the Friday Freebies. If you need help Google or YouTube the question and you’ll almost certainly find the answer 🙂

Creased and Folded Action – Friday Freebie

In the real world folding a photo isn’t a smart move unless it’s heading for the bin. However in the mad cap world of Photoshop you can virtually fold a photo any time you like.

With this Friday Freebie Photoshop action folding and creasing a photo is a simple one click affair. Not only that but you’ll also get a border and some fancy shadow effects to enhance the 3D feel. The action is one of the longer ones I’ve made for a Friday Freebie and may take a minute or two to run but the wait and the effort to make it is worthwhile.

You can download the action here: Creased and folded

Folded-Corner-action

To use the action, start with the photo you wish to use already open in Photoshop and then play the action. The first thing it does is make a copy of your photo so the original will be untouched and safe. There’s a lot of things for Photoshop to do with this action so it may take a minute or two to run through. DO NOT switch to another image whilst running the action.

There are no options or controls for this action but at the end you will be left with several layers, so if you need to make any adjustments to the final effect you can.

As with most actions, the size of your image will effect the final effect. Smaller images with less the 2000 pixels on the longest edge are best avoided. Personally I’d also steer clear of portrait format images, this action works best with wide but not too wide shots.

The action will work with Photoshop CC, CS6, CS4, CS4, CS3 and should work with Photoshop Elements 11 and beyond too.

Usage rules
The action is copyright Gavin Hoey 2014. Use is limited to any personal, non-commercial purposes. Please share the Friday Freebie by linking back to this page. Do not redistribute the original action without my permission.

Download instructions
The direct link to download the actions is https://www.gavtrain.com/wp-content/uploads/2014/08/Creased-and-folded.zip

You must UNZIP the action before installing it in Photoshop / PS Elements

No support is provided with the Friday Freebies. If you need help Google or YouTube the question and you’ll almost certainly find the answer 🙂

Cracked Photoshop Brushes

Cracked and pealing paint always draw me in as a photographer so here’s a great Friday freebie which combines a selection of my peeling paint photo and turns them into cracked Photoshop brushes. These brushes are full resolution and can be used to paint, erase or mask to create all sorts of effects.

Full download instructions are below or Click Here to DOWNLOAD THE CRACKED BRUSH SET

Cracked-Brushes-Final
If you like your graphic design then those photo real cracked paint brushes will have plenty of uses and Photographers will find them handy to. For example the photo above was given an aged and distressed look by applying the brushes on a layer set to Overlay blending mode. The cut corner border is a previous Friday Freebie Photoshop action which has also been aged with the cracked brushes and Lighten layer blending mode.

Cracked-Brushes-Sample

These Brushes will work in any version of Photoshop and they’re fully compatible with Photoshop Elements too!

As always, if you create a photo using the Friday Freebie then let me (and everyone else) know by leaving the link in the comments below.

Usage rules
The brushes are copyright Gavin Hoey 2014. Use is limited to any personal but non-commercial purposes. Please share the Friday Freebie by linking back to this page. Do not redistribute the original image without my permission.

Download instructions
1. Click the link https://www.gavtrain.com/wp-content/uploads/2014/08/Cracked-Brushes.zip to download

2. Save the brushes to your desktop

3. Unzip the file

4. Open in Photoshop or Photoshop Elements

5. Install the brushes (This link will help if you don’t know how)

6. Enjoy!

No support is provided with the Friday Freebies. If you need help Google or YouTube the question and you’ll almost certainly find the answer :-)