Perfect Photo Suite 8 First Look

maldon-1There’s no shortage of plugins for Photoshop, Lightroom and Elements and many of them can really help get the most from your photos. For years I’ve been really happy with Nik Software and Color Efex Pro 4 has become a standard part of my workflow, I even did some webinars for them. The problem is, since Nik was sold to Google in late 2012 there’s been little news of upgrades, improvements or even minor tweeks and that’s a shame. At the moment it feels like Nik Software is just going to be left to fade away gracefully.

So I’ve been on the hunt for an alternative. Something that does the things I can’t do in Photoshop and makes it quick and easy too. Enter Perfect Photo Suite 8 from onOne software. You can download the free public beta here.

Alternatively if just want to dive in you can Pre-Order Perfect Photo Suite 8 here

I’ve been using the public beta version of Perfect Photo Suite 8 for the past few weeks and my inital reaction has been really positive. It does the things I do with Nik such as enhance detail in a way not possible with Photoshop and it has an excellent black and white conversion section. In fact because it’s a complete suite you could use it as a standalone photo editor or do as I do and use it as an extra add on to my Photoshop work. That does mean I don’t use modules that replicate what I would do in Photoshop but the Perfect Effects and Perfect B&W are getting plenty of use.

maldon-1-JPG-RAW

OnOne Software have just launched a free to try version of Perfect Photo Suite 8 Beta 2 so my advice is to download a copy and give it a spin. Do keep in mind that it is a Beta and that means they’ll be some bugs, not everything will be 100% working and the final version will be better.

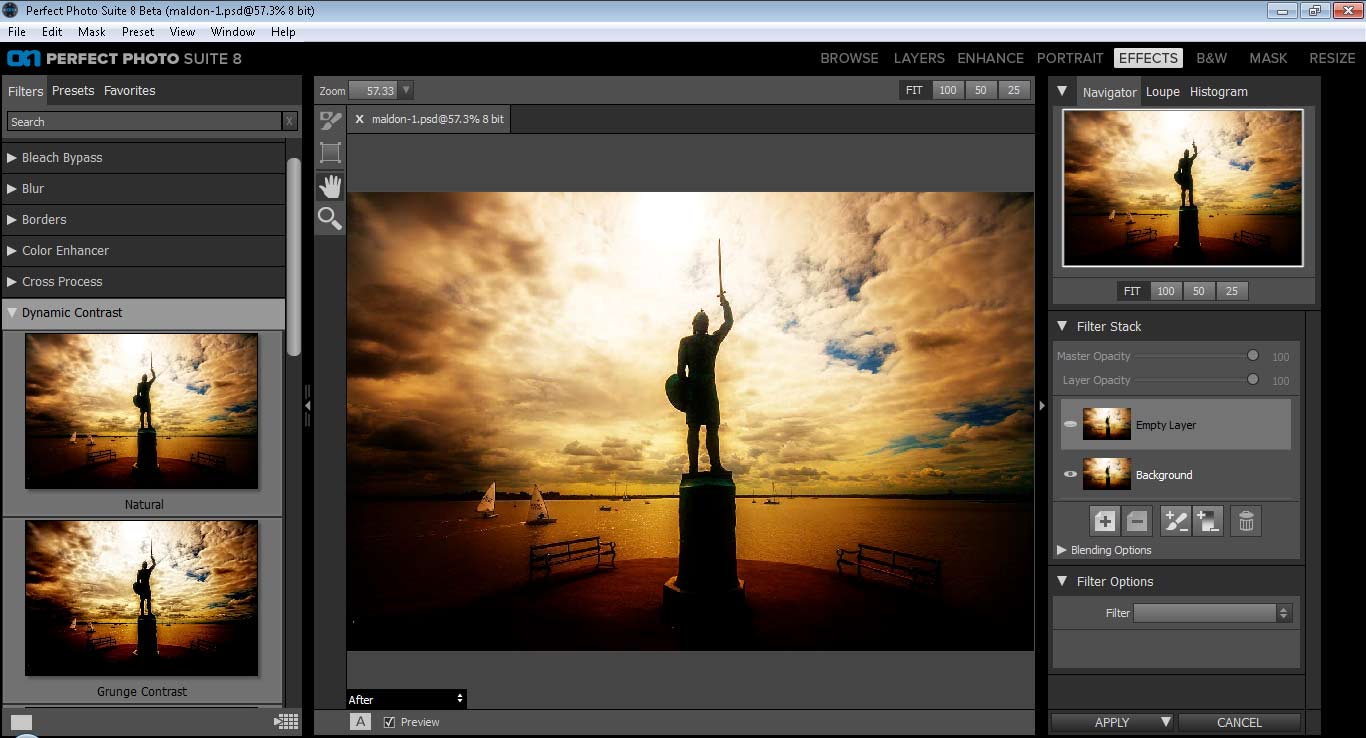
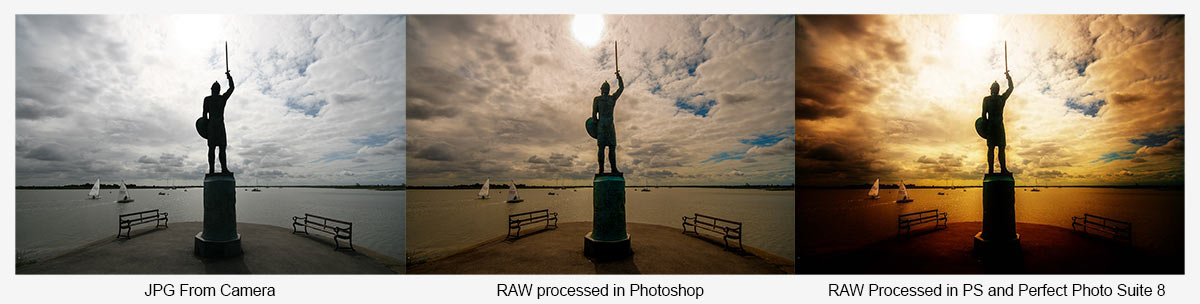
I’d recommend jumping in and trying the Effects module first (File – Automate – Perfect Effects). The example above made use of the sunshine effect to add a warm glow to the image but the thing that caught my eye are the clarity style adjustments. Things Like HDR, Dark Contrasts and Dynamic Contrast are already shaping up to me some of my favourite features. There’s even an effect called Grunge… How can I resist that! All the effects come with a bunch of presets which are previewed on adjustable sized thumbnails. You can also take control with the sliders to create your own style and save it for future use.

If you do give it a go I’d be interested in hearing what you thought, especially if like me you’re a user of Nik.

PPS8-1


Pseudo HDR – Creative Lightroom Episode 5

CL-final-5Creative Lightroom has new reached episode 5, the half way point. In this weeks episode I’ve got a quick Lightroom trick which gives your photos a little bit of HDR magic.

When I say HDR don’t think for a second that this is a replacement to the traditional HDR technique of taking multiple images and merging the exposure together in Photoshop, Photomatix or Nik HDR Pro. No what it does is to pull the maximum detail from the shadows and highlights from a single image.

By far the best photos to play with are RAW files that are correctly exposed or a bit underexposed.

To fully pull off this effect you’ll need Lightroom 5 or Lightroom 4.

As always it’s worth mentioning that if you’re a Photoshop user rather then Lightroom user, EVERYTHING I show in the video is the same as Adobe Camera RAW in Photoshop CS6 and Photoshop CC. It’s also possible to pull off the same trick with Elements 11 (but not the vignette in RAW)

[youtube]http://www.youtube.com/watch?v=NJvQWenordQ[/youtube]

Can’t see the video? Click here: http://youtu.be/NJvQWenordQ

Bonus composite videos

Mark+Gav-2Last week I uploaded the two part video with Mark Wallace and myself. If you missed it the click here to go back and see both videos.

Mark was kind enough to share all the photos he shot with me and it seemed like a terrible waste not make use of at lease one more. So in the video below I’ll show you how I created this photo composite. Going mono was all part of the plan and makes compositing two images together a whole lot easier as you no longer have the issue of matching colours to get in the way.
[youtube]http://youtu.be/vbFlTkkOglU[/youtube]
Can’t see the video? Click here http://youtu.be/vbFlTkkOglU

In this video I do a deep dive tutorial on how to use Photoshop to composite the original photos. I start with how to use Adobe Camera RAW to create an HDR background and then add some light rays with my recent Friday Freebie Light Ray Brushes.
[youtube]http://youtu.be/szQ0kj1xuZc[/youtube]
Can’t see the video? Click here http://youtu.be/szQ0kj1xuZc

Photo Realistic HDR

HDR-Gatwick AviationOver the past couple of years the letters HDR have become synonymous with heavily processed images, garish colours and unreal contrast. Don’t get me wrong, when done with skill that kind of processing can look amazing… on the right subject. The trouble is, of course, that it’s very easy to get carried away with the effect and go too far.

As a result many photographers now hear HDR and instantly dismiss it as gimmicky when in fact HDR (High Dynamic Range) is a technique that’s as old as photography itself. Dodging and burning in the darkroom, pulling out the highlight and shadow detail in RAW processing are all forms of HDR.

However, there are plenty of times when a single image doesn’t have all the detail you want in the highlights and shadows, no matter how much processing you do to it. That’s when multi photo HDR’s come in to their own.

In the video below I’ll show you a couple of ways to shoot multi image HDR photos and then I’ll skip over to Photoshop CS6 to make a photo real HDR image. Photo real means my goal is to make the photo look like a photo… not a painting.
[youtube]https://www.youtube.com/watch?v=hOLh76QhZkY[/youtube]
If you can’t see the video click here

It’s worth pointing out that you must have Photoshop CS6 and have updated its RAW processor to at least 7.1. An alternative work flow would be Photoshop CS4 or CS5 and Lightroom 4

The bigger the difference between the lightest and darkest part of you scene the more photos you’ll need to take. Often three photos are enough to make a good HDR, such as in the image below but it’s always better to have more photos even if you don’t end up using them.HDR1

Gear used in this video:

Canon 5D Mark 3 http://www.adorama.com/ICA5DM3.html?KBID=67338

Canon 16-35mm f/2.8 Mk2 http://www.adoramacom/CA2470.html?KBID=67338

Adobe Photoshop CS6 http://www.adorama.com/ABPSCS6M.html?KBID=67338

Manfrotto 055 Pro Tripod http://www.adorama.com/BG055XPROB.html?KBID=67338

Canon RS-80N3 cable release http://www.adorama.com/CARS80N3.html?KBID=67338

Many thanks to the Gatwick Avaiation Museum for allowing me to film in their Shackleton aircraft.
http://www.gatwick-aviation-museum.co.uk