Four looks, one grey background

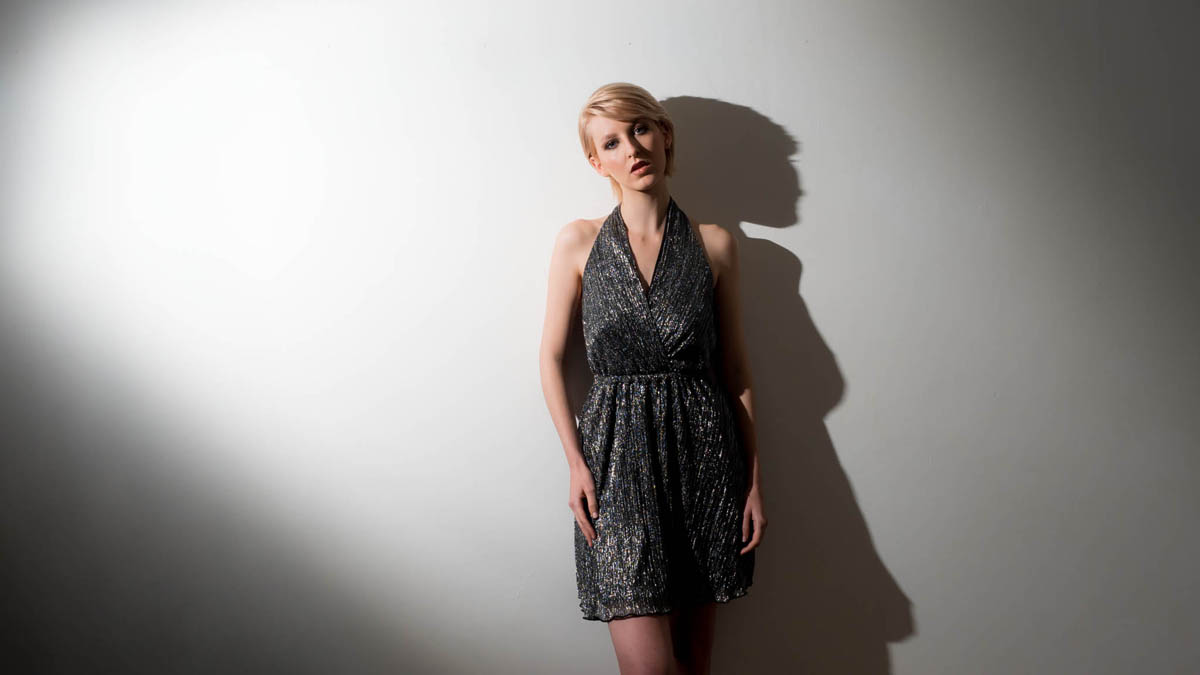
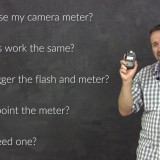
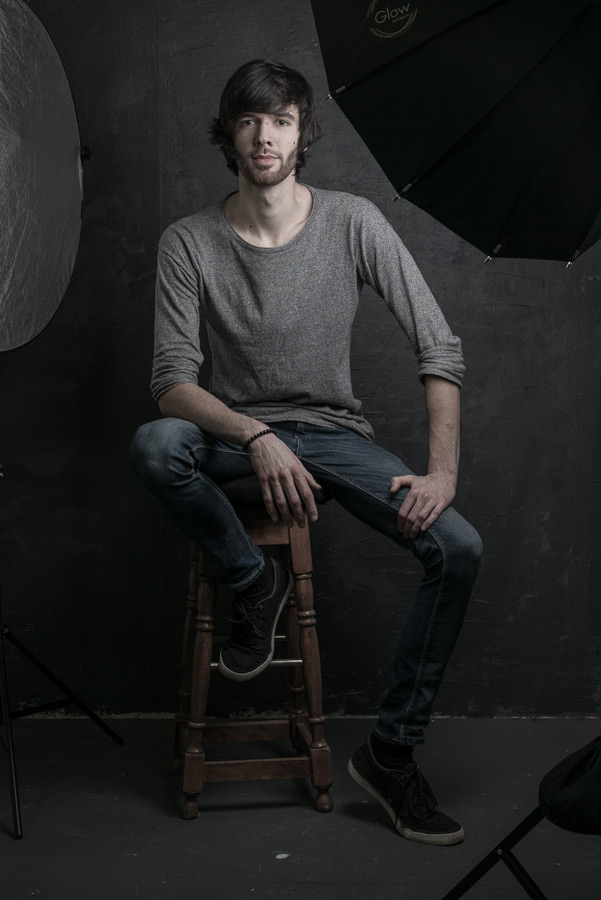
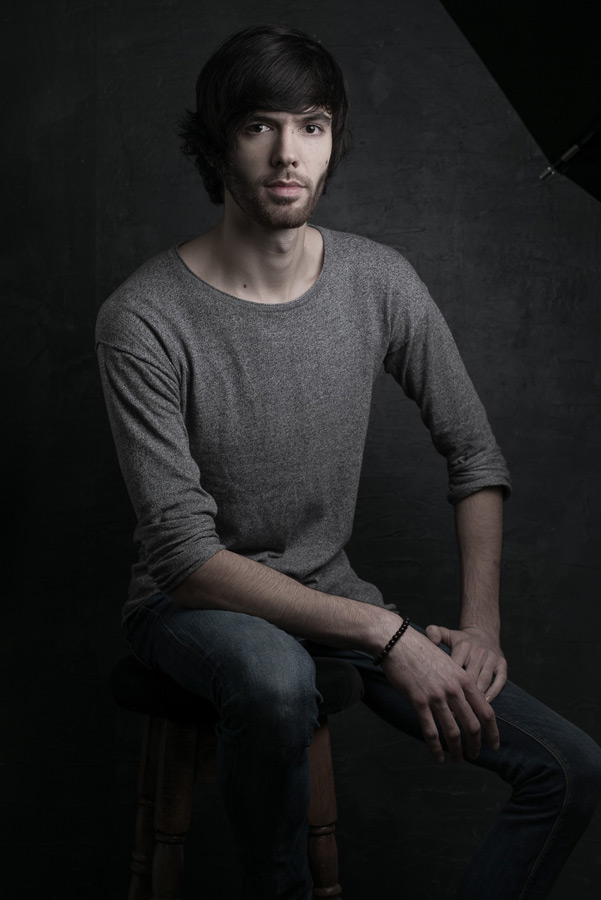
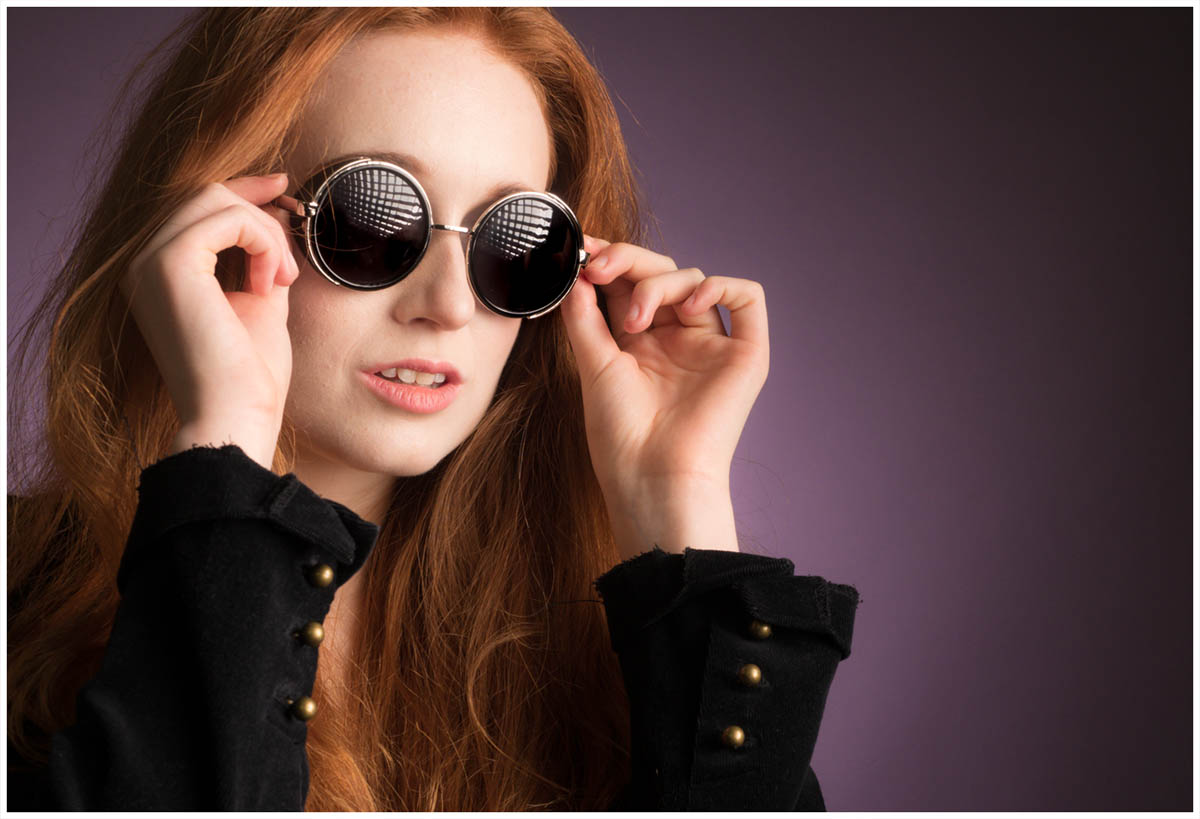
Sometime back I made a textured wall for my studio which I love but the most important thing about it is the colour. If you can only choose one background for your small studio then for me it’s always going to be grey. Why? Because with a little bit of lateral thinking and lighting knowhow a grey background can be black, white, coloured or grey (obviously).

[youtube]https://www.youtube.com/watch?v=PIoWwx-elCE[/youtube]
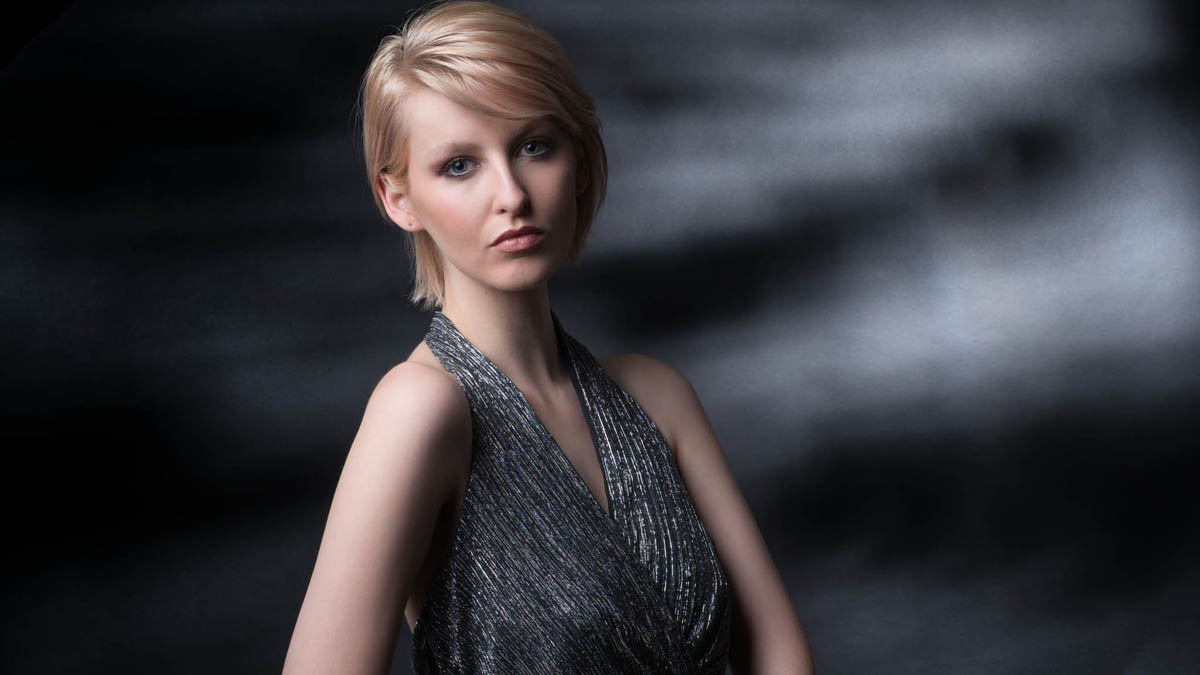
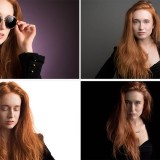
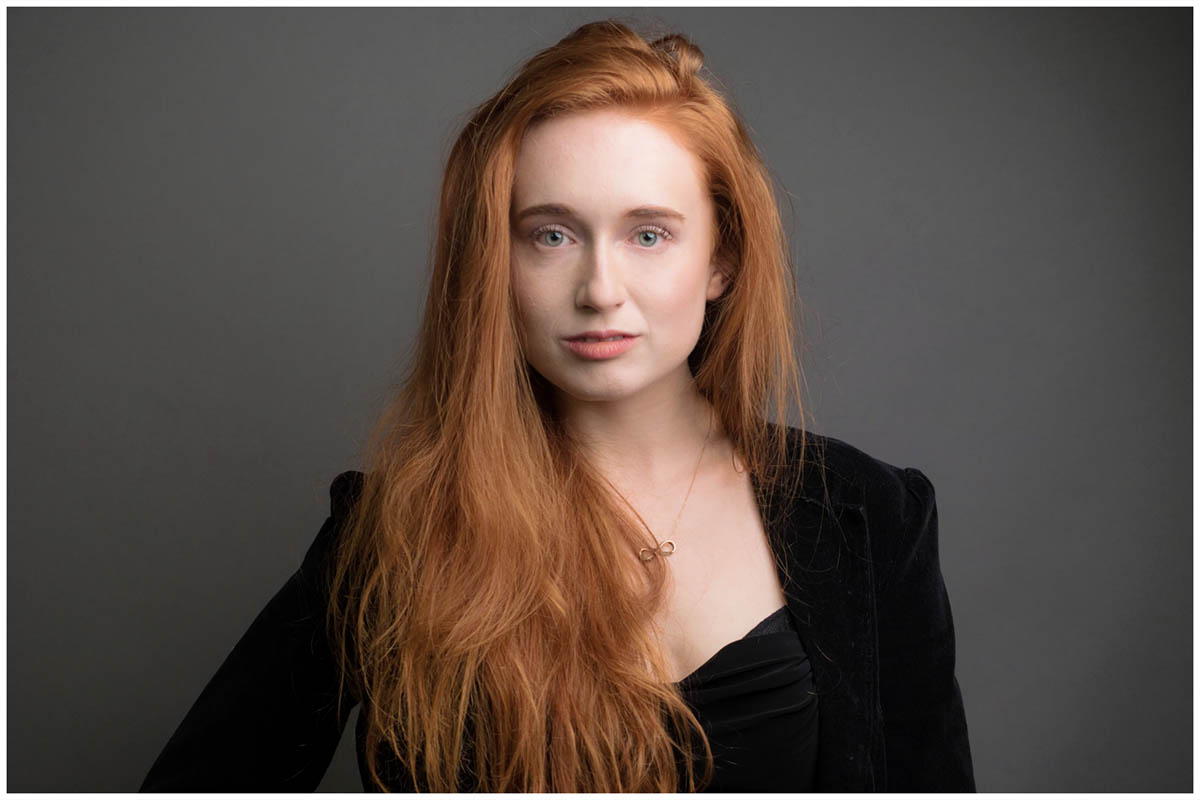
Grey
This is the easiest to do. If you only have one light get your model as close to the grey background and shoot away. If you want a darker grey simply move the model and the light away from the background. For a lighter grey you’ll need at least one more light. Scroll down to “white” for more info.
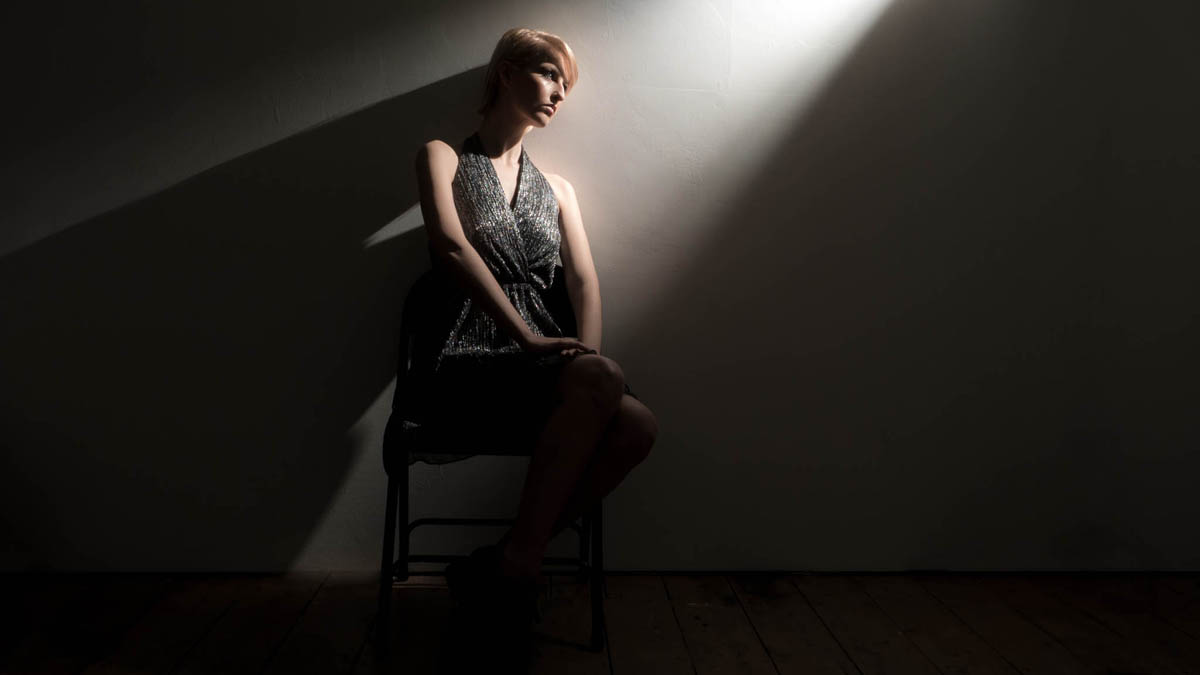
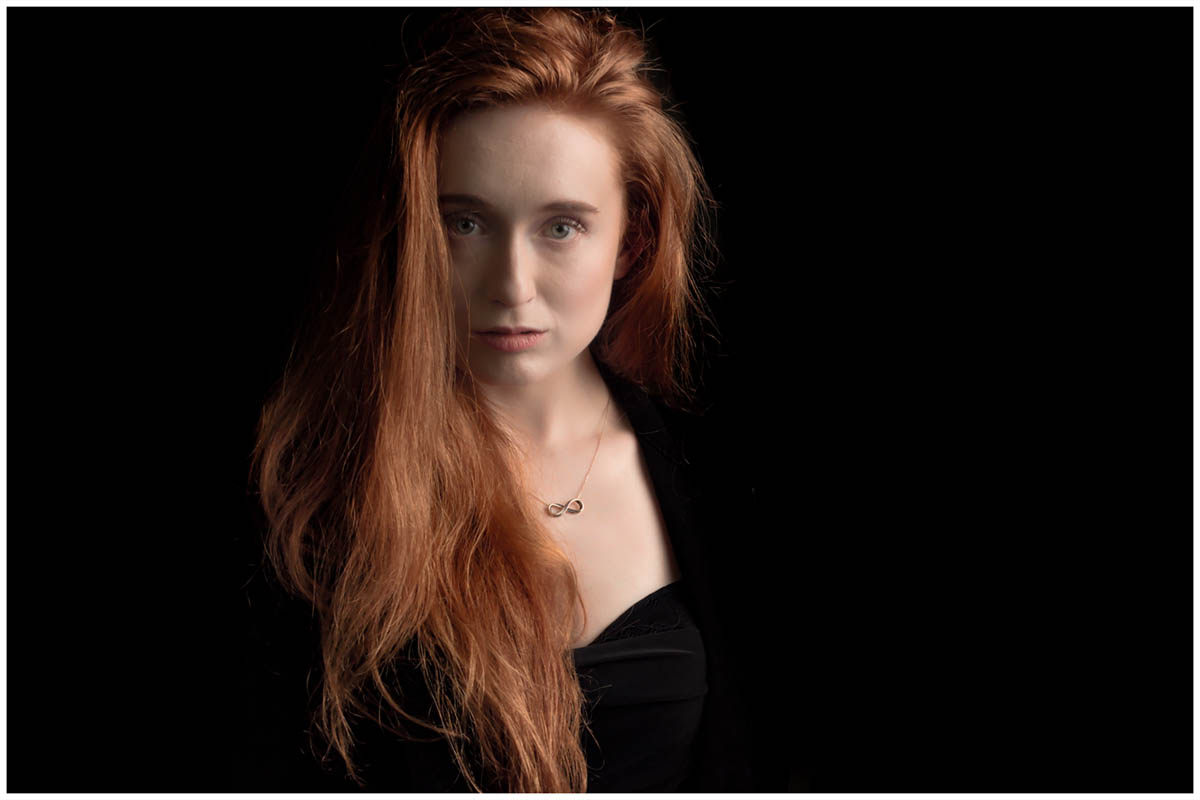
OLYMPUS DIGITAL CAMERA

Black
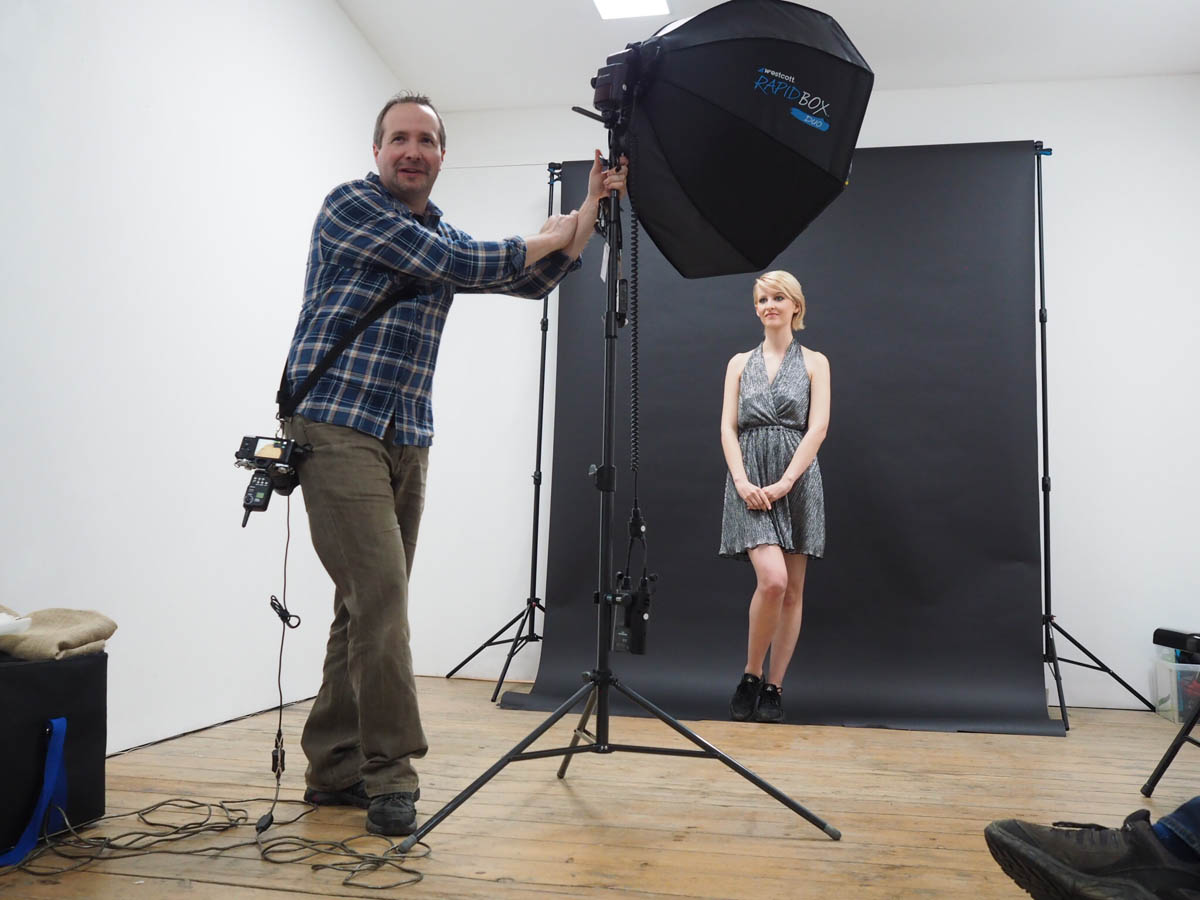
Black is basically a very dark tone of grey so to make the standard grey go black you can do one of two things. Either move the model or light as far from the background as possible or move the light as close to the model as possible. An egg crate grid over the light can be used to reduce light spilling onto the background.
In a small studio the latter way is how I go, it does mean that the softbox ends up in the shot but if you watch the video you’ll see my Photoshop / Lightroom trick to hide it.
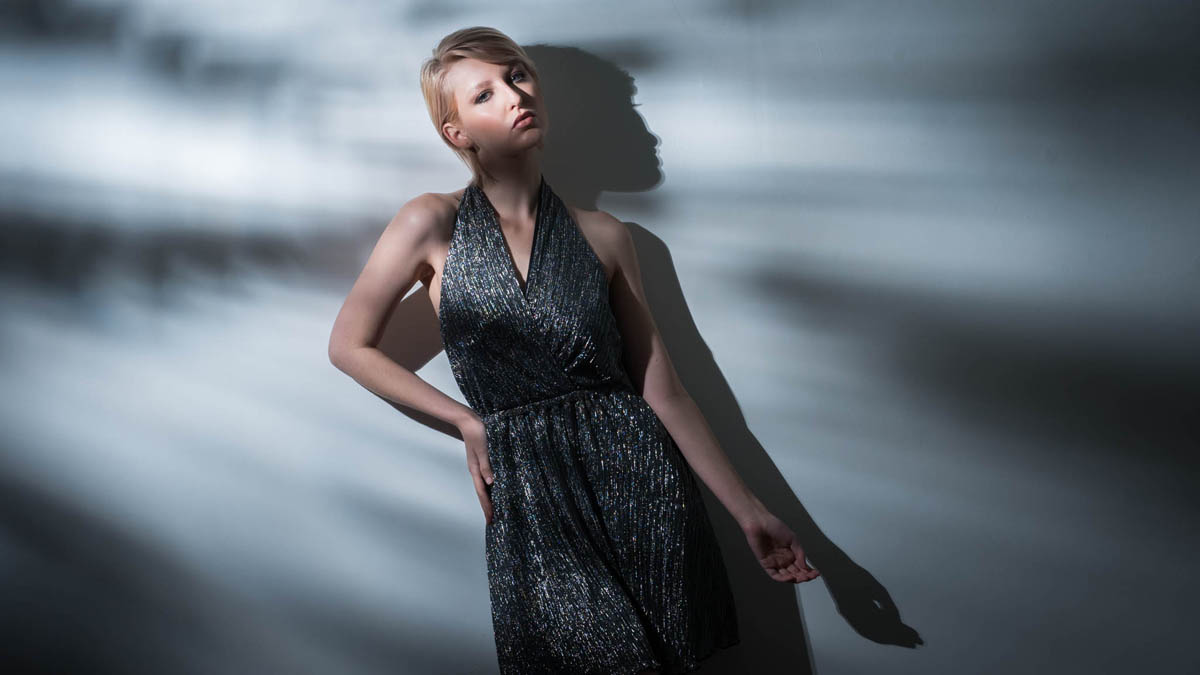
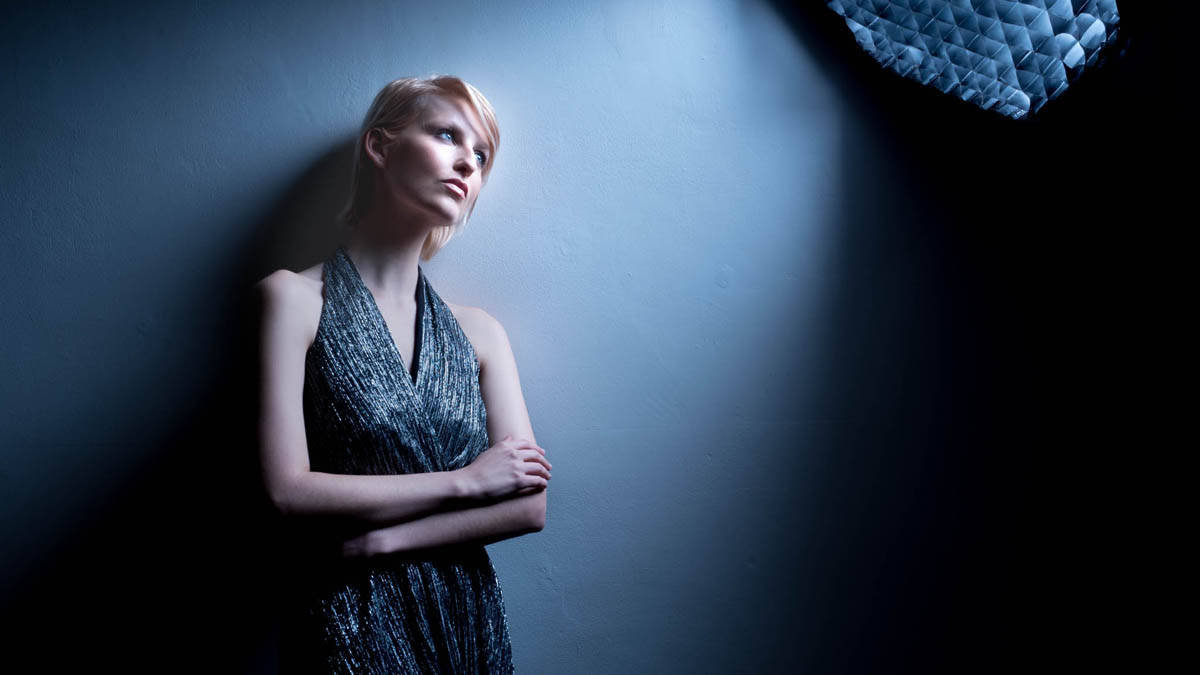
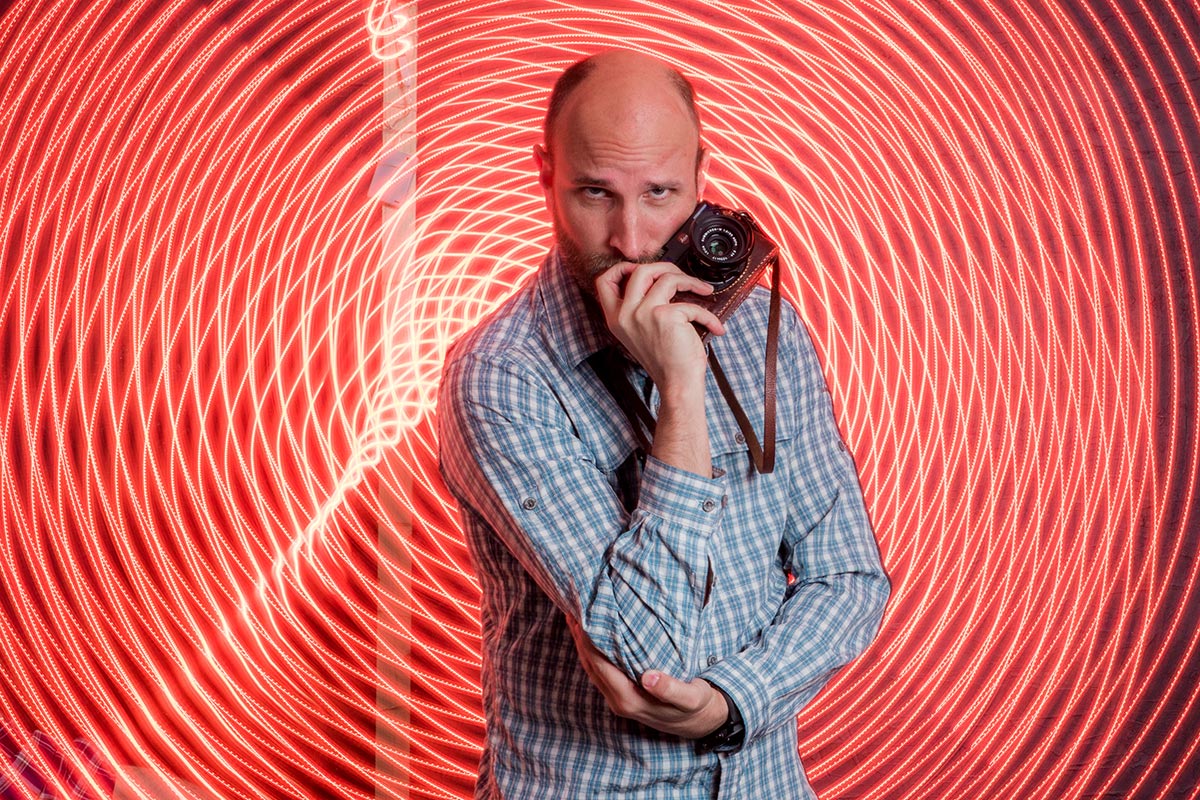
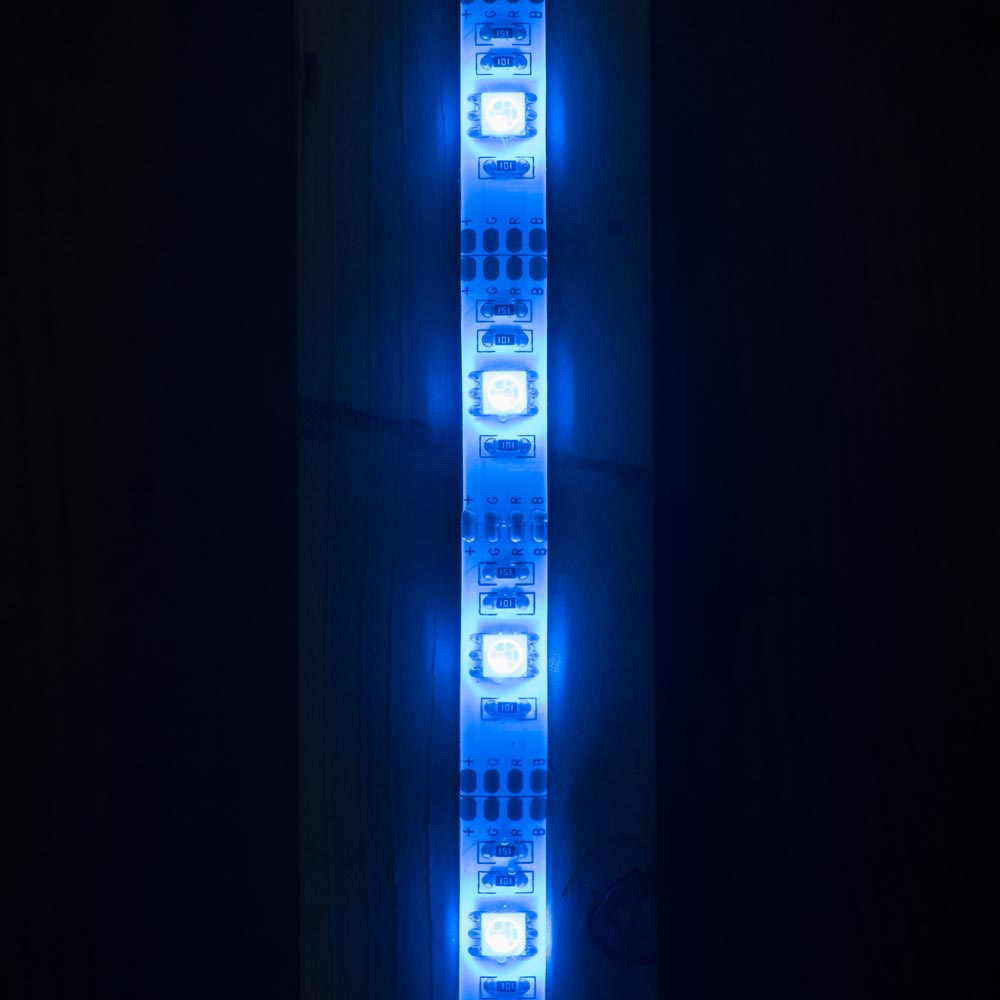
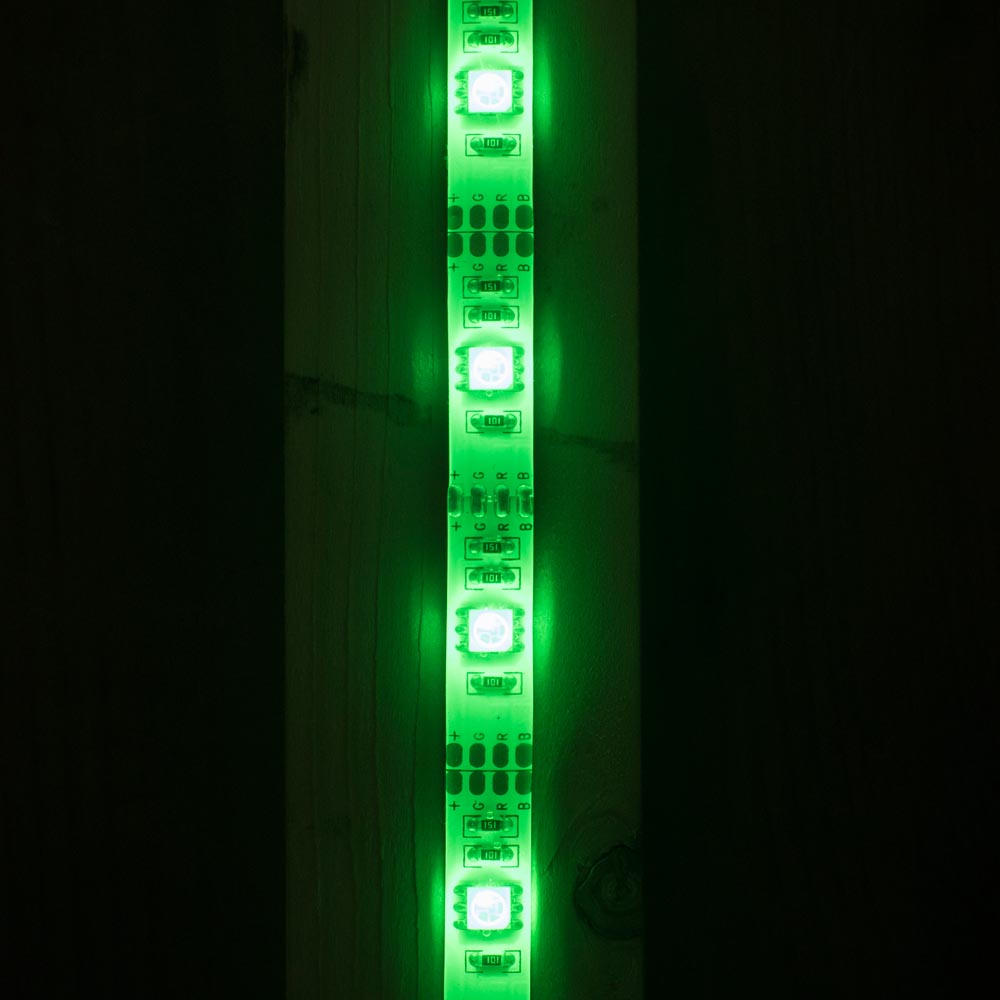
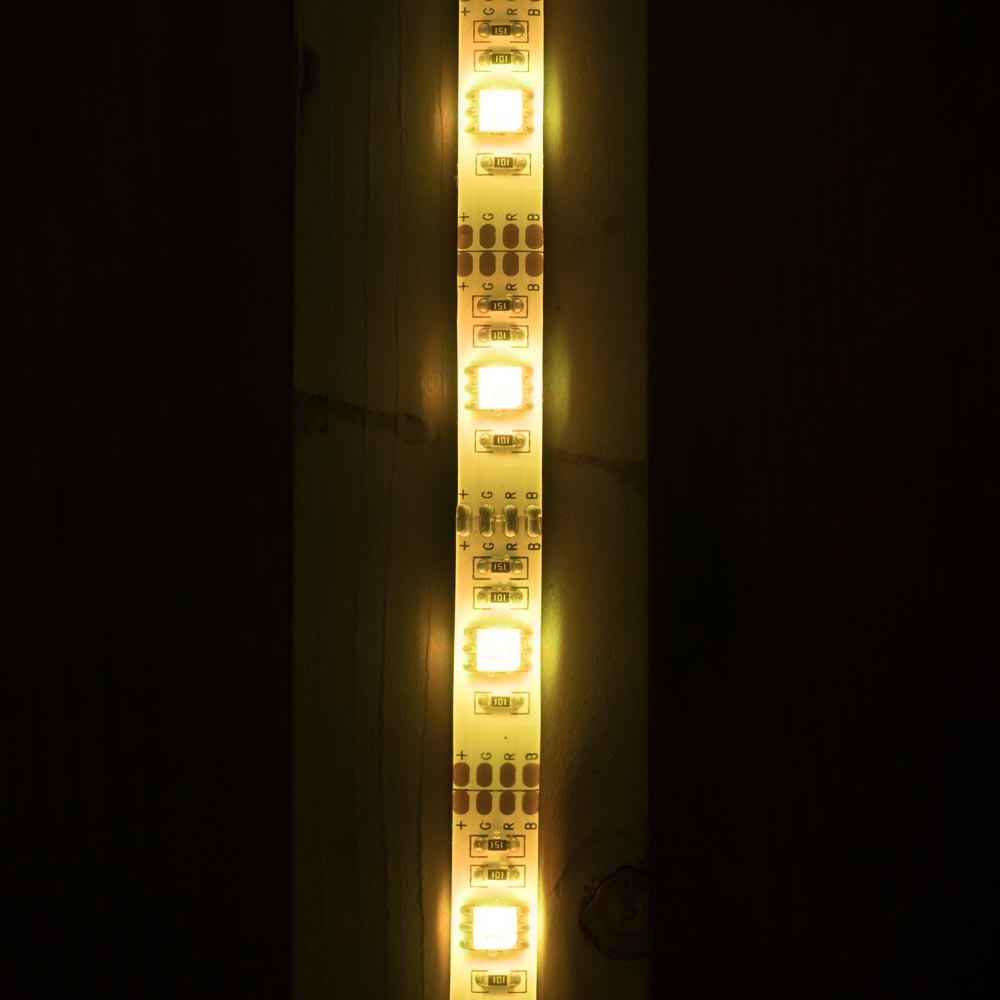
Coloured
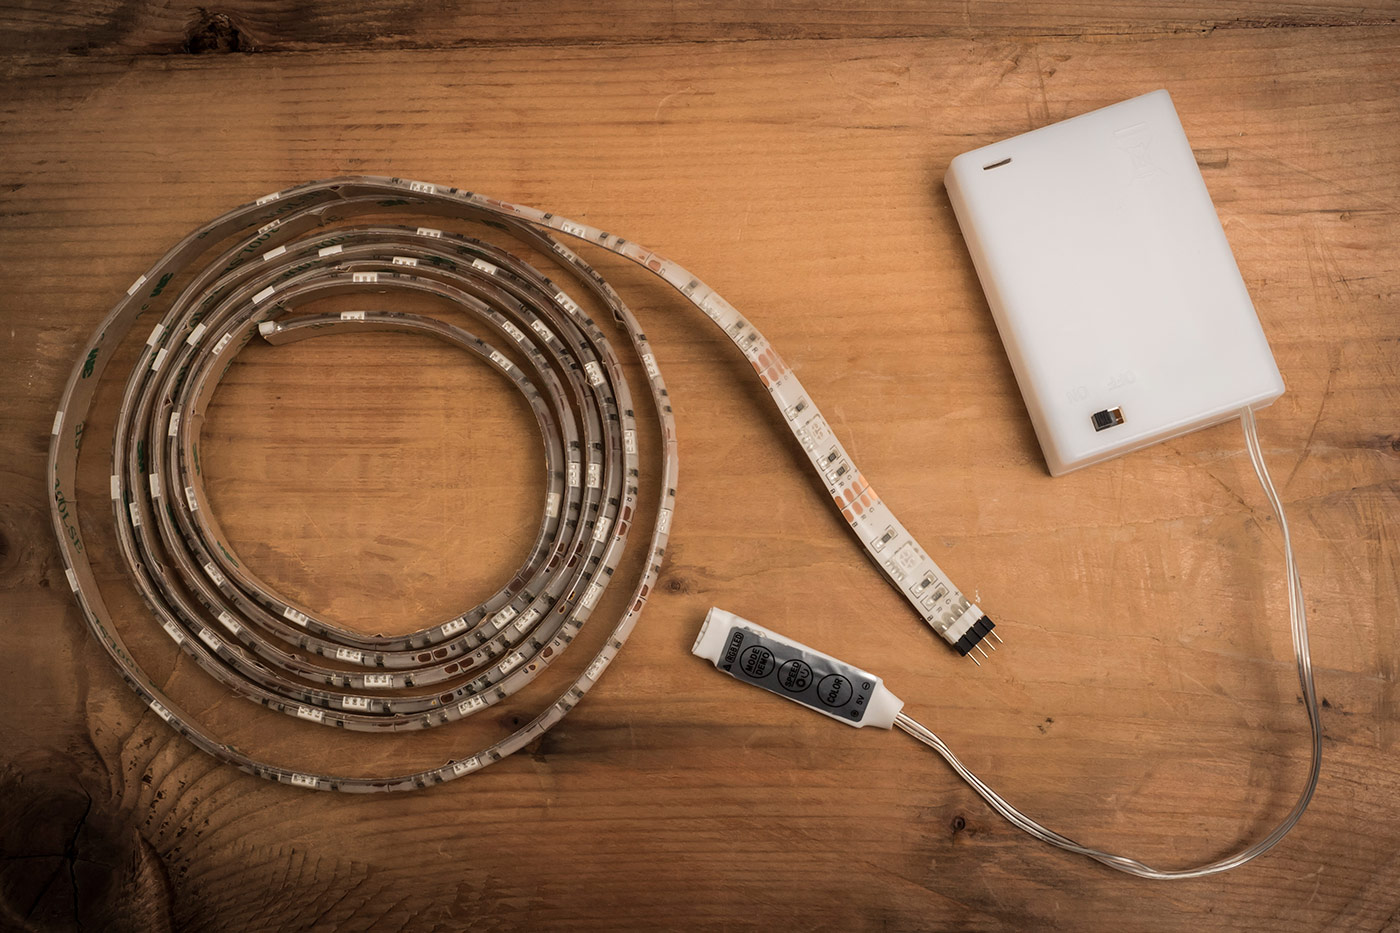
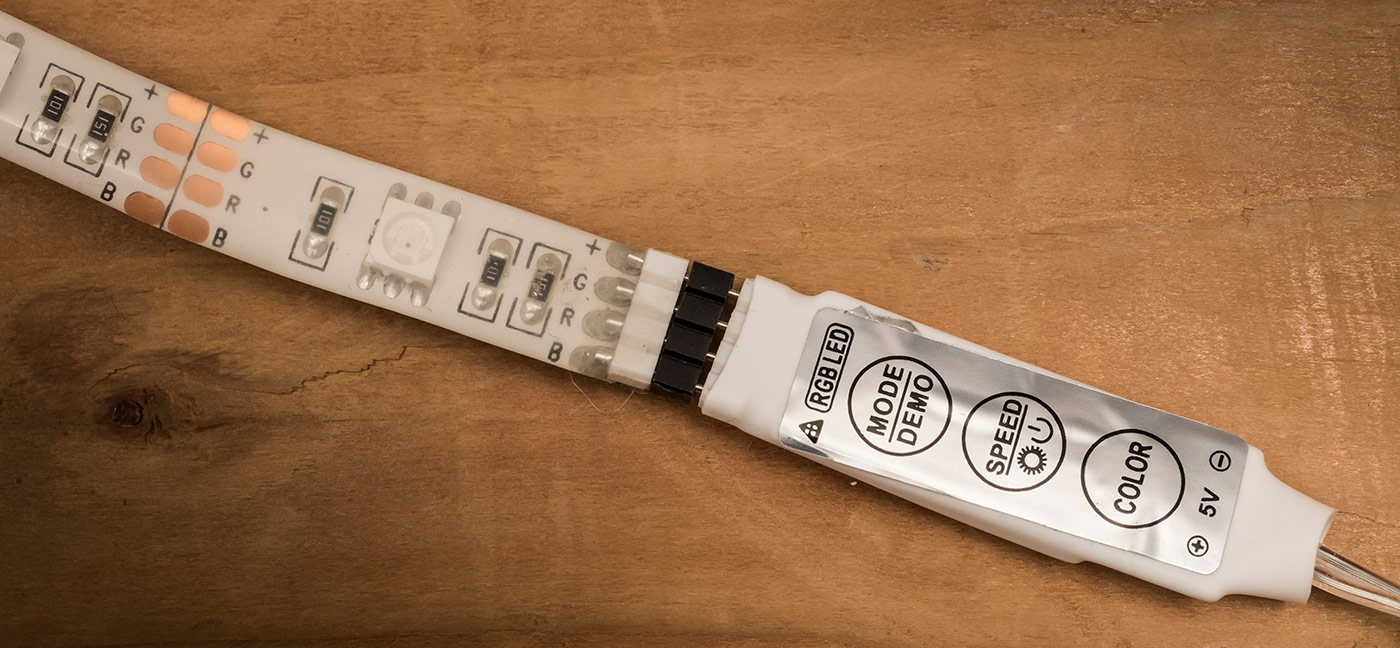
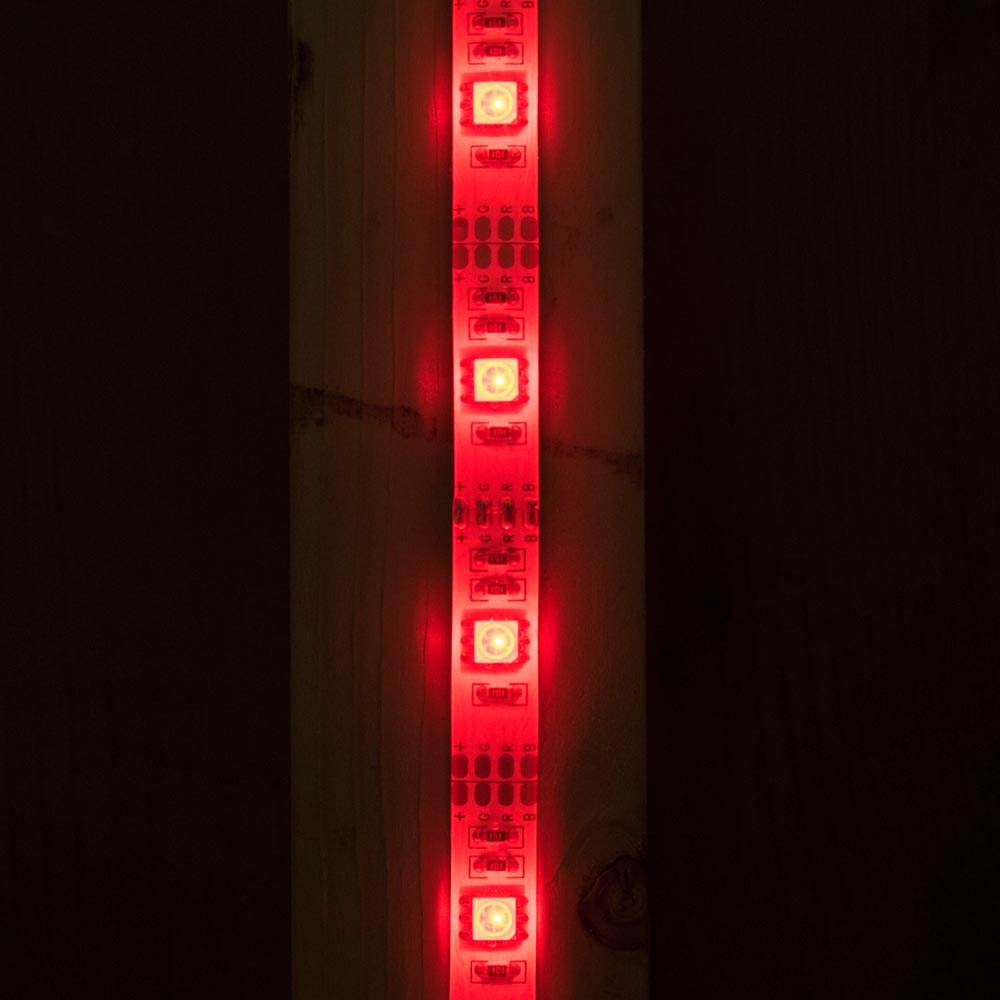
For this you’ll need at least one more light. The extra light(s) is placed behind the model and a coloured gel is fitted. The background colour is from the gel but also from the light output. A stronger background light will give brighter colours which can bounce off the background and onto the edges of your model in a small studio. A lower powered light will created a background with darker, richer colours. It’s all about balance and experimentation.
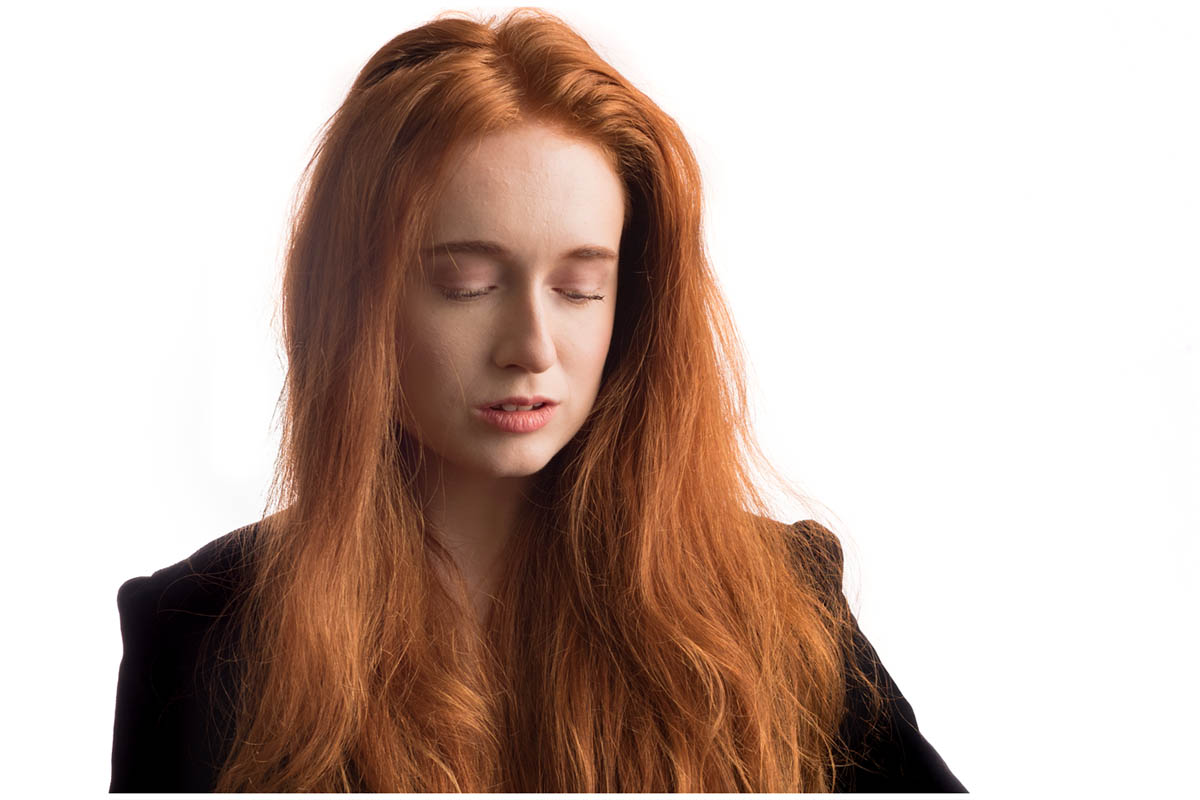
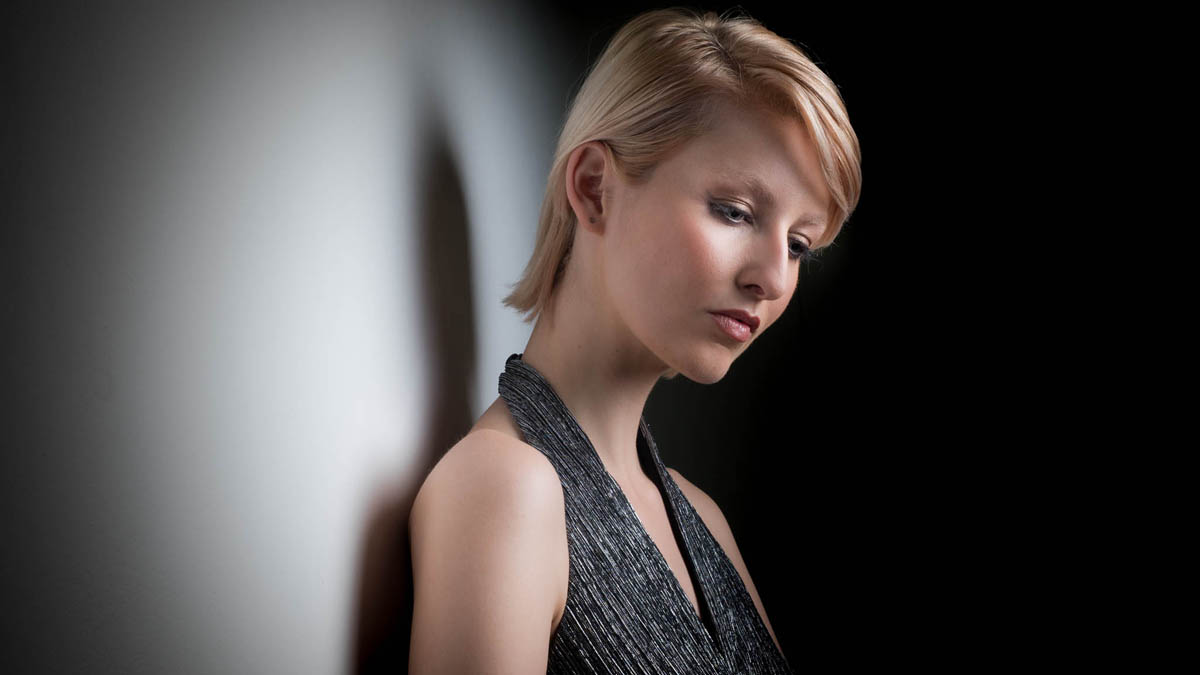
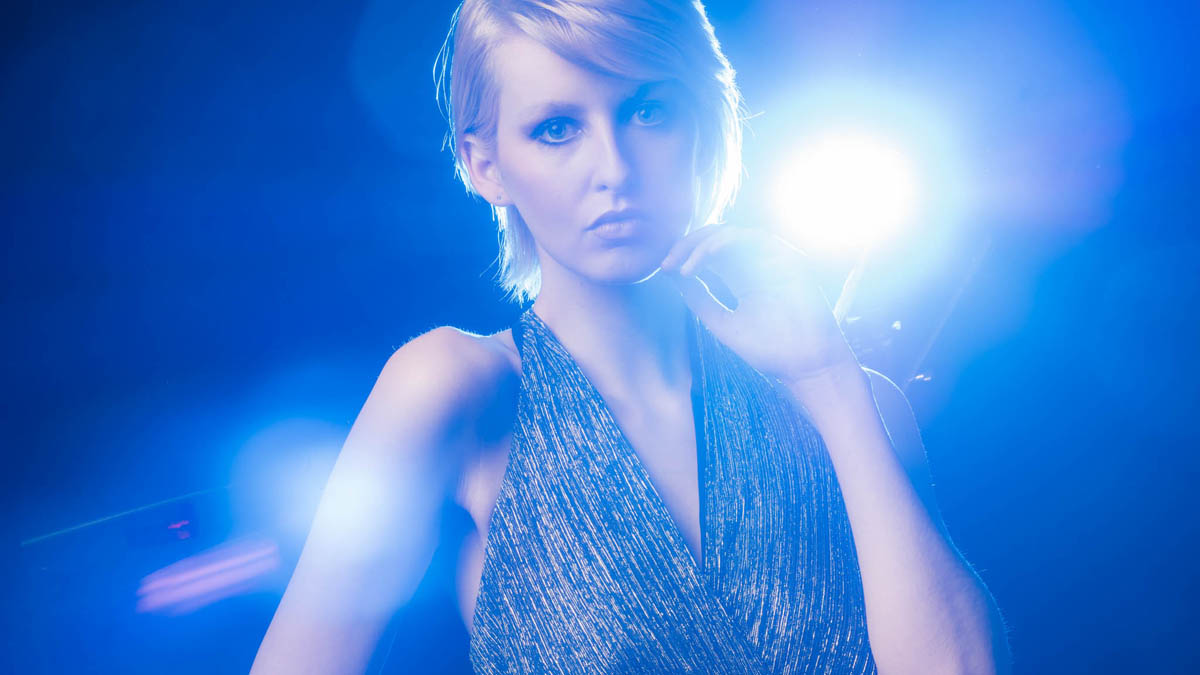
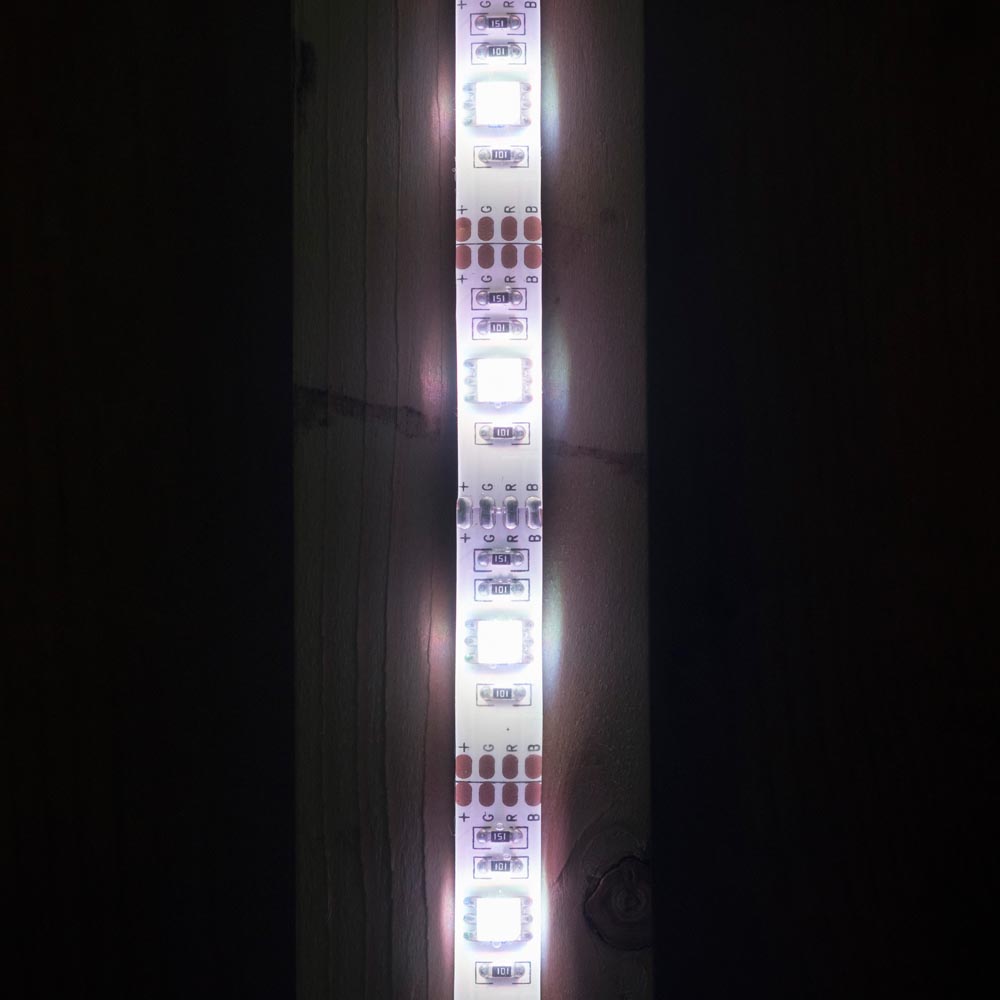
White
This is the toughest to nail. Adding more light onto the background from the rear light makes the background record as a lighter tone of grey. Add enough light and the grey will be white. Add too much light onto the background and you’ll lose detail on the model. You can find out my tips for balancing light to get the perfect white background in this video.

OLYMPUS DIGITAL CAMERA

Gatwick Aviation Museum Re-Opening

I’ve been to the Gatwick Aviation Museum more times than I can remember but for the past year it’s doors have been closed to visitors as it underwent major alterations. The great news is the new hanger has been completed, the planes have been moved inside and it’s ready to re-open its doors to aviation enthusiasts and photographers alike.

To celebrate the re-opening, the museum is holding a special four day event over the Easter weekend. As well as their usual displays, they’ll be joined by some special guests. More details can be found on their website www.gatwick-aviation-museum.co.uk

Gatwick Pano NEW

I’ll be at the Gatwick Aviation Museum on Saturday 26th March from around 11:30am until mid afternoon. If you fancy coming along I’ll be on hand to offer some photo advice whilst you get up close to some classic British aircraft.

The Gatwick Aviation Museum always had a reputation of being extremely welcoming and accommodating to photographers. So even if you can’t make it along this weekend you’ll find the volunteers at the museum will be delighted to show you round most Fridays, Saturdays and Sundays.

easterposter

My 2016 UK Photography Show Schedule

There’s just one week to go until The Photography Show opens its doors at the N.E.C. in Birmingham and this year my free demos are bigger and better then ever. Running from the 19th – 22nd March, it’s easily the UK’s biggest and busiest photography show with 30,000 amateur and professional photographers attending. It’s packed with a great mix of stands from the major photographic suppliers to the small independent retailers.

TPS2016

But this isn’t just another trade show, there’s also loads of things to see and do. There’s a constant stream of free demos and talks on various live stages and that’s on top of all the smaller demos on many of the booths dotted around the show.

I’ll be there for the whole four days giving various talks and demos on Photoshop, portrait lighting and photography. I’ll be dashing from demo to demo (see below) but if you’re coming along it would be great to meet you.

Saturday

11.15 am PiXAPRO E91 Small Space, Big Impact Lighting
12.30 pm Adobe Theatre Photoshop CC Hidden Gems
3.15 pm PiXAPRO E91 One Flash Lighting
4.30pm Olympus E31 Losing A Mirror But Finding Focus

Sunday

11.30 am TPS Live Stage Fearless Flash Photography
12.45 pm PiXAPRO E91 Small Space, Big Impact Lighting
2.00 pm Adobe Theatre Photoshop CC Hidden Gems
3.15  pm PiXAPRO E91 One Flash Lighting
5.00 pm TPS Behind the lens Snap Happiness (Talk)

 Monday

11.00 am Adobe Theatre Photoshop CC Hidden Gems
12.15 pm PiXAPRO E91 Small Space, Big Impact Lighting
2.15 pm PiXAPRO E91 One Flash Lighting
3.30 pm Adobe Theatre Photoshop CC for Photographers
5.30 pm TPS Networking Event Mega Mess Ups! (Talk)

 Tuesday

11:00 am Adobe theatre Photoshop CC Hidden Gems
12.15 pm PiXAPRO E91 Small Space, Big Impact Lighting
2.15 pm PiXAPRO E91 One Flash Lighting
3.30 pm Adobe Theatre Photoshop CC for Photographers

All my demos are free and available on a first come first served basis. There’s no need to book but as the Adobe theatre in particular has limited seating I’d recommend getting there early!

Show tickets are free for professional photographers and the trade (if booked in advance) and £13.95 for enthusiasts (£18.00 on the door)

Fashion Photography Workshop Wrap-up

Last Sunday I was in London with a great bunch of photographers. I’d been asked to be part of a workshop organised by my friend Robert Pugh and hosted by Olympus UK at their Art Bermondsey Project Space.

The day was themed around fashion photography with Rob running through a fashion set up with Profoto studio lights in the afternoon and me covering as many lighting tips and tricks as I could fit into the morning. Rob had secured the services or Amber Tutton as our model for the day, make-up was in the expert hands of Michelle Court and the clothes were supplied by Rob’s contacts in the fashion world… or so he told me 🙂

I kicked off the session with a single PIXAPRO speedlight in combination with either a MagMod snoot or just random house hold items used as GoBo’s

Next I moved on to a more powerful PIXAPRO flash inside a Westcott Rapidbox Duo softbox. Adding a grid to the softbox made controlling the light much easier and gave some great effects.

Finally I moved from the plain white walls of the gallery and on to Robs roll of black paper. The lack of background shadows makes black a great choice but a little uninteresting, that’s where background lights really help and when you throw gels into the mix, things can get really fun.

With my time up, I had one last tip. Learn the rules of photography so you can break them. My last shot did just that by pointing two speedlights right at the camera. The result was hard to predict but great fun.

You can check out Robs photos and write up of the day on his blog. Thanks to Clare Harvey-May for the behind the scenes photos

Make a simple LED Background

All sorts of random things can be turned into an amazing  portrait background but last year I was shown something called the Pixel Stick which looked amazing. It was a Kickstarter backed project that combined LED’s and long exposures in a way I’ve never seen before. Although the pixelstick was out of my budget the basic idea wasn’t.

My low tech LED stick took just a few minutes to make and worked amazingly. Take a look at the Adorama TV video I made with the spectacular Mark Wallace to see for yourself.

I’ve had loads questions all asking the same thing… How do you make my LED stick?

eBay proved to be the perfect place to start my search. There are loads of low cost LED’s on the market and I found a 2 meter roll of multi-coloured LED’s complete with battery box and controller for about £17.00.LED-Setup

Each LED is actually several coloured LED’s clustered together which turn on or adjust their brightness to change the colour. The controller is very basic but allows you to set the colour, brightness and any effects such as flashing or fading through the spectrum.

LED-Setup-2

The LED strip is very flexible and sealed inside clear silicone (or something like it), so I found a spare bit of 1.8m timber and attached the LED strip to that. There’s adhesive on the back of the strip but I just used a few rubber bands to hold it place. Just make sure the bands don’t cover the LED’s!

LED-Setup-3

Then it’s just a matter of attaching the batteries and choosing a mode. Some colours worked better then others as did some modes. The key as always is to experiment and have some fun!

5 FAQ’s (and answers) about flash meters

If you shoot with flash you may well be aware that speedlights and (increasingly) studio strobes come in either manual or TTL versions. If you’re shooting weddings, events or any sort of running and gunning photography, TTL is brilliant but for me manual flash teamed with a flash meter is how I like to work in the studio.

If you’re thinking a flash meter might be what you need to improve the consistency of you shots or you already have a flash meter but aren’t sure on how to get started with it, then I’ve got you covered.

[youtube]https://www.youtube.com/watch?v=UG4P-Odutr8[/youtube]

In the video above I cover the top 5 questions I hear from photographers and flash meters.

  • Can’t I just use my camera’s meter?
  • Do all flash meters work the same?
  • How do I trigger the flash and the meter?
  • Where do I point the meter?
  • Do I really need one?

My flash meter of choice is the Sekonic L-308S Flashmate. It’s about as basic as a handheld meter can be but it’s super reliable and excellent value for money. More information can be found over at Adorama http://www.adorama.com/SKL308SN.html?KBID=67338

Flash-Meter-Cover

5 Top Tether Tips (into Lightroom)

There’s plenty of reasons why tethering your camera to your computer is a really great idea, I do it all the time for my live demos and workshops. Having your photos appear on a large screen is a great way to show them off to a group or simply to check the sharpness and colour on a screen that’s bigger and better than the one on your camera. You don’t even have to be a studio photographer to find tethering useful for example, I hook up to a 10” Windows tablet during my location workshops.

So here are my top five tips for tethering into Lightroom.

1 Already supported
Ever since Lightroom 3 there’s been a built in way to tether a camera and Lightroom. It’s quick, simple and reliable. You’ll find it under File-Tethered Capture-Start Tethered Capture. Fill in the setting boxes and away you go.Tether-1

The bad news is it only works for a selected number of cameras from Canon, Nikon and Leica. You can see the full list here https://helpx.adobe.com/lightroom/kb/tethered-camera-support.html

Basically if you’re camera body isn’t supported you can’t use it but all is not lost. Jump down to section 5 for help.

2 Right Cable
OK so you have a camera that’s supported by your version of Lightroom, it’s all hooked up and the camera’s USB setting are correct. But for some reason Lightroom just won’t recognise it and insists that “No Camera Detected”Tether-2

What USB cable are you using? Is it the one that camera with your camera or a cable you found stuffed away in a drawer? The problem is not all USB cables are the same, despite how they may appear and Lightroom (or rather your computer) is fussy.

Some USB cables are charging cables, some are data cables, some are both and all of them look the same. If Lightroom won’t talk to your camera it may well be the cable that’s faulty or simply doesn’t support data. Swap the cable for a known good one and try again.

3 Go long
Unless you intend to shoot with your computer less than a metre from your camera (and some photographers do) you’ll want a USB extension cable. The longer the cable the less likely I am to trip over it and the more mobile I can work. However there’s a problem. If your total cable length goes beyond about 5 meters the USB signal will be intermittent or just plain stop.

The solution is to buy something called an Active USB Extension also known as a USB Repeater Cable. It’ll have either a thicker connection at the female end or a little bump in the cable which houses a signal booster and that’s what gets you past the 5 metre limit.Tether-3

4 Shrink the bar
Once everything is set up, Lightroom will auto import you images whenever you press the camera shutter button, plus it has some basic camera controls such as remote firing the shutter and… well, actually that’s it but it will show you a bunch of useful camera information like ISO and aperture.

Of course you may not need to see all that extra info, so to hide it hold the ALT key and click on the – icon in the Tether tools bar’s top right corner. You’ll be left with a single button which you can drag out of the way.Tether-4

5 Not supported, not a problem
Moving from Canon to Olympus caused me a few headaches when it came to tethering into Lightroom. Like most cameras manufactures, Olympus makes its own software for tethering and gives it away for free but it lacks things I need (like full screen reviews or any sort of image editing).  What it does do is auto import photos to a chosen folder on my hard drive which I can then set as a watched folder in Lightoom. Here’s how it works.

With the camera software importing to a preselected folder (how this is done varies from brand to brand) I then go to Lightroom and click File-Auto Import-Auto Import Settings and put a tick in the Enable Auto Import box. Set the watched Folder to be the same folder on my hard drive that I selected in the camera manufacturers software and do the same with the destination folder.Tether-5

And that’s it, Lightroom will auto import any images that land in the watched folder and they appear on screen about five seconds after I take the shot. Best of all Lightroom remembers these settings, so it’s a “set and forget” process too!

Gavin vs Mark Portrait Challenge

A few weeks back I was honored to have Mark Wallace, my friend and fellow Adorama TV host, stop off at my studio for a couple of days. Mark has been travelling the world for the past 18 months or so and this was the first time in a long time that he’s been shooting in a studio.

Now you probably already know I love a photo challenge, so when Mark suggested a studio challenge I jumped at the chance.

The rules were simple. We’d both use the same studio, same single flash and photograph the same model. We set a 20 minute time limit to include planning and filming and would see each other’s shoot until the end.

Mark went first and you can see his video below.
[youtube]https://www.youtube.com/watch?v=L2aEN6UUDYA[/youtube]

I love what Mark did with the simple lighting and subtle editing. I was also blown away by the quality for the Leica especially as Mark had been telling me it’s probably not a camera that you’d choose for studio portraits

Once Mark was through, I got my turn.
[youtube]https://www.youtube.com/watch?v=FzQr3GTUrwg[/youtube]

It was great to try out an idea I had been thinking about for a while and as you can see, my image is totally different to Marks in almost every way. I went with a contrasty light, aggressive pose and bags of drama.

The “home advantage” really can’t be underplayed. Remember I was using my gear, a model I’ve worked with before and I had the props hanging around in my studio. Even so I think it says a lot about how the photographer adds to the image when two of us can come away with such different emotions from the same subject using the same light.

Most of all it was a huge amount of fun and that’s what photography should always be about!


My best of 2015

2015-6With the year drawing to a close, now seems like a good time to take a moment and look back at what I did with my camera during 2015. A lot (but not all) of my time goes into making videos for Adorama TV and in 2015 I made 26 of them, which have had over 1.4 million views so far.

So here are a few of my personal highlights. If you have your own, please leave me a comment.

Most watched video
At 150,000 views in just over 5 months, my “day to night” video for Adorama TV has easily been the most watched video I made in 2015. As anyone who makes YouTube videos will tell you, it’s almost impossible to predict which videos will become “popular” and often it’s not the ones you would expect, or perhaps that should be wish.

[youtube]https://www.youtube.com/watch?v=aGsQxXUEvc4[/youtube]
However I’m really thrilled this video has taken off. It was a sound idea that took a long time to plan but was great fun to shoot. Best of all I the final photos came out even better than I had hoped.

Most fun video
It’s tricky to choose just one as I enjoy them all in different ways. But the poker player shoot I did with Brian back in February was a very memorable one.

[youtube]https://www.youtube.com/watch?v=kum6KjmToYU&index=22&list=PL821B7D720DEA39FA[/youtube]
I know absolutely nothing about poker and as it turned out, neither did Brian. Fortunately Brian is an excellent actor as well as a model and once the technical bit was out of the way, he excelled in the role. I loved the range of emotions he produced although some of that may have come from drinking the “whisky” which was in fact cold tea!

Video I’m most proud of
usually my videos are all about taking and making a great shot but back in June I made a video that was more technical than usual. It covered how focal length can affect the compression in a photo.

For years I’ve listened to photographers go on about how they use a longer focal length lens to compress the foreground and background but that’s actually not strictly true. Yes they used a longer focal length lens but it’s camera to subject distance that does the compression and in this video I prove it… although I still get photographers telling me I’m wrong!

[youtube]https://www.youtube.com/watch?v=GbESqYkodmQ&list=PL821B7D720DEA39FA&index=14[/youtube]
I had photography students firmly in mind when I made this one but I know a few “expert” photographers who learned from it too.

Most fun photo shoot
I don’t just make videos, I’m also a full time photographer. I always throw myself in to any shoot but occasionally a job comes along that really stands out. The best example of that in 2015 was a PR shoot I did with LG mobile and the Three network here in the UK.

When I got an email asking if you can photograph a medium and ghosts at a ruined church in the most haunted village in the UK, I jumped at the chance. The full brief included shooting a spooky outdoor cinema in the dead of night at a location without power… I loved it!

As you can see from the photos, things got very spooky and smoky. Our medium arrived late at night having just come from a séance but I guess my lights must have frightened away the spirts as she was unable to detect any ghosts until I was packing my gear into the car!

Best “Subscribe” ending
Do you watch my videos to the end? If you do then you’ll know I like to have fun with the “Subscribe” button. And yes I do spend far too much time on it.

This year I’ve made the subscribe button float in a balloon, appear on a London bus and ripple at the bottom of a fish bowl.

But my favourite subscribe button was at the end of my 15 minute photo challenge at the Pantheon in Rome. Chiselled on to the 2000 year old wall with just a little help from Adobe After Effects, this subscribe button took a fair bit longer to make then the rest of the video took to film!

[youtube]https://www.youtube.com/watch?v=9XaF-IPSwJo[/youtube]

Tips for Better Bokeh

Recently I shared a few of my bokeh shots as a Friday Freebie. Nice as they are, nothing beats shooting your own stock shots and luckily bokeh is easy to do. This time of year is also perfect for bokeh shots with many places covered in festive lights which makes brilliant bokeh.

In the video below I cover the basics of bokeh, what it is, how you can control it and some simple tips for getting some great photos with it.

[youtube]https://www.youtube.com/watch?v=4zBfBDNyGpA[/youtube]

OK, so you’ve mastered bokeh and it’s time to go beyond basic bokeh. In part 2 of this mini series I dive a bit deeper by adding flash, doubling my bokeh count and changing the bokeh shape.

[youtube]https://www.youtube.com/watch?v=3mXg7-Juvrc&feature=youtu.be&a=[/youtube]

Bokeh is brilliant fun to play with but remember it’s not just for Christmas, the basic principles can be applied year round on any shot that has small points of light in the background.