Using light to your advantage

Recently I recorded a series of short videos as part of the “Lovers of light” photography competition. In this clip I have a few words to say about the different types of light.

[youtube]https://www.youtube.com/watch?v=z4uhpvMzN6g&list=PLtSaDsQ1Szx1KSX5cJ7b1BdAnK8fiZsca[/youtube]

There are three types of light in photography. Good light, bad light and no light. Being able to tell the first from the second isn’t as simple as you might think.

Good light:
What is classed as good light will vary depending on what you’re photographing. Great landscapes often come from strong directional light which casts long shadows. Portraits are best taken in soft, overcast light where shadows are few and far between.

Bad light:
Just like good light, what one photographer considers bad light might be perfect for another. Knowing what you shoot and when to shoot it is a skill that can be learned just like any other.

No Light:
Without light we don’t have any photos but with today’s digital cameras able to shot in extreme low light, it’s very rare to be left with no light at all. It’s all too easy to confuse the quantity of light with the quality of light, night time shots can be just as magical as day time photos.

goodvsbad-light

Direction of light:
Where the sun is in relation to your camera can have a dramatic impact on the scene. The lower it is in the sky, the longer the shadows it casts.
Keeping the sun over your shoulder will make colours richer and shadows more pronounced.

Closing the lens aperture down to a big number (e.g. f/22) will give the sun a natural star burst effect.

Looking directly into the sun is dangerous for your eyes but with very careful use of your camera it can yield amazing results.NOTE: DSLR users should avoid looking at the sun through their viewfinders as it can damage your sight. Using “live view” is the way to go

Into-the-light-1

Pentax 645Z Hands On Experience

The last time I got to play with a medium format camera was a few years back at Hasselblad. Back then I loved the quality of the photos but found the experience of using the camera cumbersome compared to a DSLR.

Jump forward to late 2014, switch brands to Pentax and things have really changed for the better.

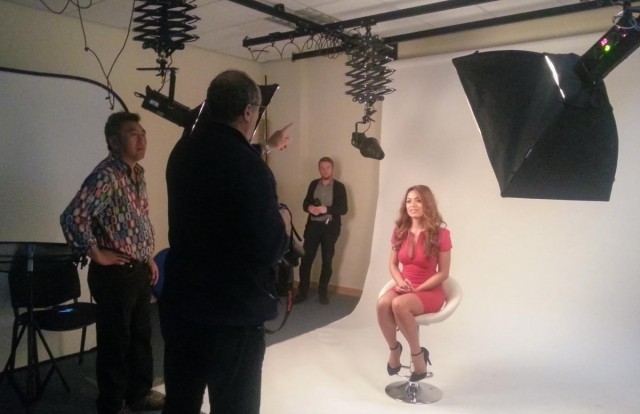
I got some hands on time with the Pentax 645Z thanks to a Park Cameras and Pentax/Ricoh offering a two hour group try-out session. Shooting time was limited and the style was a studio shoot run by my good friend Will Cheung. With that in mind please remember this isn’t a full on camera review.

Untitled-2

First impressions
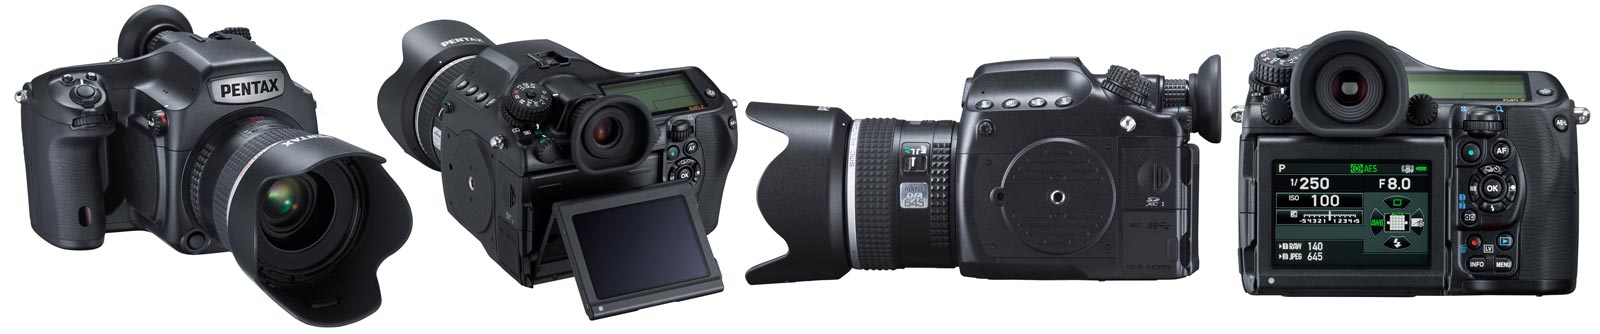
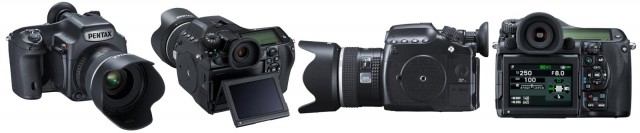
Coming from a Canon 5D2, the Pentax 645Z feels big and heavy but I’d expect nothing less.  Once you get past the size it’s a great camera to hold and feels very DSLR in design.

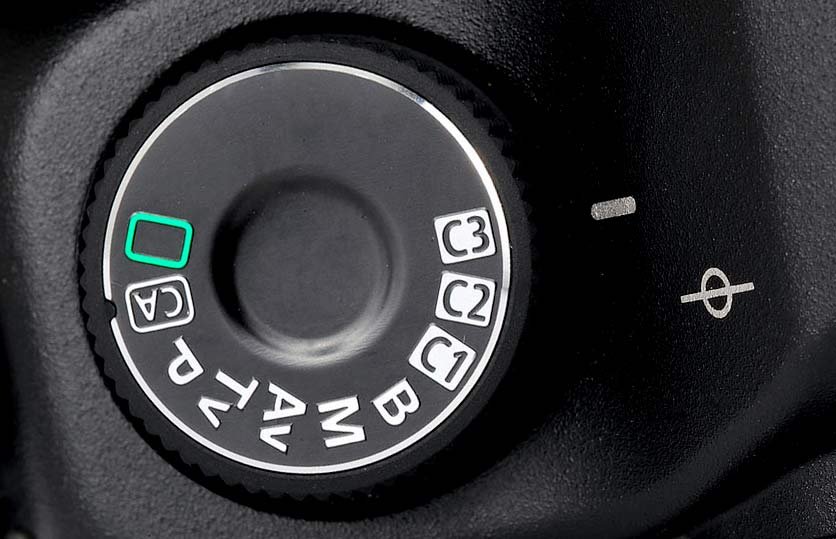
The viewfinder was big, bright and brilliant to use and same could be said for the LCD screen on the back. In fact I swear some of the buttons and controls have been lifted from the Pentax DSLR range, they looked so familiar.

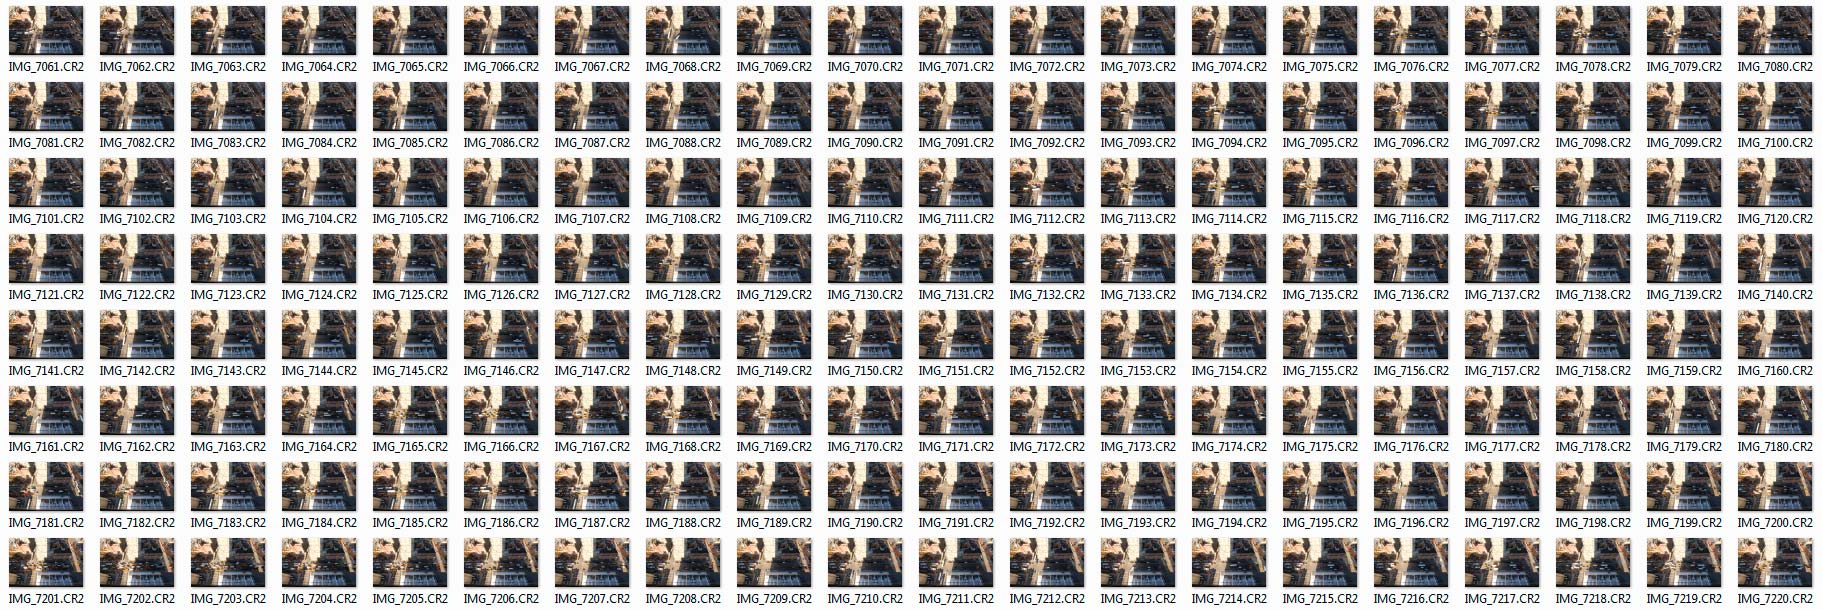
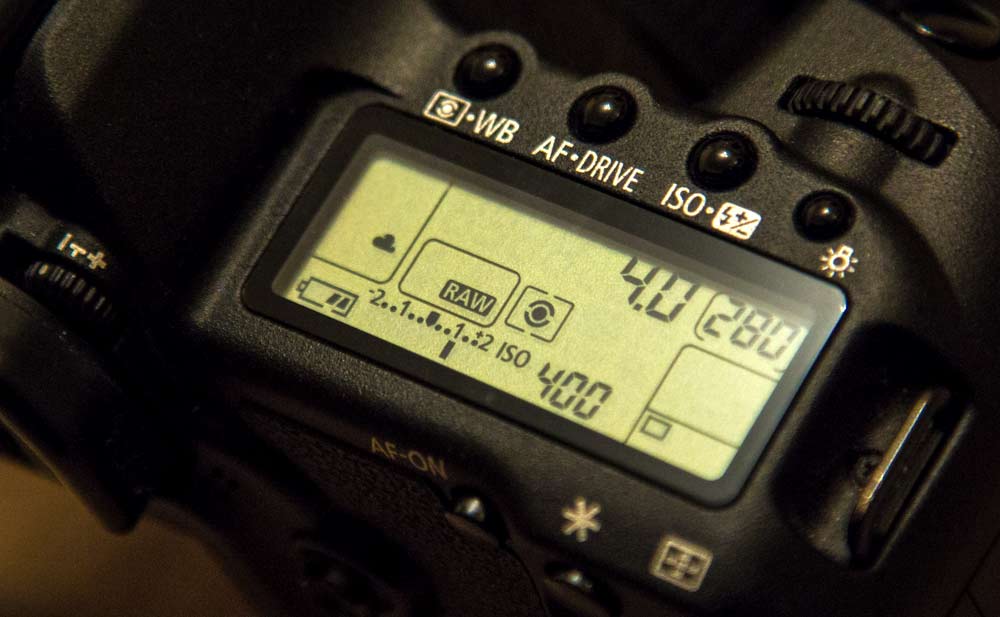
The first big surprise came when I popped my 32GB SD card into one of the two slots. Even though the card was empty I had just 219 available (RAW+JPG) photos before it was full. The Pentax packs a whopping 51.4 million pixel sensor with RAW files averaging out at around 65MB and JPG’s at 18MB each.

IMGP9994

In Use
Using the Pentax 645Z was real pleasure, the shutter fired with a satisfying clunk and the photos appeared almost instantly on the LCD. Pentax made a big thing about the focusing system, with its 27 AF points 25 of which are cross type and so on. However in practice I found the focus slightly sluggish. Not sloooow but certainly not as fast as I’m used to. To be honest I can’t say if that’s just how it is with this camera or if it’s down to the 90mm lens I was using.

Those big files take time to write to the card. Fortunately I packed one of my fast SD cards that I use for capturing video but I noticed a couple of the other photographers were using standard SD cards. At the end of their session they needed to wait some time before the files had been written to the card and they could safely remove it.

Features
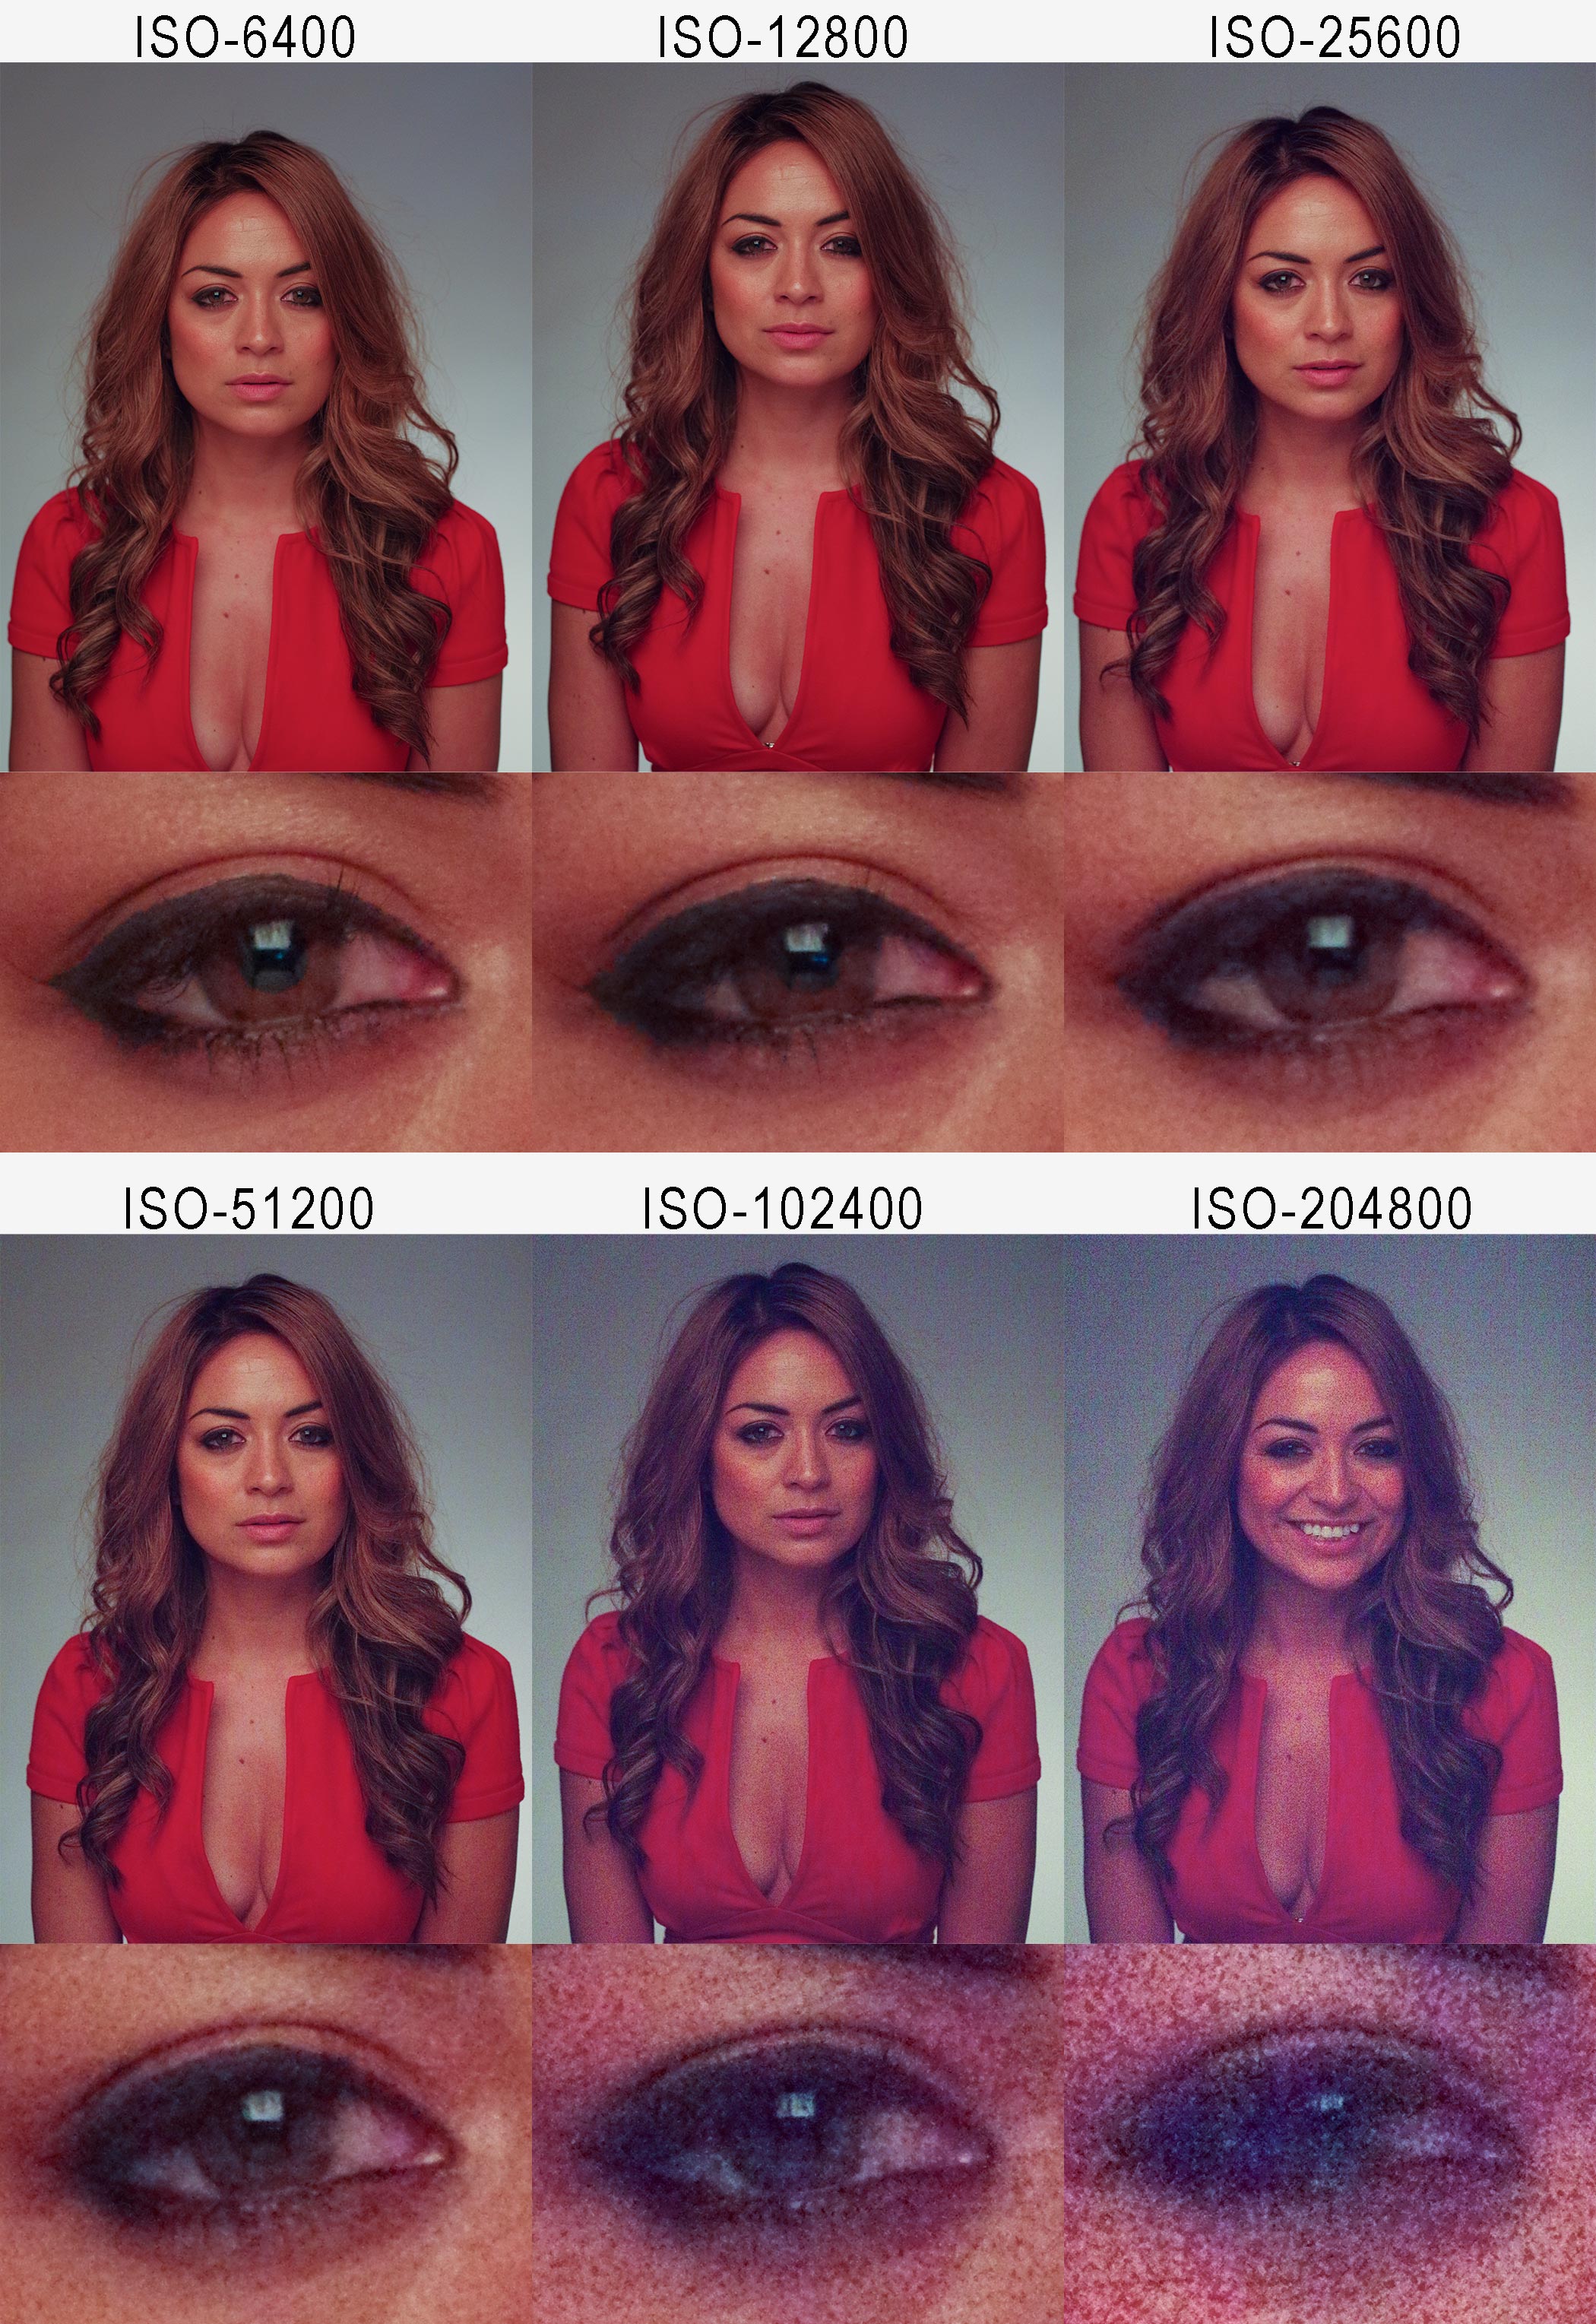
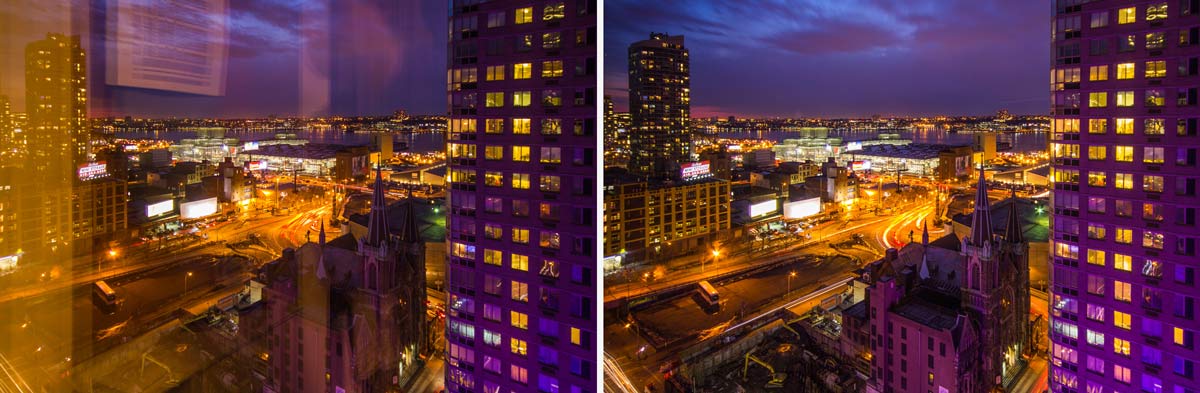
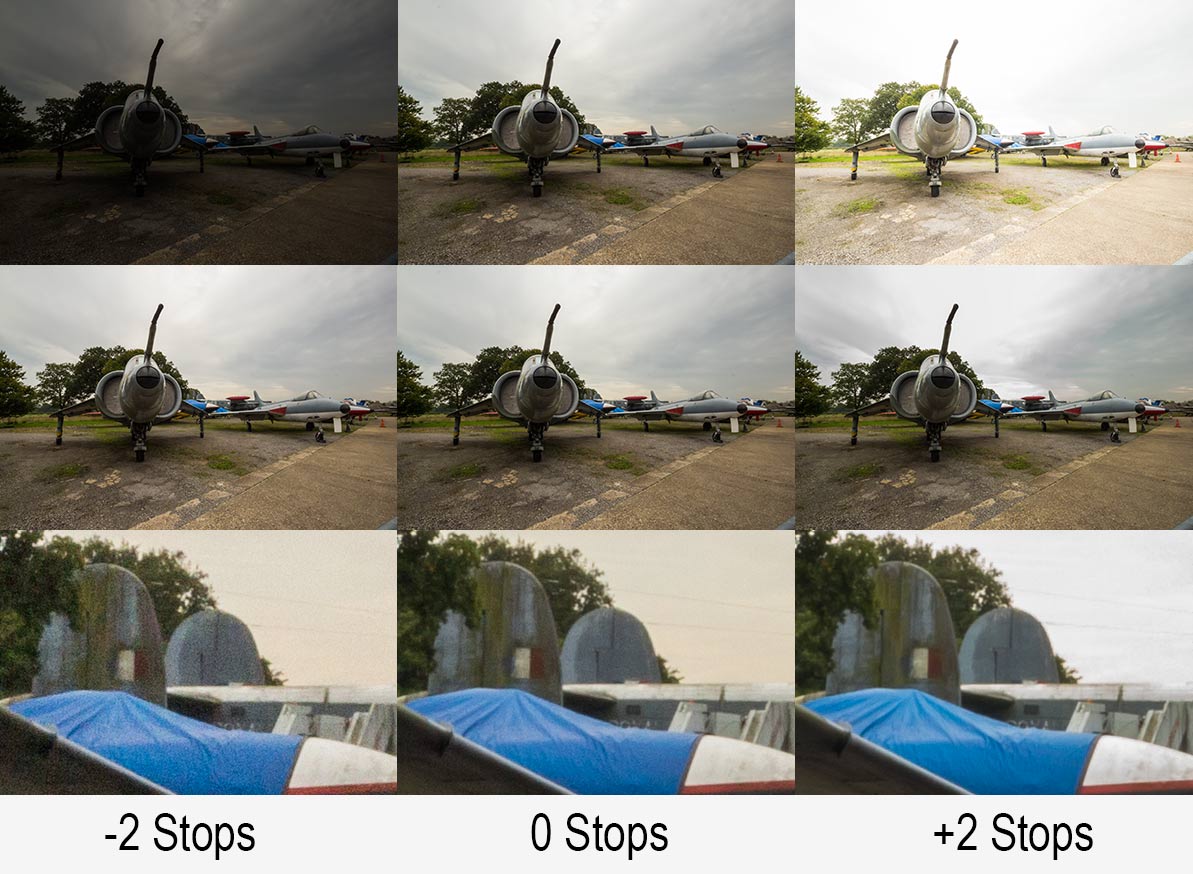
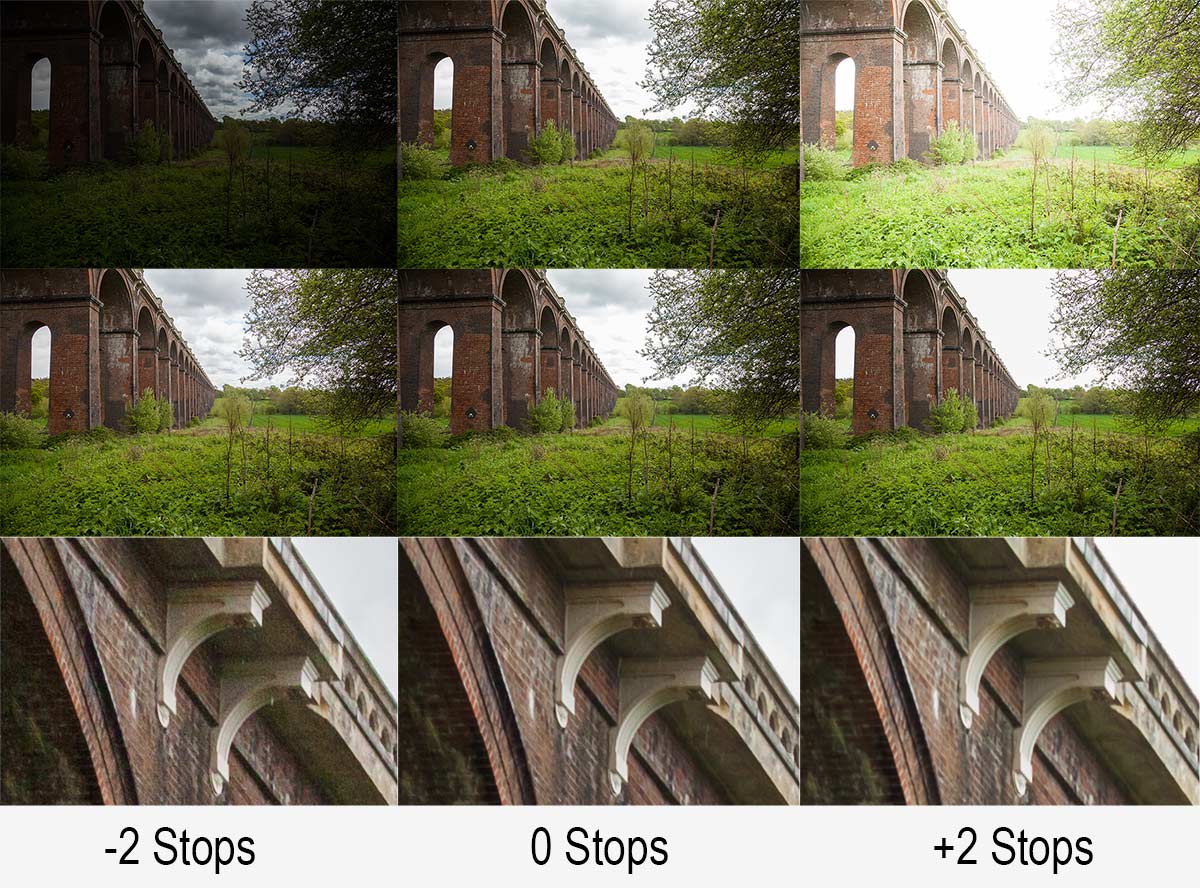
Pentax were really keen to talk up a few of the features that make the 645Z different from other medium format cameras. For example it can shoot at 3 frames per second, it’s weather sealed, it shoots video and it shoots at high ISO. I really wanted to test the last one so here’s a series of (JPG) photos starting at ISO6400 (Where my Canon 5D2 stops) right up to a jaw dropping and utterly useless ISO204800

Pentax645-HiRes

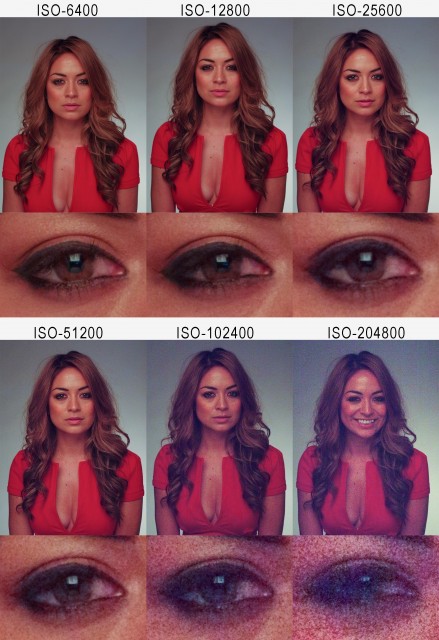
It’s hardly a definitive test but from what I can see that’s probably one of the best high ISO performances I’ve ever seen.

Reviewing the photos
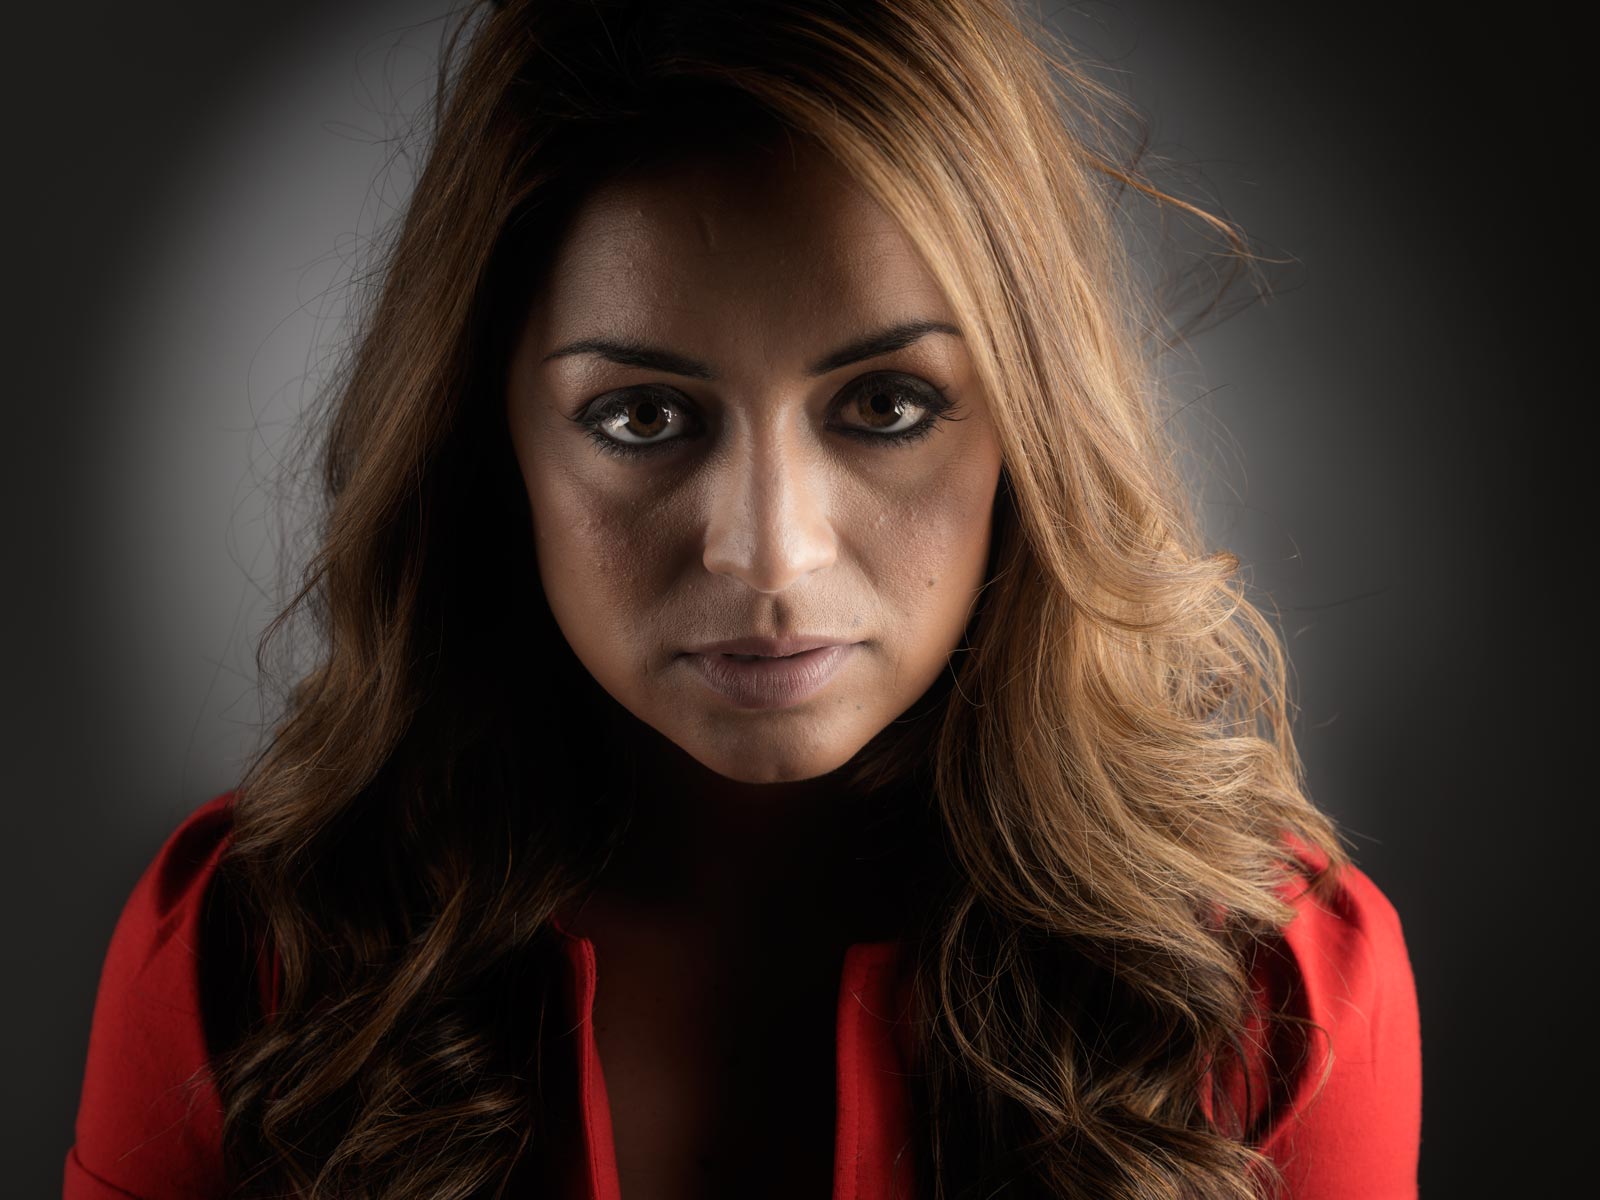
So the big question is how did the photos look? In a word they were… detailed!

We only got the chance to shoot portraits but when I viewed at 1 to 1 in Lightroom every little blemish, imperfection and detail could be seen. That level of detail is perfect for many photographers needs but for my portraits it would mean a little more retouching might be required!

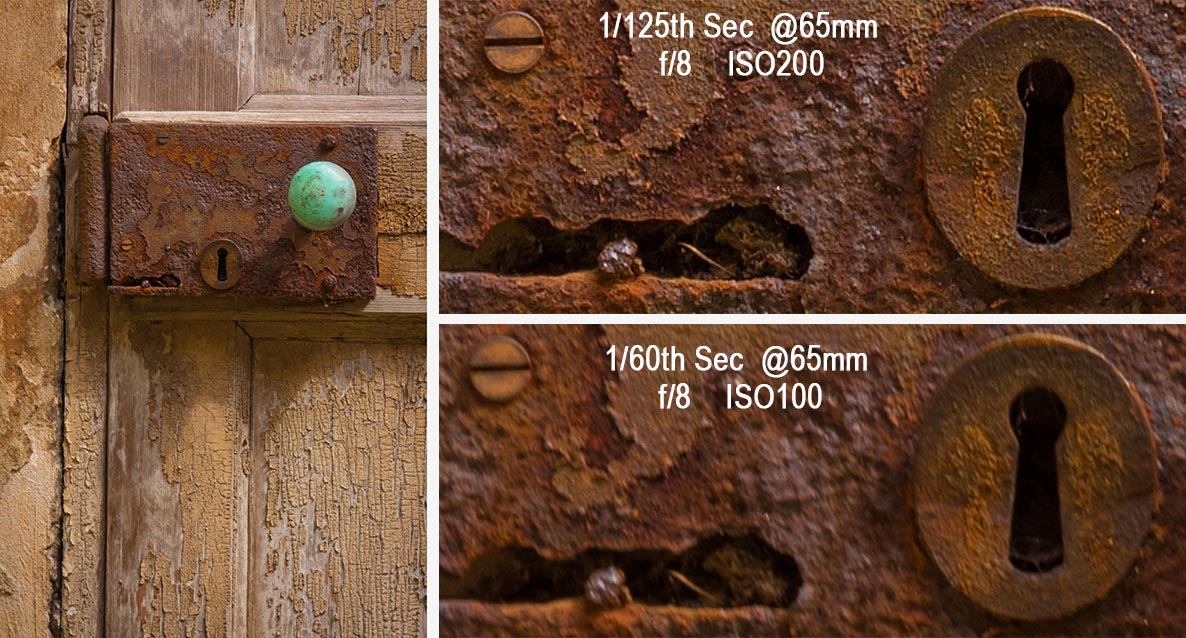
Yes the sensor has lots of pixels but it’s also big in size at 43.8mmx32.8mm. The bigger the physical size of the sensor the shallower the depth of field and when reviewing my photos I could see that my usual f/8 was giving me a noticeable reduction in depth of field.

IMGP0097

Final thoughts
With a price point of £6800 body only and limited selection of lens to choose from, the Pentax 645Z isn’t on my real world shopping list but part of me wishes it was.

The price may seem high but compared to its competitors at Hasselblad and PhaseOne it a bargain. And when you consider the Pentax uses exactly the same sensor as it’s medium format competitors, it’s not surprising that the Pentax 645Z is constantly on back order at retailers.

20141022_150908

I’d like to thank Mark and Luke from Pentax/Ricoh for letting me get my hands on the camera, Park cameras for providing the venue and Will Cheung for being a brilliant teacher/assistant and for continuing his tradition of wearing truly terrible shirts 😉

Using two lights – Home Studio Essentials – Part 5

There are many ways you can use a single flash to take great portraits but sooner or later the limitations of a single flash will be reached. Adding a second flash can be a great way to open up new and creative photo opportunities.

In this video I fire up a second light to act as a hair light and separate the model from a dark background. Then in the final shoot I add a few bubbles to create something a bit special.

[youtube]https://www.youtube.com/watch?v=FcQg0cBncHs&list=UU8Pksdbj37CdE00kmE7Z1dw[/youtube]

More lights means more complexity but my advice is to treat each light separately and meter accordingly. Turning them both on and trying to balance them at the same time sounds easier but trust me it’s not!

Bubbles-Studio

Gear used in this video (Links back to Adorama)

Flashpoint StreakLight 360 Ws Creative Collection (Includes flash, battery, trigger, boom etc)

Flashpoint Streaklight 180 WS

Westcott Apollo Orb Softbox

Canon 5D Mark 2 

Canon 24-105L 

The Focal Length vs Shutter Speed Rule

During a recent webinar I briefly touched on a rule of thumb that I’ve used for years. It connects the focal length of a lens and the shutter speed of the camera with the sharpness of a photo. It generated a few questions so let’s get some answers.

Camera shake vs motion blur
Camera shake is where the camera moves, motion blur is were the subject moves and they’re two very different things. In this post I’m focusing just on camera shake, in other words where you photograph a static subject such as a landscape or seated portrait with a handheld camera. Getting sharp shots of speeding cars is another skill all together.

The rule of thumb
When I started in photography the rule of thumb was really simple. When hand holding your camera the shutter speed should match or exceed the lens focal length. In other words if you wanted a sharp, shake free shot with a 50mm lens your shutter speed would be 1/50th sec or faster.

Whilst that was fine in its day the world has moved on and so has my rule. Modern lenses and cameras are capable of recording very fine detail and as we all love to zoom in close we view our images with a more critical eye. Add to the mix all the different sensor sizes that will alter the effective zoom of the lens and you’ll understand why the old rule needs updating.
focal-length-vs-shutter-speed-1

The new rule of thumb
Today I use the rule of thumb that the shutter speed should be double (or more) then the lens focal length. In other words if you were using a 50mm lens your shutter speed would be 1/100th sec or faster.

To put that into the language of real world photography, if I’m using my 10mm fisheye I’m happy to shoot all the way down at at 1/20th second shutter speed but if I was shooting with a 400mm lens I’d want a whopping 1/800th second shutter speed. Which might be tricky and brings me onto my final point.

Bend the rule
Some rules are set in stone but others can be bent or broken, my rule of thumb is the later.

Does your lens have an image stabiliser (shake reduction) system, are you really good at holding your camera and is your camera a full frame sensor or bigger? If so then you can bend this rule a little, to a lot. If you use a tripod then you can totally break this rule as long as nothing is moving in your scene of course.

Summer Workshops

Summer-2014With summer just a round the corner I’m really looking forward to getting out and shooting some photos but I’m also excited about teaching photography and meeting photographers at some of the workshops I have around the UK. These all day events are on top of my usual evening camera club talks and are either practical workshops or all day demos, either way if you’re coming along do bring a camera, a note book and a willingness to get involved!

DATRPS-LOGOE: 15th June 2014
LOCATION: Foxton, Nr. Cambridge
DESCRIPTION: A day photography and Photoshop tips, techniques and demonstrations.
ORGANISED BY: The Royal Photographic Society
WEBSITE: http://www.rps.org/events/2014/june/15/taking-and-making-creative-photographs


WELSHOT-LOGODATE: 28th June 2014
LOCATION: Chester
DESCRIPTION: Create amazing photos by pouring, splashing and adding things to water
ORGANISED BY: Welshot Imaging
WEBSITE: http://www.welshotimaging.co.uk/event/make-create-water-workshop-gavin-hoey


WELSHOT-LOGODATE: 29th June 2014
LOCATION: Chester
DESCRIPTION: A day of photo challenges, fun and learning around the city of Chester.
ORGANISED BY: Welshot Imaging
WEBSITE: http://www.welshotimaging.co.uk/event/gavin-hoey-chester-challenge-photography-post-processing-day


Gavtrain-Logo-160x160DATE:
 20th July 2014
LOCATION: Gatwick
DESCRIPTION: Get up close and inside some classic aircraft at the Gatwick Aviation Museum,
ORGANISED BY: Gavtrain
WEBSITE: https://www.gavtrain.com


How to make a DSLR time-laspe

A few years ago I made a video about shooting a time-lapse sequence with a DSLR and then making a video from the images. Most of the information is still as valid today as it was in 2011 but it’s amazing haw fast technology changes the way we shoot and edit. Back then very few cameras had a built in intervalometer and you needed a custom made slideshow preset for Lightroom if you wanted to create the time-lapse video in your photo editing software.

Timelapse-NYC-THUMBS

Skip forward 3 years and although my Canon DSLR’s still don’t have timelaspse out of the box I can use my smart phone to control my camera and take the photos. Plus Photoshop CS6 and CC can both create video from stills in just a few clicks of the mouse.

[youtube]https://www.youtube.com/watch?v=J5Bwpm8_5XM[/youtube]
Can’t see the video? Click here http://youtu.be/J5Bwpm8_5XM

Equipment used in this video (Links to Adorama)

Canon 60D 

Sigma 10mm-20mm

ioShutter release cable 

Vanguard 284 CB100 Tripod  

How to shoot through windows without reflections

Earlier this year I made my first ever visit to New York and one of the things I put on my “to do” list was capture some great shots of the New York skyline. Wih that in mind I spent a long time researching hotels that had great views. Now there’s no shortage of hotels in New York and some of them have unbelievable views which come at a sky high price but eventually I settled on the Yotel Times Square. I paid a few dollars extra for a room towards the top of the hotel and sure enough the view from the 22nd floor was stunning.

Reflection-daylight

Like all modern hotels the Yotel came with lovely big windows which gave a great view but horrible reflections. Fortunately reducing the reflections and even getting rid of them completely isn’t too difficult, especially if you follow my simple steps in the video below.
[youtube]https://www.youtube.com/watch?v=b3q6aIBc_cc&list=PLwm6LvGc5xq3_BqxMpqpGyxYdJJMQE1mM[/youtube]
Can’t see the video? Click here http://youtu.be/b3q6aIBc_cc

The daytime view was always beautiful but just after the sunset it became amazing, especially with the huge purple neon “Yotel” sign which reflected off the surrounding buildings. The only regret I have is that the view from the rooms on the other side of the Yotel were potentially even better… and that sounds like a good reason to return to me.

Reflection-Night

Equipment used in this video (Links to Adorama)

Canon 60D http://www.adorama.com/ICA60D.html?KBID=67338

Sigma 10mm-20mm http://www.adorama.com/SG1020EOS.html?KBID=67338

Vanguard 284CB100 Tripod http://www.adorama.com/VGALTA284CB.html?KBID=67338

Do you under or overexpose?

exposure compensation CanonIt’s a question I haven’t thought much about since the days when I shot JPG images only. Now that’s a long time ago. Back then if you lost the highlights in your image you’d basically lost the image, so it was general practice to underexpose the JPG by 2/3rds of a stop from the cameras meter reading. Yes every photo was a little dark but that could be fixed in Photoshop and you still had highlight detail.

With RAW there’s a lot more exposure latitude and worries about clipped highlights in day to day photography are almost a thing of the past. In fact there’s so much hidden image information in the highlights of a RAW file I know plenty of photographers who will deliberately over expose their images knowing they can recover it in post-production.

Why overexpose?
In a word, noise, and the theory goes something like this. Noise is very evident in the dark, shadowy areas of a photo that are made lighter when processing. But as RAW files have all this hidden highlight detail, if you start off with RAW files that are a bit too bright and make them darker, you won’t add any more noise.

Sounds crazy right? Well, believe it or not it really works… but keep reading because there’s a catch.

over-under-1

Take a close look at the image above, you’ll need to click it to really see what’s going on.

I shot the same scene at three different exposure (Top Row) I then brought all three RAW files into Adobe Camera RAW and edited them so they looked more or less the same (Middle Row). From a distance the three images in the middle row all look the same but a close up says otherwise (Bottom Row).

The bottom row confirms the theory. Brighten an under exposed image and they’ll be more noise evident but darken an over exposed RAW image and the noise is about the same as the correctly exposed image and may be even slightly less!

The catch
So you may be think that I’m going to say from now no you should over expose your images by a stop… well I’m not.

You see, although the lower noise is brilliant there are other things to think about.

over-under-2

First there’s the question of just how much highlight detail you can recover. Take a look at the photo above and you’ll see the problem. Where’s the sky gone on the right hand (overexposed) image? The correctly exposed image (middle row) struggled to keep highlight detail so over exposing is asking just a bit too much, even in RAW.

That’s not all. One stop over exposure means your shutter speed is twice as long and that could be the difference between a sharp shot and a blurred shot. You might be able to counter that by opening up the aperture if the lens / depth of field allows it and of course you could double your ISO but that rather defeats the purpose doesn’t it.

Over, under or as metered?
As is so often the case there’s no rights or wrongs that will apply to every situation and camera meters are prone to errors by design. However for me, I’m sticking to the as metered reason unless there’s a valid reason to do otherwise and I’d recommend you to do the same.

Questions to Canon

canon_logoOn Sunday I mentioned on my Facebook page that I was visiting Canon this week and asked for any questions I should put to them.

There were a few questions about bagging some freebies but most of the questions raised were about future Canon cameras, lenses and features. Understandably Canon were very tight lipped about that kind of thing so I can’t tell you when the 7D2 will be announced.

However there were lots of questions Canon were happy to help with. Please note this shouldn’t be read as official Canon policy but my interpretation of our conversations.

Will Magic Lantern firmware invalidate my warranty?
Possibly yes, possibly no. Magic Lantern is 3rd party firmware for Canon cameras and adds some very useful video / photography features. I got the feeling that Magic Lantern firmware was a grey area with no official company line but there was a firm feeling of “use it at your own risk”.

The impression I got was if the firmware runs just off the Memory Card you should be OK but if the Canon firmware is replaced, modified or added to in anyway whatsoever don’t expect Canon to be willing to help if you run in to trouble. For the record I run Magic Lantern on my 60D and have no plans to stop using it anytime soon.

Can Canon fix rolling shutter issues on DLSR’s
As far as I could tell the answer is no. Rolling shutter is a phenomenon seen in videos. When the camera pans suddenly to the side, upright things will bend or go diagonal. If it’s a problem that you can’t live with then Canon’s Cinema bodies is the way to go.

Is it true that DSLRs are on their way out?
Again Canon aren’t going to tell me about their future plans but similarly they didn’t show any signs of ditching DLSR’s anytime soon.

Why don’t they incorporate a time-lapse function in their cameras.
No reason given but no comment if it will be ever added. To me it seems like an easy add to the firmware and I for one would like to see it.

Time-lapse is part of Magic Lantern firmware (see above regarding warranty issues) but bare in mind if you take 1000 images in your time-lapse that might be 1% or more of the life expectancy of the shutter. 100 timelapses and your shutters is dead… which is why I rarely do time-lapse with my DSLR.

5D-Mode-DialIs there a Spot Meter button on the 5D Mark3?
There’s no single button but it’s all part of the meter mode button. If you need a fast way of switching between spot metering and standard metering then consider setting up a custom profile of the mode dial. EG set C3 as spot and C2 as standard.

Rounded Corner Border – Creative Lightroom Episode 6

cl-7-FINALThis weeks episode of Creative Lightroom has a super quick but very smart looking border effect.

Rounded rectangle borders like this look amazing not only on vintage and retro photos but are just great with any photo. Back when I started taking photos as a VERY young child all the prints would have rounded corners just like this.

In the video I show you just how quick this effect can be made, plus some variations on the look. OK I say variations but in reality you can have a black or white border that’s either soft or heard edged. You can also choose the roundness of the corners too.

To create this effect you’ll need either Lightroom 5, Lightroom 4 or Lightroom 3

In the video I mention my hand painted border effect from episode 2, which you can see here www.gavtrain.com/?p=3162

As always it’s worth mentioning that if you’re a Photoshop user rather then Lightroom user, EVERYTHING I show in the video is the same as Adobe Camera RAW in Photoshop CS6 and Photoshop CC. It’s also possible to pull off the same trick with older version of Photoshop from CS4 onwards.

[youtube]https://www.youtube.com/watch?v=8F_xj4NSb7Y[/youtube]

Can’t see the video? Click here: http://youtu.be/8F_xj4NSb7Y