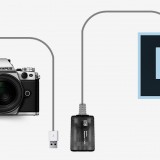
5 Top Tether Tips (into Lightroom)

There’s plenty of reasons why tethering your camera to your computer is a really great idea, I do it all the time for my live demos and workshops. Having your photos appear on a large screen is a great way to show them off to a group or simply to check the sharpness and colour on a screen that’s bigger and better than the one on your camera. You don’t even have to be a studio photographer to find tethering useful for example, I hook up to a 10” Windows tablet during my location workshops.

So here are my top five tips for tethering into Lightroom.

1 Already supported
Ever since Lightroom 3 there’s been a built in way to tether a camera and Lightroom. It’s quick, simple and reliable. You’ll find it under File-Tethered Capture-Start Tethered Capture. Fill in the setting boxes and away you go.Tether-1
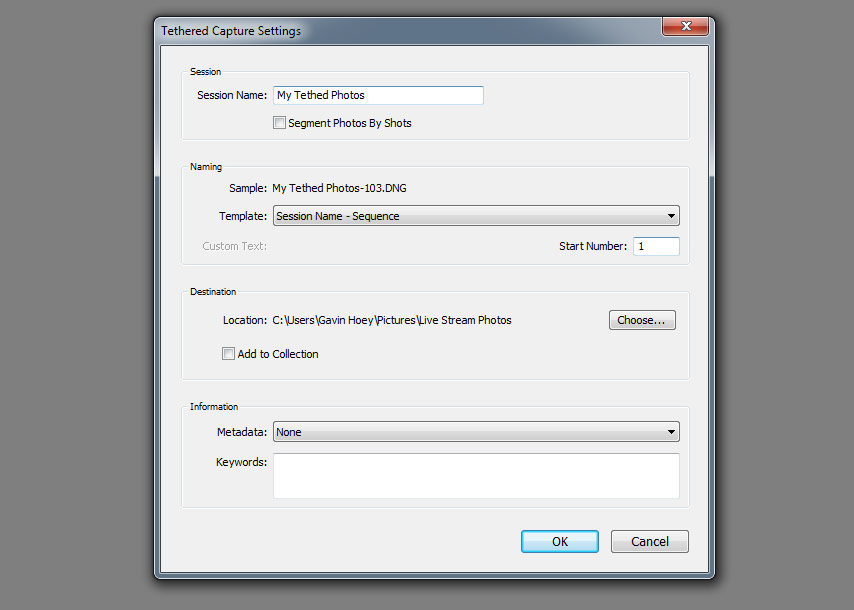
The bad news is it only works for a selected number of cameras from Canon, Nikon and Leica. You can see the full list here https://helpx.adobe.com/lightroom/kb/tethered-camera-support.html

Basically if you’re camera body isn’t supported you can’t use it but all is not lost. Jump down to section 5 for help.

2 Right Cable
OK so you have a camera that’s supported by your version of Lightroom, it’s all hooked up and the camera’s USB setting are correct. But for some reason Lightroom just won’t recognise it and insists that “No Camera Detected”Tether-2

What USB cable are you using? Is it the one that camera with your camera or a cable you found stuffed away in a drawer? The problem is not all USB cables are the same, despite how they may appear and Lightroom (or rather your computer) is fussy.

Some USB cables are charging cables, some are data cables, some are both and all of them look the same. If Lightroom won’t talk to your camera it may well be the cable that’s faulty or simply doesn’t support data. Swap the cable for a known good one and try again.

3 Go long
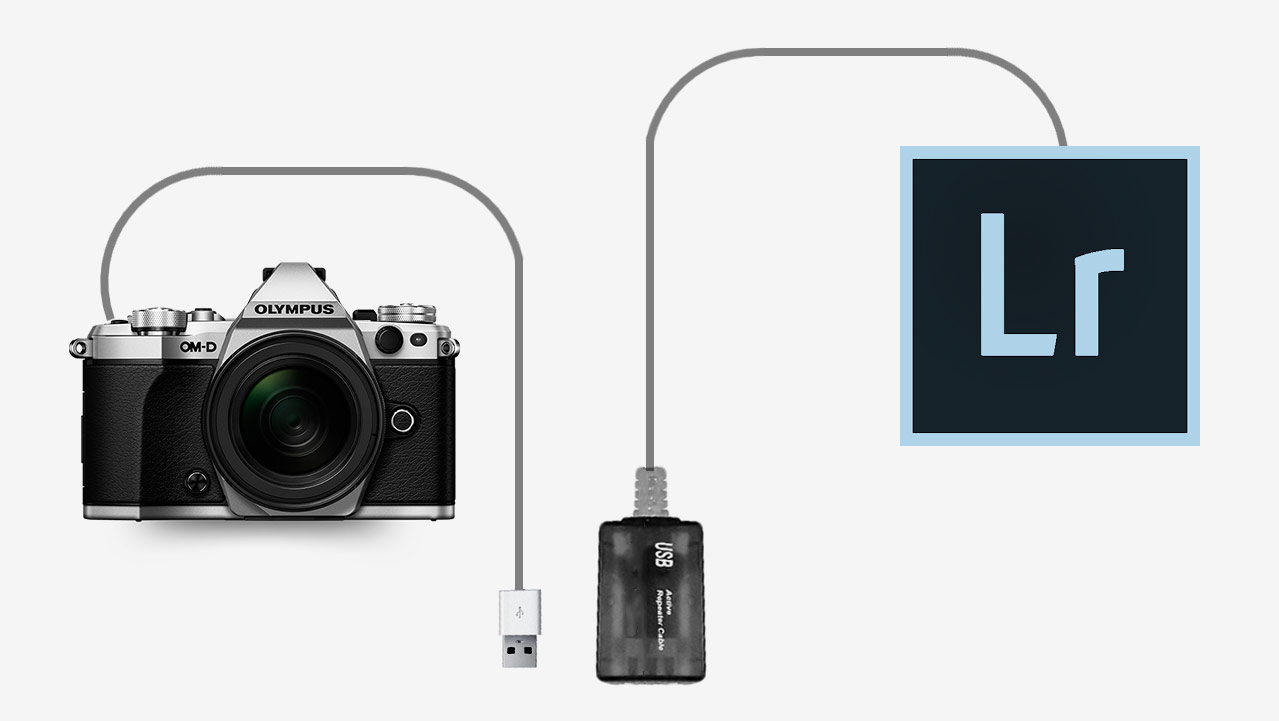
Unless you intend to shoot with your computer less than a metre from your camera (and some photographers do) you’ll want a USB extension cable. The longer the cable the less likely I am to trip over it and the more mobile I can work. However there’s a problem. If your total cable length goes beyond about 5 meters the USB signal will be intermittent or just plain stop.

The solution is to buy something called an Active USB Extension also known as a USB Repeater Cable. It’ll have either a thicker connection at the female end or a little bump in the cable which houses a signal booster and that’s what gets you past the 5 metre limit.Tether-3
4 Shrink the bar
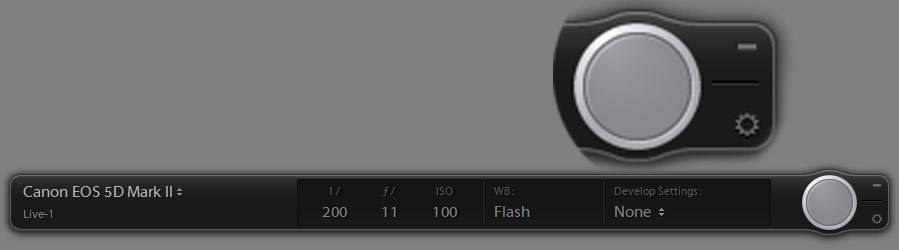
Once everything is set up, Lightroom will auto import you images whenever you press the camera shutter button, plus it has some basic camera controls such as remote firing the shutter and… well, actually that’s it but it will show you a bunch of useful camera information like ISO and aperture.

Of course you may not need to see all that extra info, so to hide it hold the ALT key and click on the – icon in the Tether tools bar’s top right corner. You’ll be left with a single button which you can drag out of the way.Tether-4
5 Not supported, not a problem
Moving from Canon to Olympus caused me a few headaches when it came to tethering into Lightroom. Like most cameras manufactures, Olympus makes its own software for tethering and gives it away for free but it lacks things I need (like full screen reviews or any sort of image editing).  What it does do is auto import photos to a chosen folder on my hard drive which I can then set as a watched folder in Lightoom. Here’s how it works.

With the camera software importing to a preselected folder (how this is done varies from brand to brand) I then go to Lightroom and click File-Auto Import-Auto Import Settings and put a tick in the Enable Auto Import box. Set the watched Folder to be the same folder on my hard drive that I selected in the camera manufacturers software and do the same with the destination folder.Tether-5
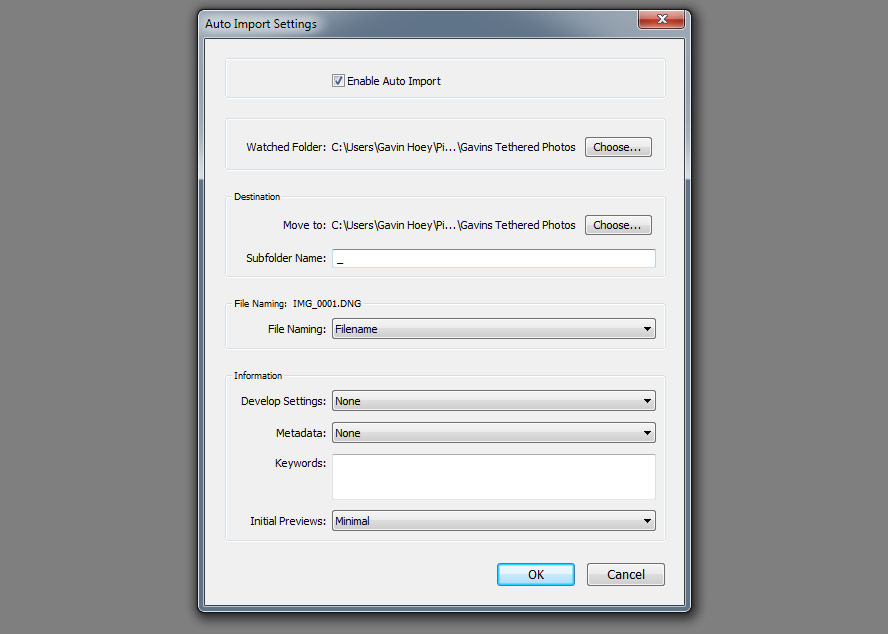
And that’s it, Lightroom will auto import any images that land in the watched folder and they appear on screen about five seconds after I take the shot. Best of all Lightroom remembers these settings, so it’s a “set and forget” process too!

Gavin vs Mark Portrait Challenge

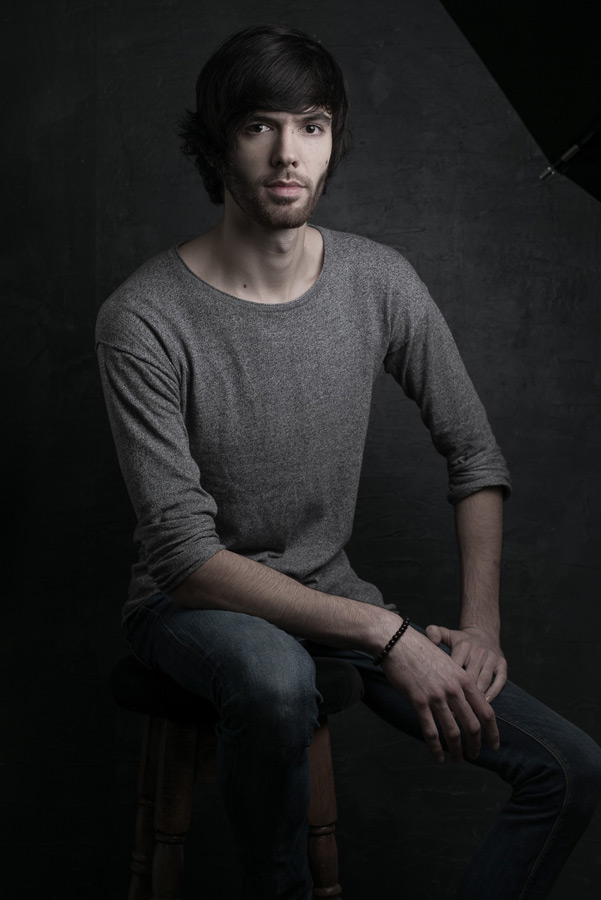
A few weeks back I was honored to have Mark Wallace, my friend and fellow Adorama TV host, stop off at my studio for a couple of days. Mark has been travelling the world for the past 18 months or so and this was the first time in a long time that he’s been shooting in a studio.

Now you probably already know I love a photo challenge, so when Mark suggested a studio challenge I jumped at the chance.

The rules were simple. We’d both use the same studio, same single flash and photograph the same model. We set a 20 minute time limit to include planning and filming and would see each other’s shoot until the end.

Mark went first and you can see his video below.
[youtube]https://www.youtube.com/watch?v=L2aEN6UUDYA[/youtube]

I love what Mark did with the simple lighting and subtle editing. I was also blown away by the quality for the Leica especially as Mark had been telling me it’s probably not a camera that you’d choose for studio portraits

Once Mark was through, I got my turn.
[youtube]https://www.youtube.com/watch?v=FzQr3GTUrwg[/youtube]

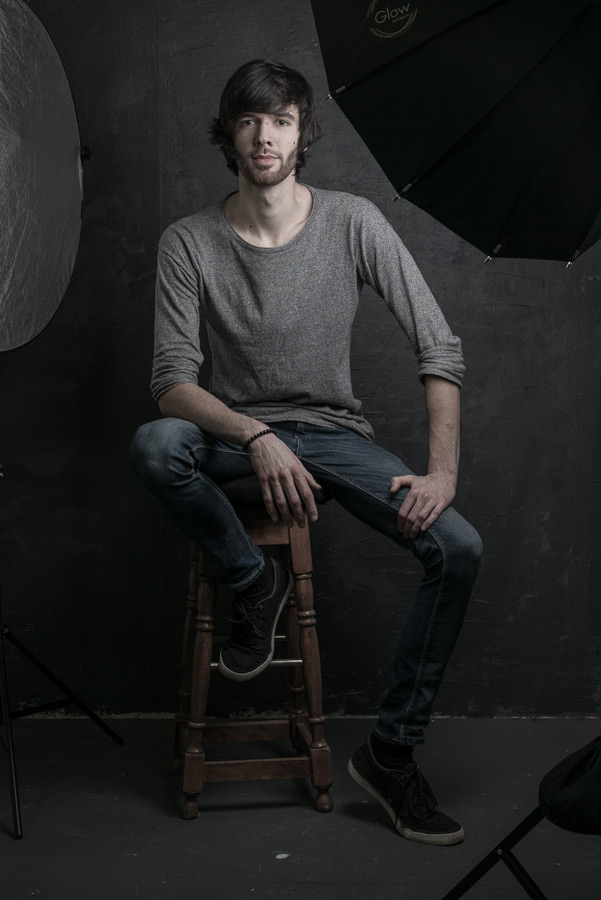
It was great to try out an idea I had been thinking about for a while and as you can see, my image is totally different to Marks in almost every way. I went with a contrasty light, aggressive pose and bags of drama.

The “home advantage” really can’t be underplayed. Remember I was using my gear, a model I’ve worked with before and I had the props hanging around in my studio. Even so I think it says a lot about how the photographer adds to the image when two of us can come away with such different emotions from the same subject using the same light.

Most of all it was a huge amount of fun and that’s what photography should always be about!


My best of 2015

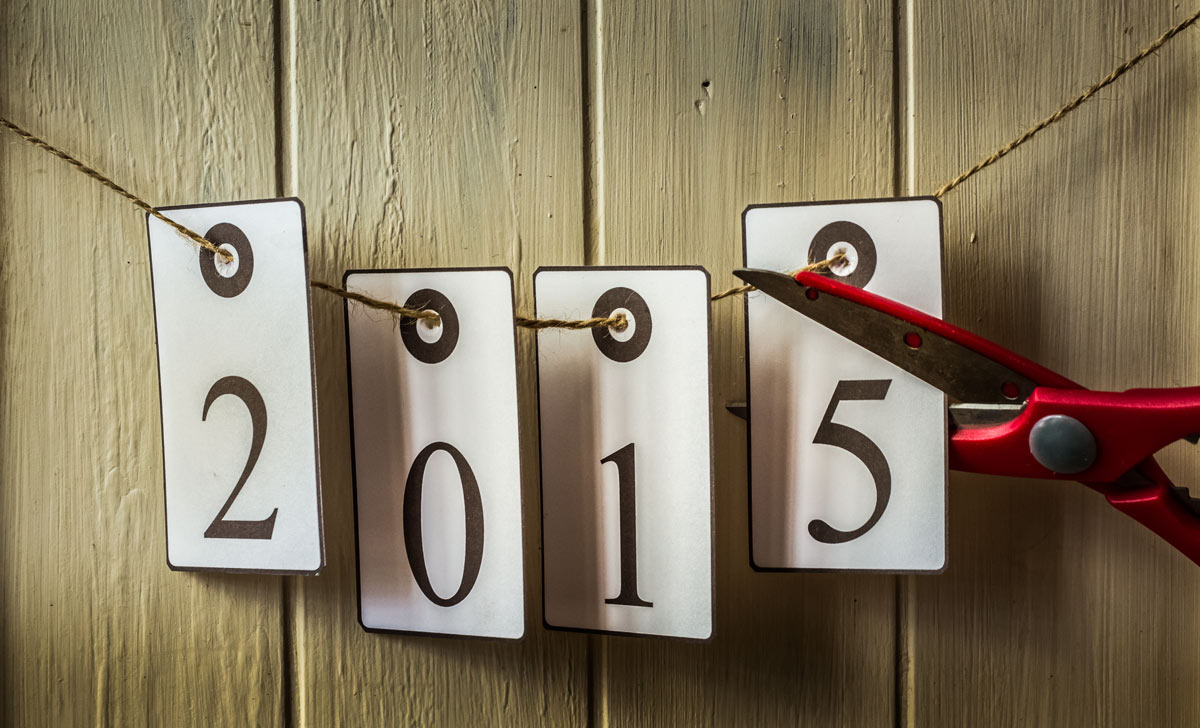
2015-6With the year drawing to a close, now seems like a good time to take a moment and look back at what I did with my camera during 2015. A lot (but not all) of my time goes into making videos for Adorama TV and in 2015 I made 26 of them, which have had over 1.4 million views so far.

So here are a few of my personal highlights. If you have your own, please leave me a comment.

Most watched video
At 150,000 views in just over 5 months, my “day to night” video for Adorama TV has easily been the most watched video I made in 2015. As anyone who makes YouTube videos will tell you, it’s almost impossible to predict which videos will become “popular” and often it’s not the ones you would expect, or perhaps that should be wish.

[youtube]https://www.youtube.com/watch?v=aGsQxXUEvc4[/youtube]
However I’m really thrilled this video has taken off. It was a sound idea that took a long time to plan but was great fun to shoot. Best of all I the final photos came out even better than I had hoped.

Most fun video
It’s tricky to choose just one as I enjoy them all in different ways. But the poker player shoot I did with Brian back in February was a very memorable one.

[youtube]https://www.youtube.com/watch?v=kum6KjmToYU&index=22&list=PL821B7D720DEA39FA[/youtube]
I know absolutely nothing about poker and as it turned out, neither did Brian. Fortunately Brian is an excellent actor as well as a model and once the technical bit was out of the way, he excelled in the role. I loved the range of emotions he produced although some of that may have come from drinking the “whisky” which was in fact cold tea!

Video I’m most proud of
usually my videos are all about taking and making a great shot but back in June I made a video that was more technical than usual. It covered how focal length can affect the compression in a photo.

For years I’ve listened to photographers go on about how they use a longer focal length lens to compress the foreground and background but that’s actually not strictly true. Yes they used a longer focal length lens but it’s camera to subject distance that does the compression and in this video I prove it… although I still get photographers telling me I’m wrong!

[youtube]https://www.youtube.com/watch?v=GbESqYkodmQ&list=PL821B7D720DEA39FA&index=14[/youtube]
I had photography students firmly in mind when I made this one but I know a few “expert” photographers who learned from it too.

Most fun photo shoot
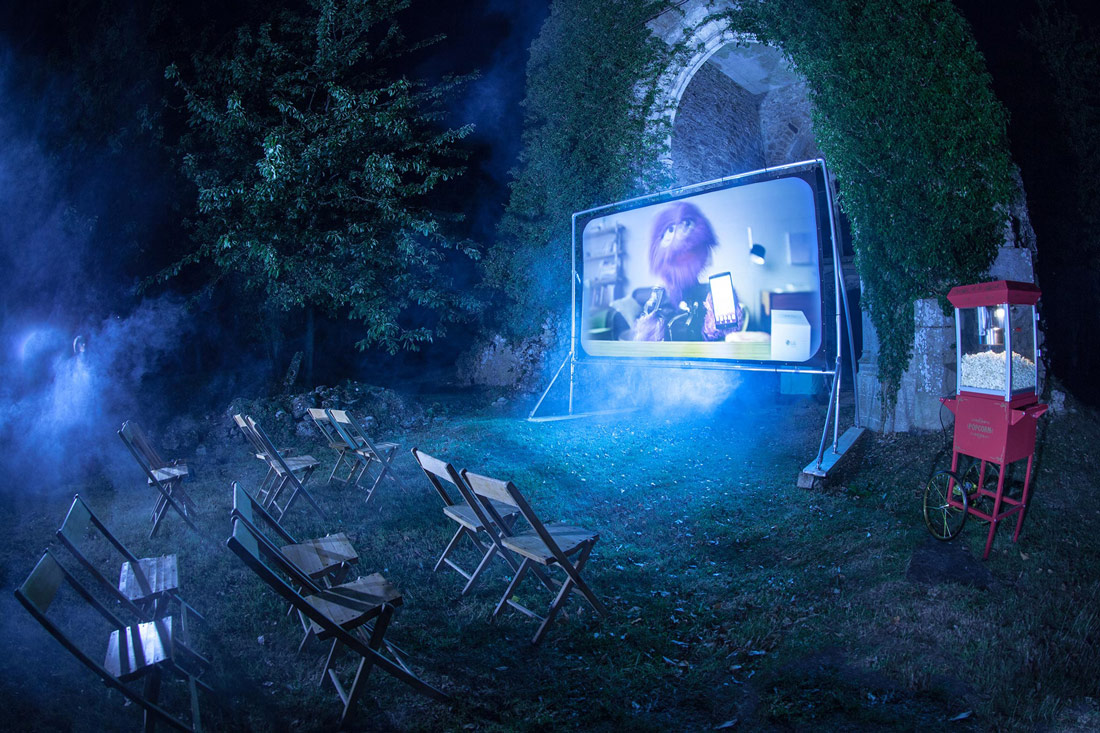
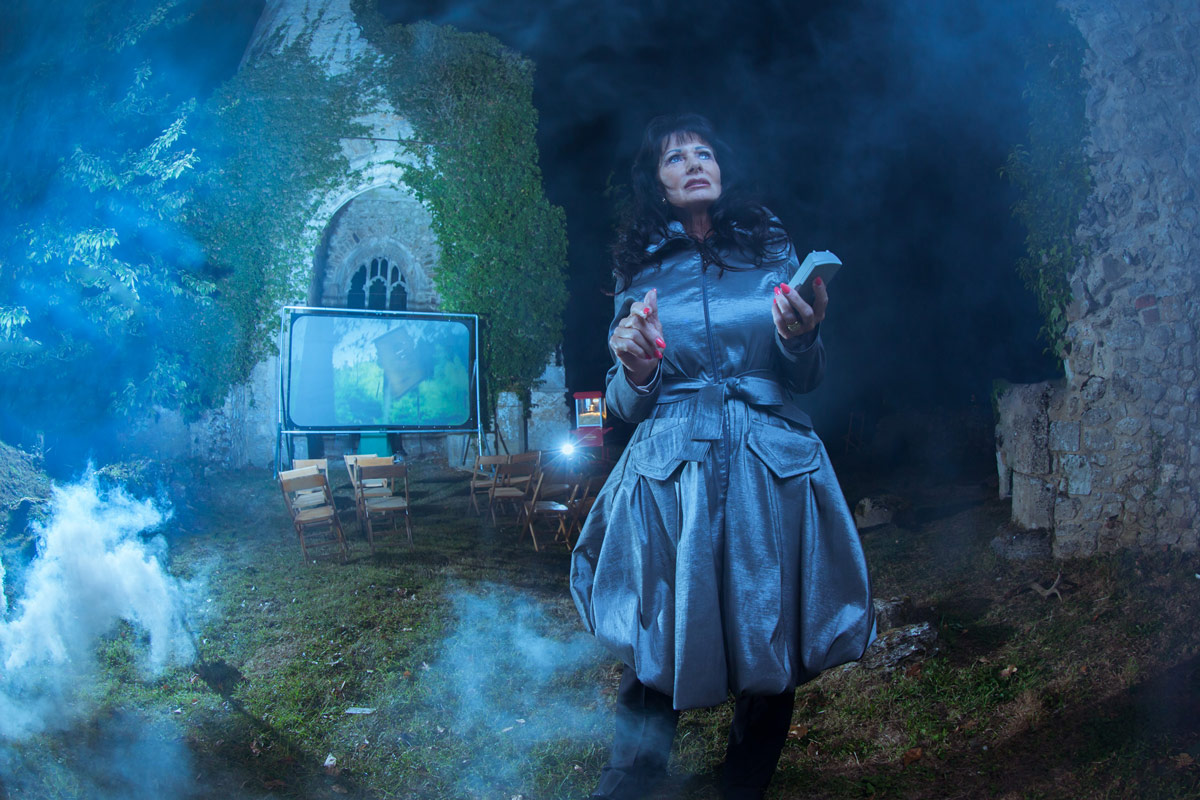
I don’t just make videos, I’m also a full time photographer. I always throw myself in to any shoot but occasionally a job comes along that really stands out. The best example of that in 2015 was a PR shoot I did with LG mobile and the Three network here in the UK.

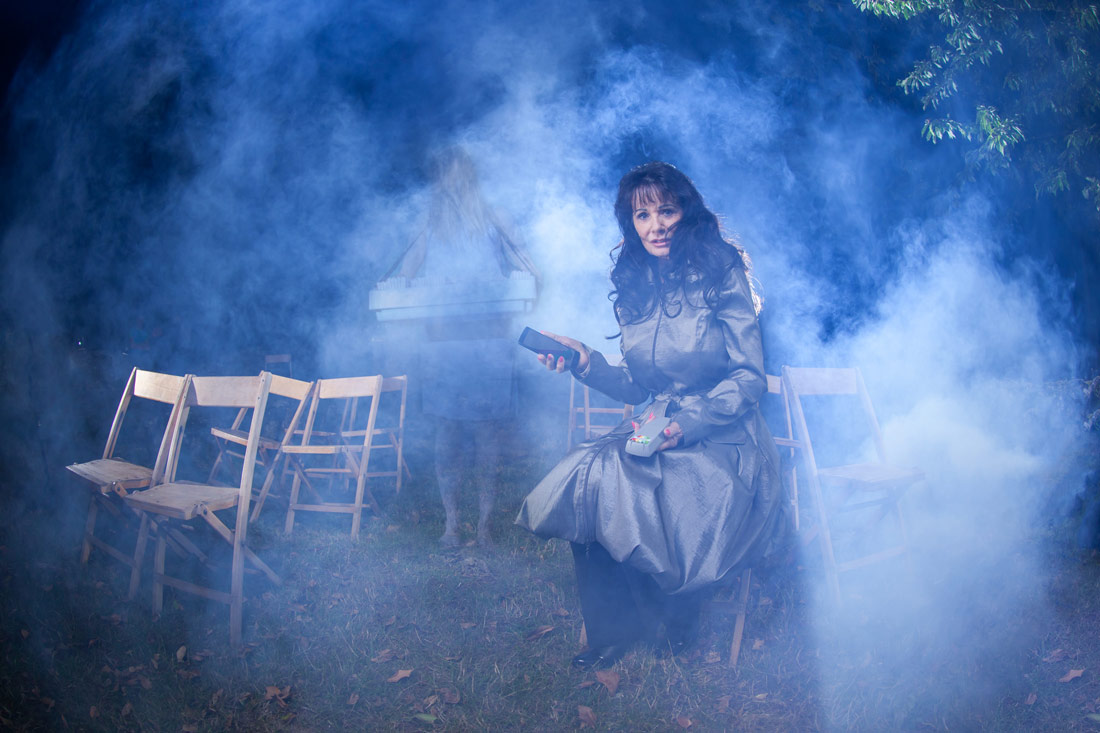
When I got an email asking if you can photograph a medium and ghosts at a ruined church in the most haunted village in the UK, I jumped at the chance. The full brief included shooting a spooky outdoor cinema in the dead of night at a location without power… I loved it!

As you can see from the photos, things got very spooky and smoky. Our medium arrived late at night having just come from a séance but I guess my lights must have frightened away the spirts as she was unable to detect any ghosts until I was packing my gear into the car!

Best “Subscribe” ending
Do you watch my videos to the end? If you do then you’ll know I like to have fun with the “Subscribe” button. And yes I do spend far too much time on it.

This year I’ve made the subscribe button float in a balloon, appear on a London bus and ripple at the bottom of a fish bowl.

But my favourite subscribe button was at the end of my 15 minute photo challenge at the Pantheon in Rome. Chiselled on to the 2000 year old wall with just a little help from Adobe After Effects, this subscribe button took a fair bit longer to make then the rest of the video took to film!

[youtube]https://www.youtube.com/watch?v=9XaF-IPSwJo[/youtube]

5 Questions about flash meters

One of the very first lighting accessories I brought was a flash meter, in fact the same meter gets used and abused almost every time I use manual flash. I’ve used my handheld flash meter with speedlights and studio flashes of all makes, I use it in the studio and on location. Honestly, I couldn’t work without it.

If you’re thinking of getting your own flash meter or already own one but are not sure how to get the best from it the video below should help answer some of the most common quesions.

[youtube]https://www.youtube.com/watch?v=UG4P-Odutr8[/youtube]

Not a video viewer? No problem, try this instead.

1 Can’t I just use my camera meter?
Nope, you’re camera meter is designed to work with continuous light and can’t react fast enough to meter flash. However you can use your cameras LCD to review the photos and adjust the flash power based on what you see. This trial and error approach is OK but does have its drawbacks… see the video for more on this.

2 Do all meters work the same?
Well, they all meter the light so at a basic level they’re all the same. In my case I simply set the meter to match my camera’s ISO and shutter speed and when the flash fires I can read off the aperture.

Of course there’s plenty of advanced flash meters around that have features that might make life a lot easier for you. Some meters can measure the amount of ambient contamination in your shot, others can figure out lighting ratios and there’s even some which have pocket wizard radio triggers built into the meter itself.

3 How do I fire the flash?
That largely depends on the flash meter. On my Sekonic L-308s I prime the meter by pressing a button on the side and then fire the flash by pressing the “test” button on either the flash or radio trigger.

Other firing options include attaching a PC Sync cable from the flash to the meter or as I previously mentioned, finding a meter that has a built in radio system (such as Pocket Wizard)

4 Where do I point the meter?
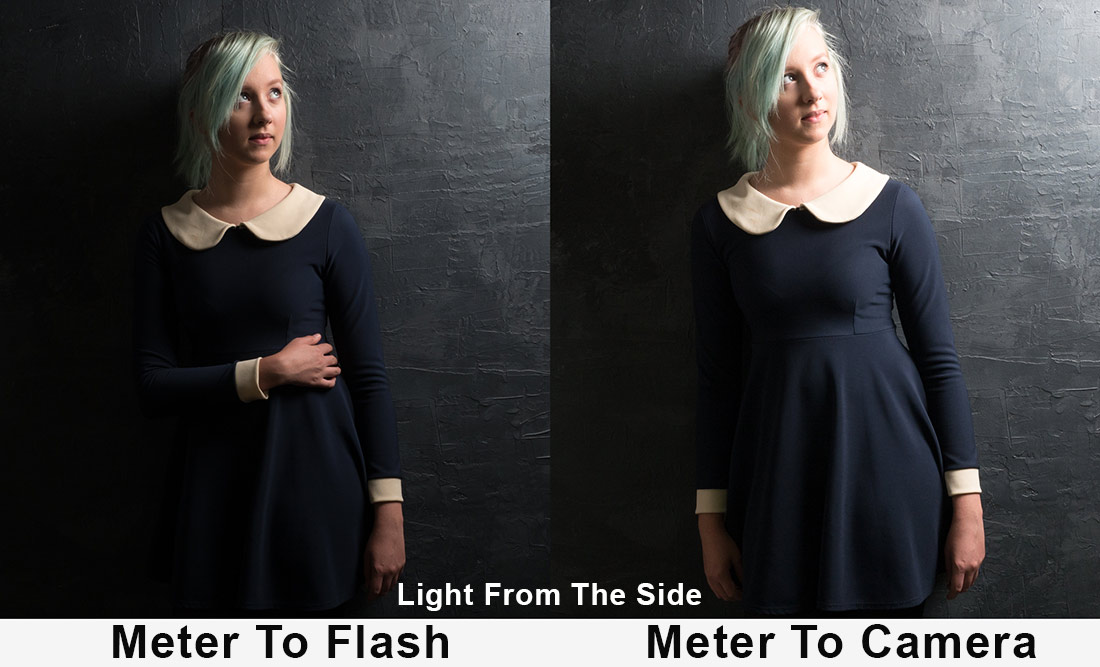
This is the question that usually sets off much debate among photographers. For me it’s always… Point the meter at the light, however as you’ll see in the video, if the light is mostly coming from the camera position, the same exposure is recorded by pointing the meter at either the flash or the camera.

Meter-Before-After

One mistake a lot of photographers make is to place the meter in the shadow cast by the chin or by the models hair etc. It’s easy done, so if the meter is telling you something that feels wrong, move the meter and try again.

5 Do I really need one?
No, you can do the trial and error way of working and get very good exposures. However if you move or modify the light you’ll need to do the same work all over again.

A flash meter saves time on a shoot and gives you extra confidence in nailing the correct exposure. However it’s always worth remembering that correct exposure isn’t the same as perfect exposure so it’s a good idea to ignore the meter from time to time and get a little experimental with your shots.

Lastly there’s one more reason for using a flash meter and it has nothing to do with how it works… Just like shooting with a big camera, the untrained eye can equate using a flash meter to knowing what you’re doing. Now, whether that’s a good or bad thing I’ll leave up to you.

5 times your camera meter will be wrong

Camera metering systems are pretty amazing and I’m usually very happy for the evaluative metering systems in my cameras to figure out the exposure and leave me to get on with sorting the composition.
But no matter how smart modern metering systems become, there are still times when they can get fooled, so here’s 5 times you might want to ignore what the camera tells you and go your own way.

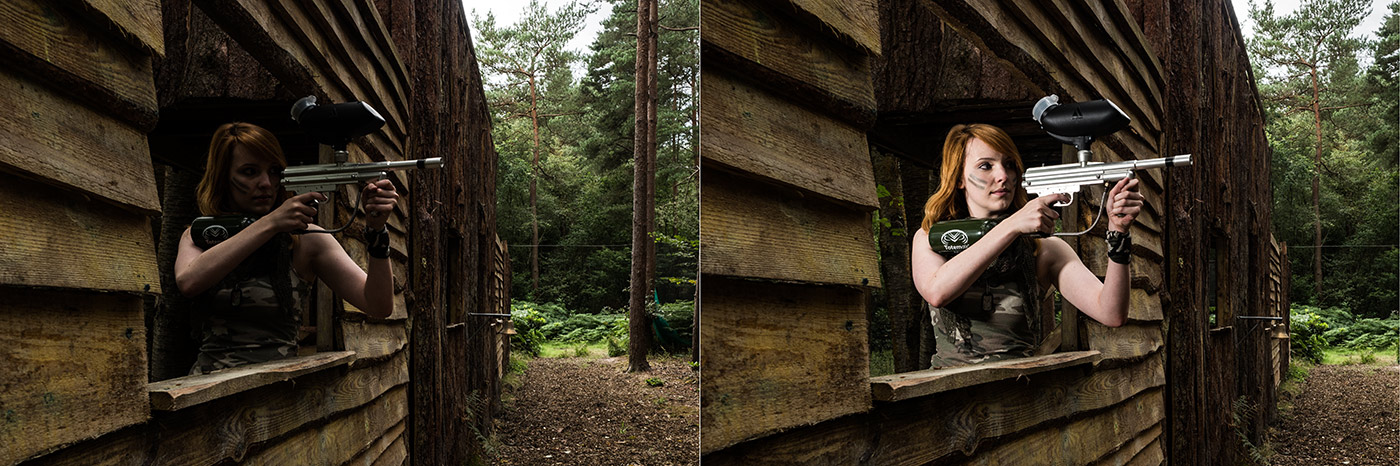
1: Light coloured subjects
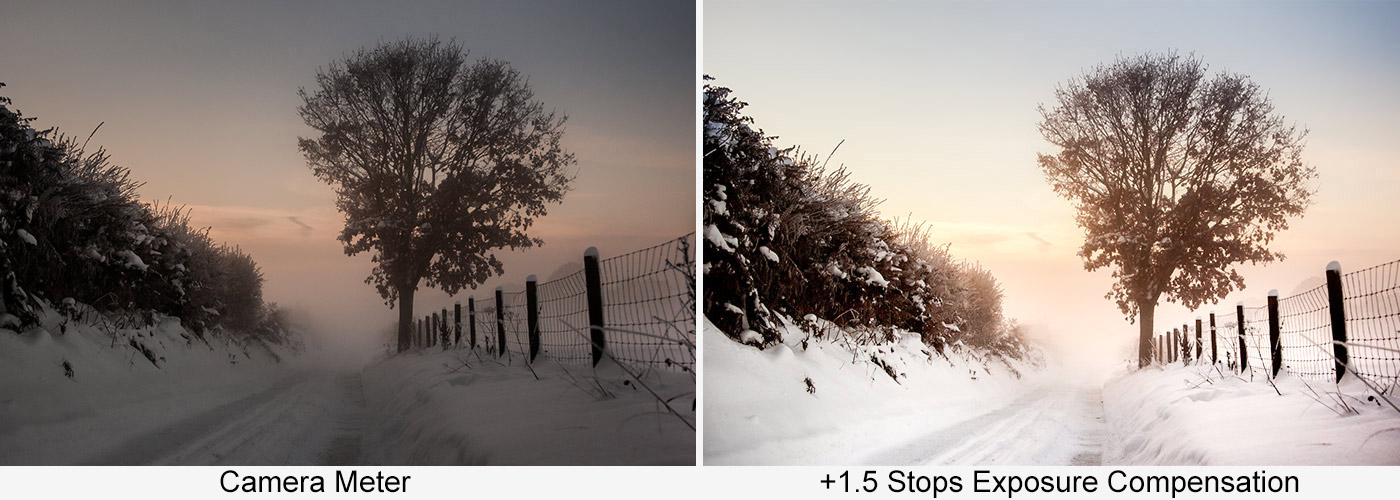
Meter-1White in a photo looks amazing especially when it’s clean and pristine. The trouble starts when there are lots of white or light colours in your shot. Why? Because cameras assume that most photos average out to a middle grey tone. Whilst that’s more or less true most of the time, large amounts of bright colours can fool the meter into under exposing and making your photos darker than expected
Solution: Dial in positive exposure compensation

2: Dark subjects
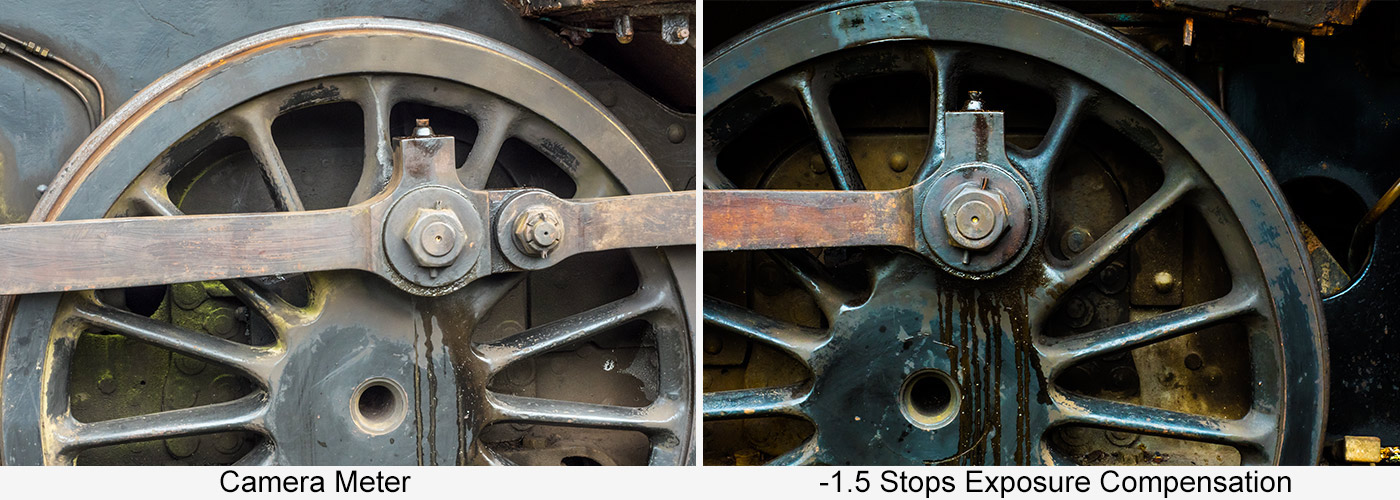
Meter-2The other side of the coin is also true. Dark, low key subjects will become artificially bright (over exposure) if the meter is left to its own devices. Just like with light tones, the more dark tones you have in the shot, the more incorrect your meter will become.
Solution: Dial in negative exposure compensation

3: Off camera Flash
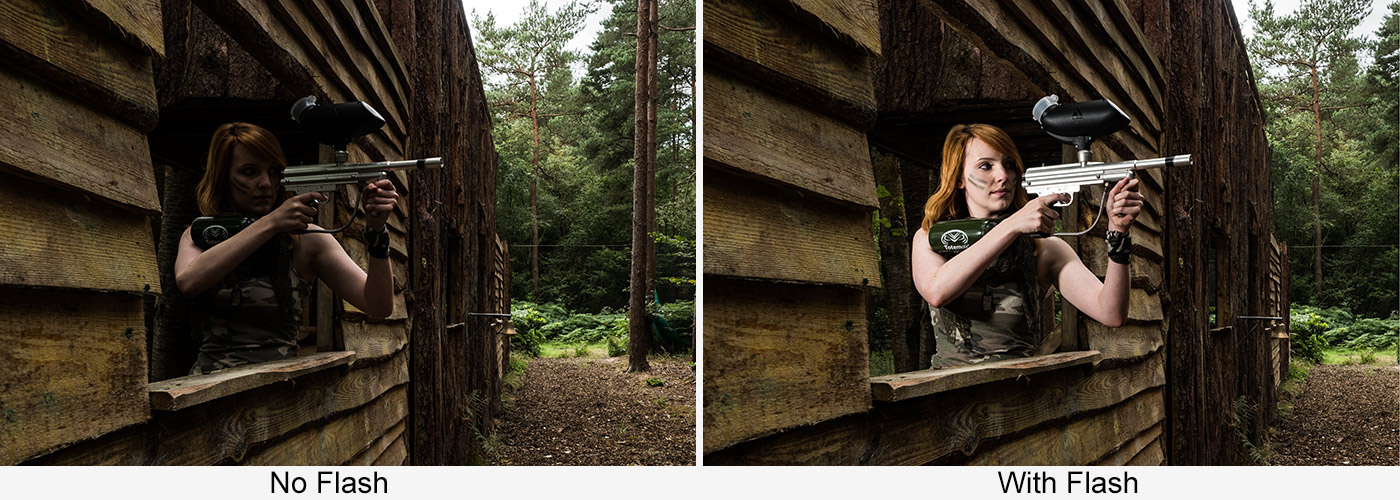
Meter-3Camera meters work great with ambient light but flash is a very different animal. If you have a dedicated speedlight attached to the cameras hotshoe, then things generally go well but take the flash off the camera and you’ll find yourself on your own for metering. Put simply, the flash of light is way too short a time for the cameras meter to measure the light.
Solution: Switch to manual mode and use a flash meter

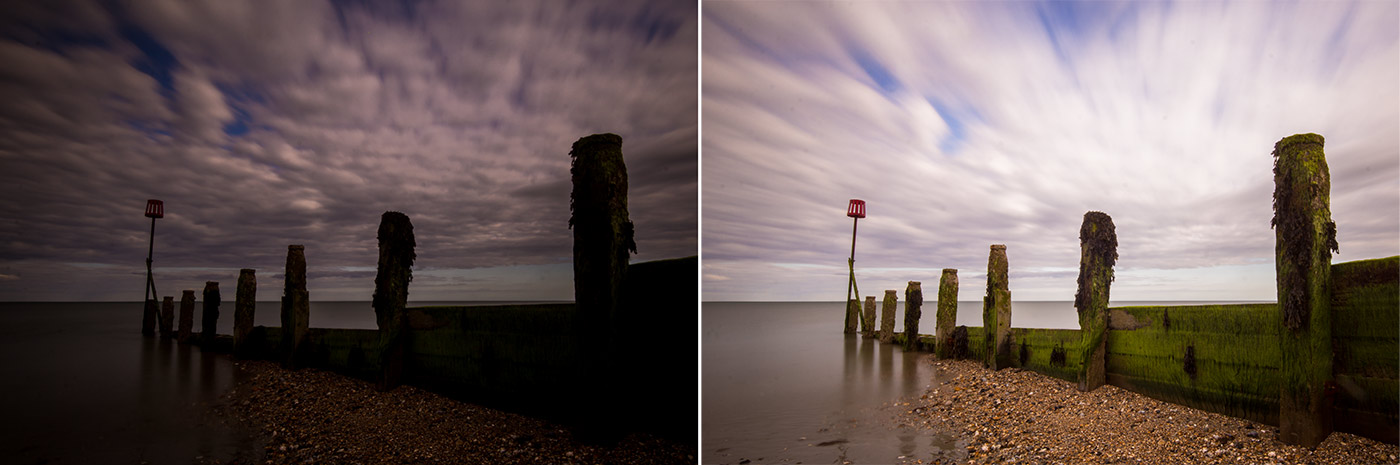
4: Long Exposure with ND Filters
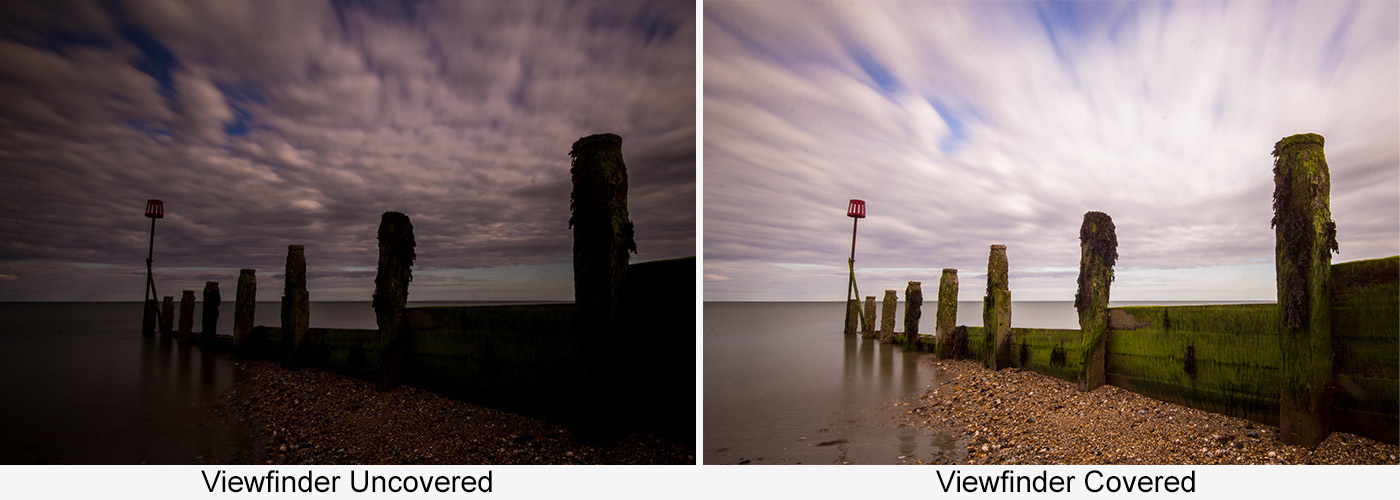
Meter-4Super dark 9 and 10 stop Neutral Density filters can push shutters speeds to extreme lengths and create amazing eye catching shots, they can also cause exposure issues. This problem is confined to DSLR shooters and happens because light can leak back through the viewfinder bounce off the mirror and cause an exposure error.
Solution: Cover the viewfinder… or go mirrorless!

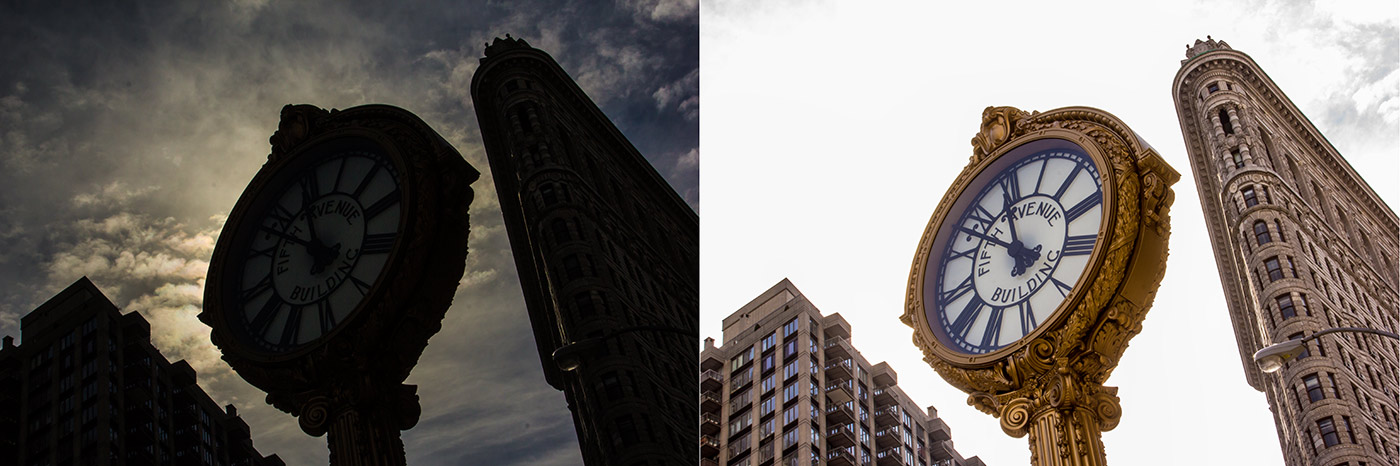
5: Back light
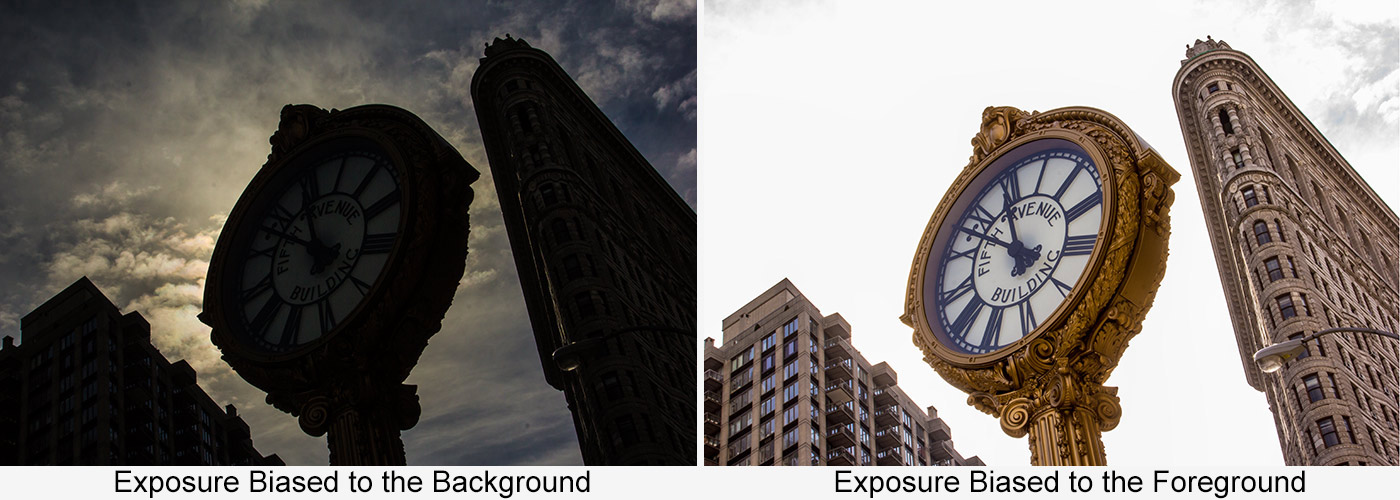
Meter-5This is where random things can happen. Picture the scene. You have a background that’s brighter than your subject, perhaps it’s a building against the sky. One of two things can happen if you let the meter do its own thing. Either you get detail in the sky and the buildings go black or you get detail in the buildings and the sky goes white. Murphy’s Law dictates whichever happens you wanted the opposite.
Solution 1: Dial in positive exposure compensation if you want more detail from the shadows
Solution 2: Dial in negative exposure compensation if you want more detail from the highlights

How Focal Length Affects Your Background

There are many reasons for choosing one lens over another and which one you shoot with can have a massive impact on the final photo. Like many photographers I love the flexibility of zoom lenses and often have to make the choice of shooting with a wide angle and short telephoto lens. At first glance the choice of lens is pretty obvious… if I want to go close I shoot with a telephoto focal length and if I want to see more I zoom out with a wide angle focal length.

Look around on the internet or ask your photography peers and you’ll find that the general consensus is that wide angle lenses increase perspective distortion and telephoto lenses compress background. It’s common knowledge but sadly, it’s also not true… although I completely understand why so many photographer think it is.

[youtube]https://www.youtube.com/watch?v=GbESqYkodmQ[/youtube]

In the video above I explain and show how changing focal length alone doesn’t affect compression or distortion but moving your feet does

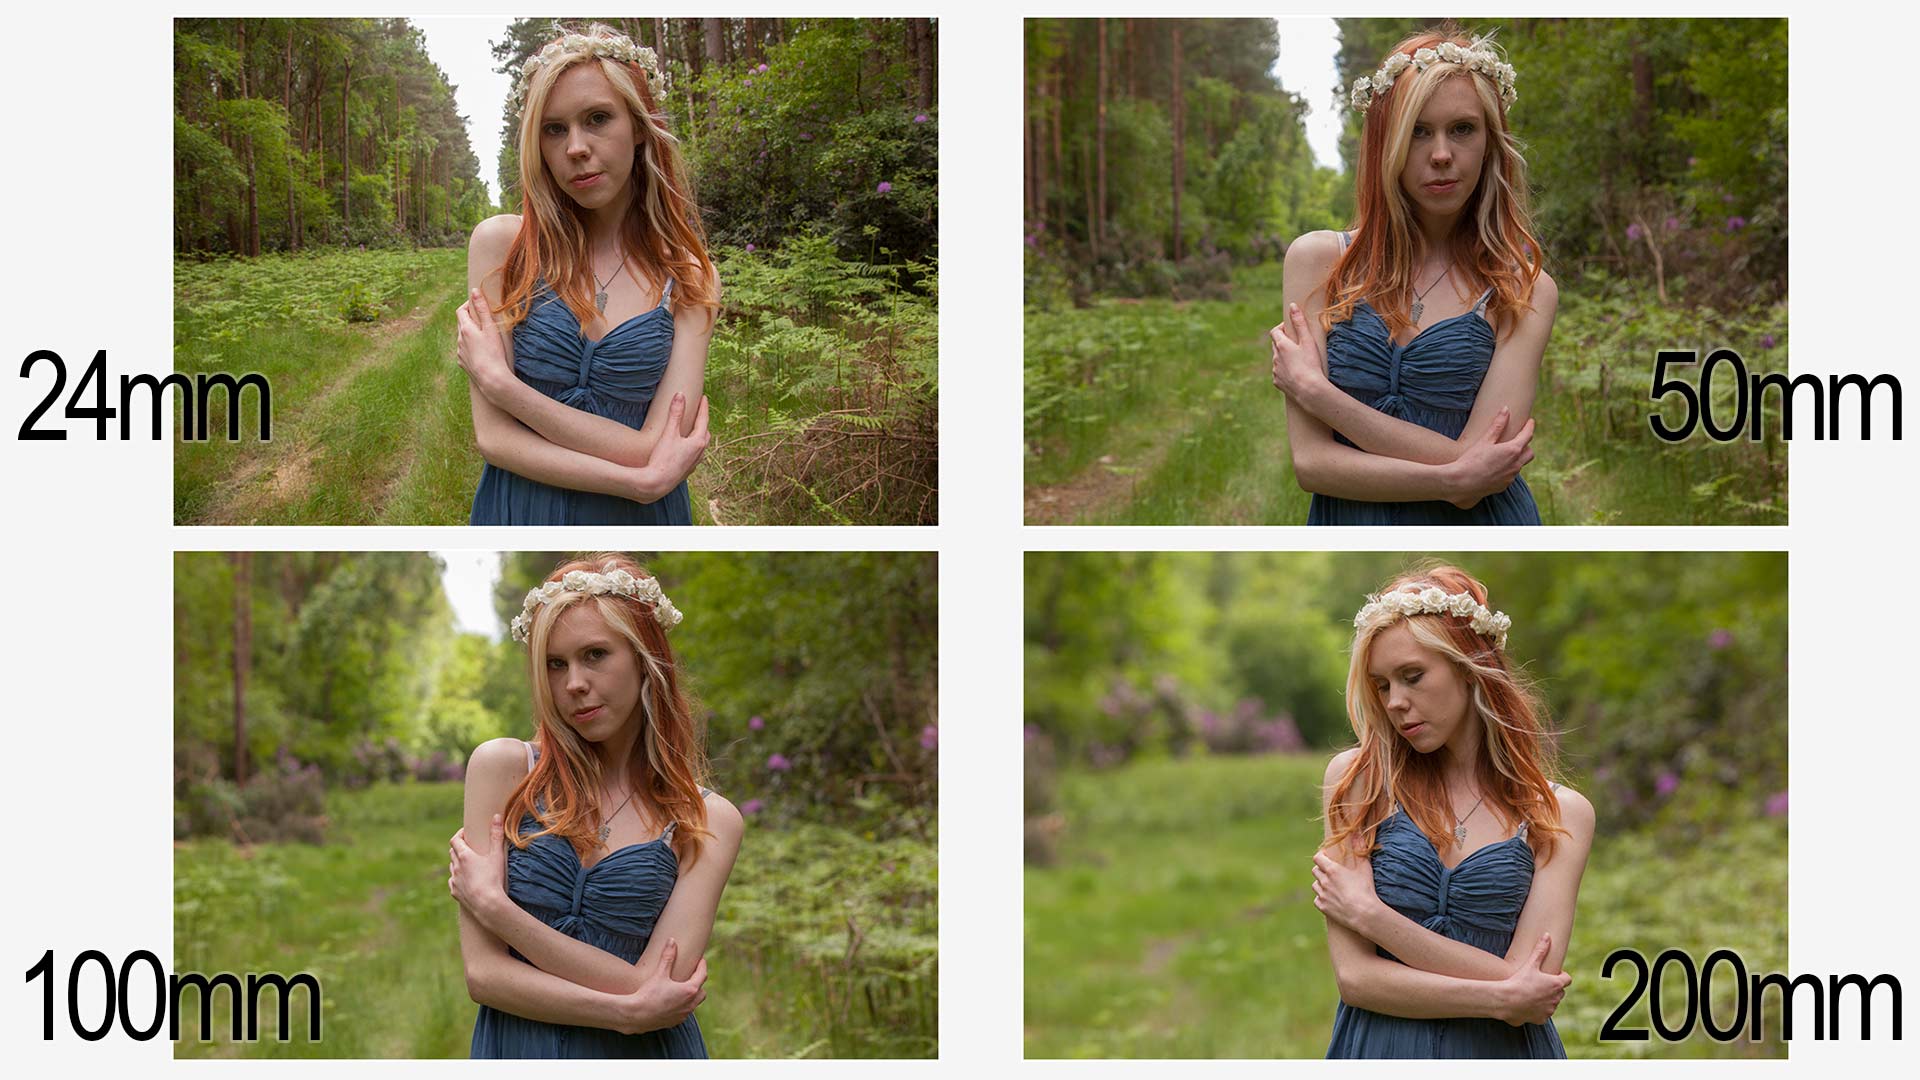
Google focal length compression and you’ll see photos like the one below and as you can clearly see the more I zoom in the more the background appears to grow in relation to the model. We call it background compression and it’s a really handy trick to learn.
Compression-ALL

But in order to keep my model (The amazing model Fern Meave ) the same size I had to increase my shooting distance as I zoomed in and it’s that increase in distance that causes the background to compress. Let me say that again…
Increasing your focal length does NOT compress your shot, increasing your distance from the subject does. Unless you want your subject to be small, once backed up you have to zoom in to maintain the composition and that’s why so many photographers will tell you telephone lenses compress your shot.

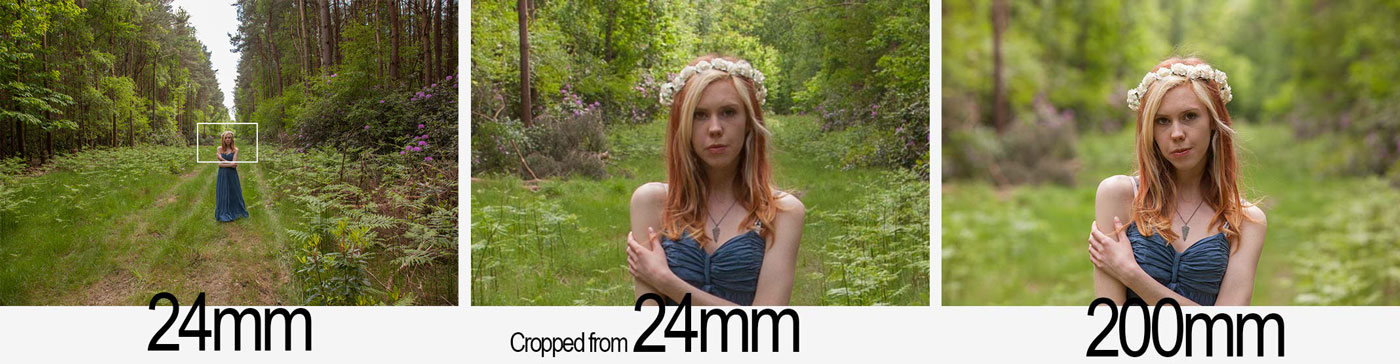
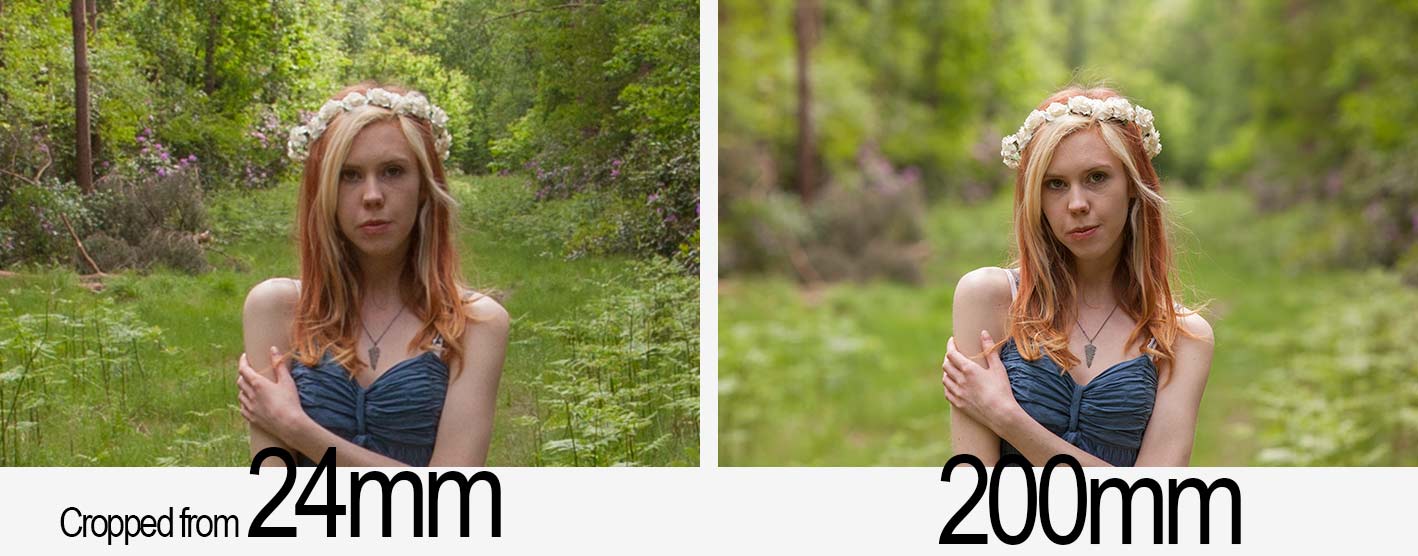
To prove the point. Take a look at the photos below. For the one on the right I used a 200mm lens, the one on the left is a from a shot taken with my 24mm lens and the middle image is a tight crop from the centre.

lens-compress-debunk

The distance from myself and the model was the same in each shot, only the focal length changed. Spot the difference?  Ignore the the depth of field difference between the two shots, that’s a side effect of the different focal lengths and I’ll save that for a future blog post. There really is no difference in compression and perspective distortion when you change lens focal length.

So if background compression isn’t caused simply by zooming in, do wide angle lenses increase perspective distortion? No they don’t (excluding exotic lenses such as fisheye’s). With a wide angle lens you often go close to fill the frame and that increases the distortion. In theory you could take a wide angle shot using a 200mm lens, you’d just need to take lots and lots of images and join them together like a jigsaw puzzle. Search Google for Gigapans to see this in action.

Still not convinced? Here’s a simple test to try, no camera required… next time you’re in front of the bathroom mirror, get your head really, REALLY close. Close one eye and look around at your refection. Your nose will look huge, your ears will look small and all because you’re close to the mirror. Step back and your face will appear as normal as it was before.

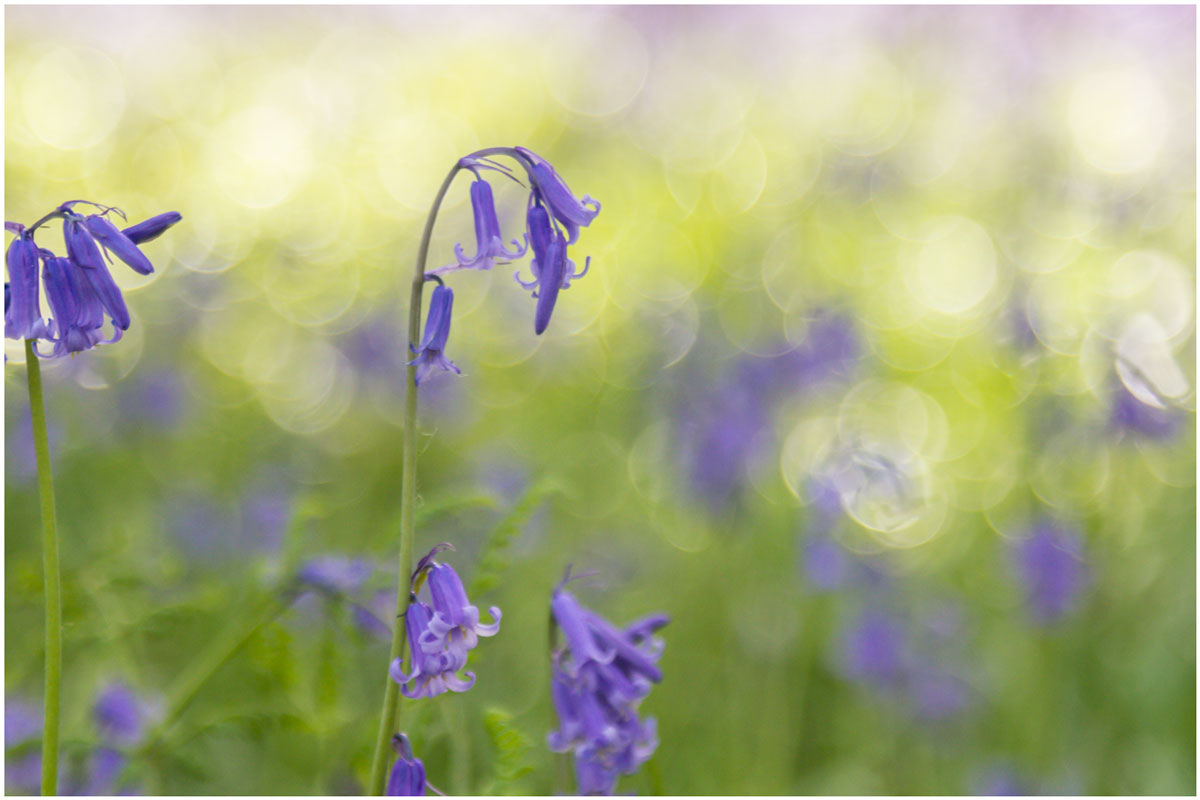
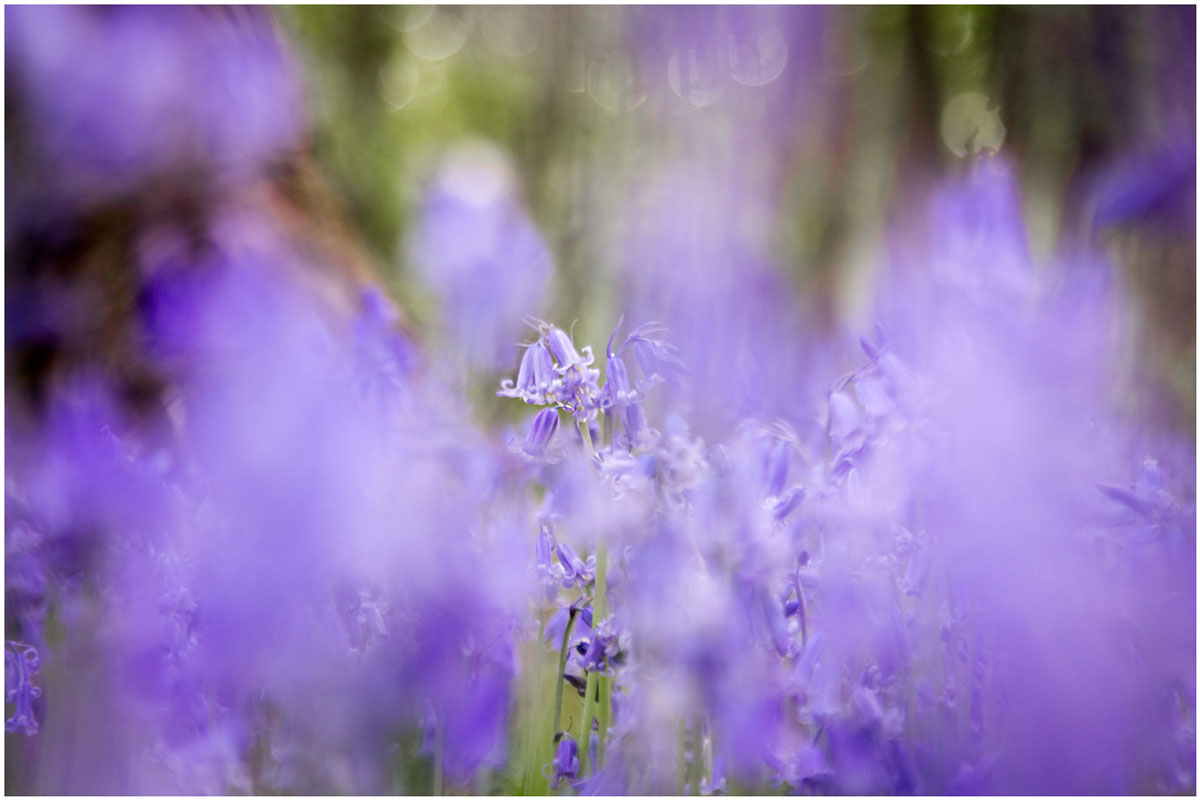
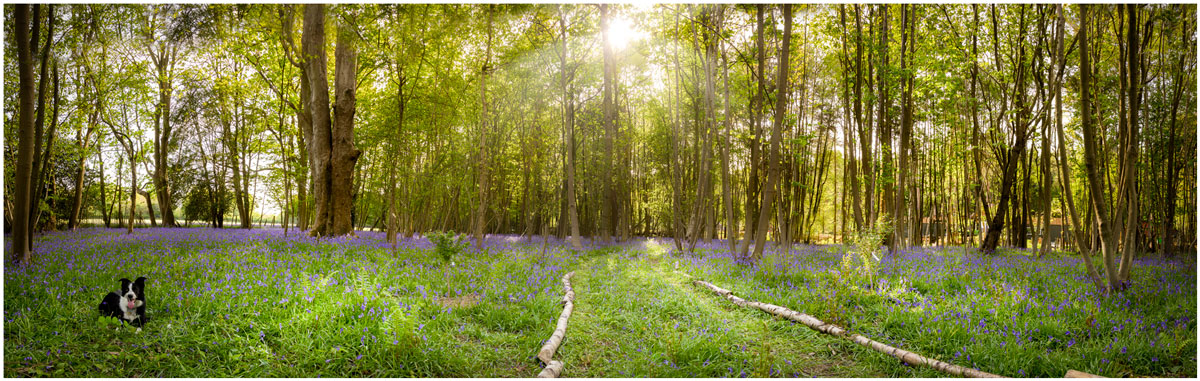
Bluebell 15 Minute Photo Challenge

I’m a sucker for bluebells, so when I got the chance to shoot some at a local wood I grabbed it. The bluebell season can be very short but there’s still something to be said for waiting for the right light and shooting at the right time of day. For me that meant late afternoon when the sun was low but not so low that it would make the woods very dark.

Bluebells, like many flowers, are a bit top heavy so as well as picking the right light I wanted to avoid shooting on a windy day. Luckily everything came together so I packed my camera and by 24-105mm lens and set off to do another 15 minute photo challenge.

[youtube]https://www.youtube.com/watch?v=2b0trjfaRok[/youtube]

Bluebell-1jpgBluebell-2Bluebell-Pano

Getting your photography noticed

Recently I recorded a series of short videos as part of the Lovers of light” photography competition. In this clip I have a few words to say about getting your work noticed.

[youtube]https://www.youtube.com/watch?v=10TGbr0XfTQ[/youtube]

Who’s your audience
The first step to getting your photography noticed is deciding who you want to be noticed by. Are you trying to attract customers, looking to reach corporate clients or seeking the approval of your photography peers. If you know your target audience you can start planning a strategy to reach them.

Find your style:
Shoot what you love and it will show in your photos. It might be that you have a hobby or sport that combines well with photography or maybe you have a passion for a type of photography and want to explore it.

If you shoot and share a random selection of photos your audience will be most likely be the same.

Develop your style:
Sticking to a style that you can explore and develop will also help you develop a band of followers who share your style. But don’t get stuck in a rut, challenge yourself to try new ideas within your area of photography. Look at the work of photographers you admire and try and emulate their shots. Don’t try and reproduce the same shot exactly but give it your own spin.

Be Social:
Social media is a great way to talk to fellow photographers and share your work. Post new photos to your social media channels regularly and post your work to more than one place. Stick at it, the more you post the greater the chance you’ll break through.
Don’t give up!

And finally, enter competitions. Even if you don’t win you’ll gain experience and have a reason to shoot more. Remember the first  step of winning a competition is to enter. http://www.velux.co.uk/loversoflight

Tips for buying a camera

With the January sales either looming or already here, you might be considering buying a new camera. Now I’m not going to tell you which brand and model of camera you should choose as there are countless options out there and not one of them is right for everyone. However here are some things to consider when buying a camera

[youtube]https://www.youtube.com/watch?v=_P_3lgXYkpM[/youtube]

The two most important questions are…
What sort of photography will you be mostly shooting?            
How much do you want to spend?

Answer those and your search can begin in earnest.

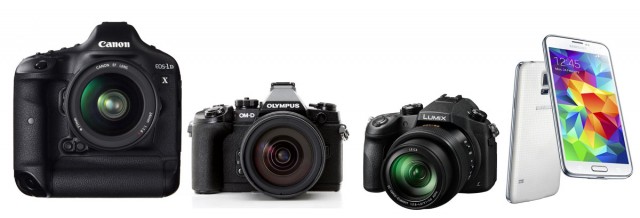
camera-type

There are basically four types of digital camera. DSLR, Compact System camera (CSC), Bridge Camera and Mobile phone. All types have their pro’s and cons

If you’re want the best quality images then DSLR is probably the way to go. If you’re after great quality but with less bulk the CSC is the answer for you. Need portability and flexibility? Then a Bridge camera could be the answer. If you just want a point and shoot then the mobile phone ticks that box.

Don’t forget the lens. If you’re buying a DSLR or CSC then you’ll need to budget for a lens or two. When it comes to image quality the lens you use can make a bigger difference then the camera it’s attached to.

Bridge cameras are famed for their super long zoom lenses but often that comes at the expense of a true wide angle. The lens is built into the camera so make sure it can do what you want before you buy one.

Mobile phones can get a hard life inside pockets and bags. Before you take a photo check the lenses is clean and scratch free.

Whatever style of camera you choose and whatever name is printed on the front, remember it’s the person behind the camera that makes truly great photos happen.

Home Studio Essentials Episodes 1-10

If you’ve been watching my recent videos over on Adorama TV you’ll have noticed a pattern forming. Over the past months the majority of the videos have focused on shooting with flash in a small, home studio and judging by the feedback it seems to have gone down very well indeed. I think part of the reason for their popularity is the way each video builds on the previous skills learned, at least that was the idea I had when I originally planned them.

HSE-MontageGear is always a big part of photography but none of the videos need a specific brand of equipment to complete. I used my trusty Canon 5D2 and 24-105mm lens. My flash gear is supplied by Adorama and is their amazing Streaklight flashes. If you want to know more then you can read my review.

To save you digging through my blog / YouTube to find them all I’ve added them all here.

Episode1: One bare flash
[youtube]http://youtu.be/hR4DW7dXOsk[/youtube]

Episode 2: One flash with an umbrella
[youtube]https://www.youtube.com/watch?v=ur58XNQwMXA&list=PL821B7D720DEA39FA&index=11[/youtube]
Episode 3:One flash and a softbox
[youtube]https://www.youtube.com/watch?v=z0MTQFYnvQA&list=PL821B7D720DEA39FA&index=10[/youtube] 
Episode 4: One flash and a reflector
[youtube]https://www.youtube.com/watch?v=TYQh9MNC3Is&list=PL821B7D720DEA39FA&index=9[/youtube] 
Episode 5: Adding a second light
[youtube]https://www.youtube.com/watch?v=FcQg0cBncHs&list=PL821B7D720DEA39FA&index=7[/youtube] 
Episode 6: Using honeycomb grids
[youtube]https://www.youtube.com/watch?v=K-C9xgTCLfM&list=PL821B7D720DEA39FA&index=6[/youtube] 
Episode 7: Using coloured gels
[youtube]https://www.youtube.com/watch?v=sR0wu9Sy6GM&list=PL821B7D720DEA39FA&index=5[/youtube] 
Episode 8: Getting a white background
[youtube]https://www.youtube.com/watch?v=RP4IixDOP5M&list=PL821B7D720DEA39FA&index=4[/youtube] 
Episode 9: Softbox as a white background
[youtube]https://www.youtube.com/watch?v=wy0VZEhwtSU&list=PL821B7D720DEA39FA&index=3[/youtube] 
Episode 10: Hair / seperation light
[youtube]https://www.youtube.com/watch?v=PaDUIqdQpPM&list=PL821B7D720DEA39FA&index=2[/youtube]