NYC here I come!

Next month, for three days only, I’ll be in New York City and thanks to Adorama I’ll be sharing part of the experience with as many photographers as possible.

If you’re in New York on Tuesday 25th February I’d love to meet you. I have a whole day of photography talks and demo’s lined up and the best bit is… it’s all FREE!

Full details are over on the Adorama website. It’s a ticket only event and very much first come first served so bag yours now!

If you can’t join me in person then you can still join me online. The plan is to live stream a small part of the day, so no matter where you are in the world you can join me live! More details to follow.

Panorama Post Processing Tips

It feels like I’ve been planning to live stream forever but today it finally happened for real. In this live video I run through some of my post processing tips and tricks to go from a bunch of pretty average RAW files to the pano you see here. Being a streamed video there was a chance for me to answer questions from the live chat, obviously that’s not possible now but if you do have any question feel free to add them to the comments below.

Tower Bridge ViewOne the great things, and frustrating things, about making pano’s is not knowing how the final image will look. We’re all so used to instantly reviewing our photos that the sense of mystery and excitement about our photos has almost been lost. This photo is a perfect example. Taken in 2013 it sat, over looked, on my hard drive for months before I finally got around to stitching it and revealing the image in it’s full glory.

Top Tip: You can skip the first 45 seconds of the video;-)
[youtube]http://www.youtube.com/watch?v=sAu7N7uaAp4&feature=share&t=21s[/youtube]
If you can’t see the video click here http://www.youtube.com/watch?v=sAu7N7uaAp4&feature=share&t=41s

Once I remembered the correct sequence of buttons to press, I was live streaming for 30 minutes and it was amazing to get instant feedback and comments. A huge thanks goes to Sam who was kind enough to keep the questions flowing along to me from the chat room and an even bigger thanks to those that were able to join me live.

I’ll be doing more live streaming, including some live shoots in the future. Details will most likely appear on my twitter feed and on Facebook.

How my photo made the BBC news

bbc-screengrabLast Friday one of my photos wound up on the BBC website and although the subject matter was a potential tragedy for those affected, I’m still very proud to see my work on the BBC news website.

To be honest the biggest surprise was just how many people noticed the small “by line” on the photo and got in contact. I also got plenty of questions about how my photo ended up being used, so here are some answers…

Was it commissioned
Not this time. Following weeks of wet weather we had one day of rain too many and the small stream that flows through the village in which I live, decided to flood in a way that I’ve never seen. I snapped a few photos just as record.

So how did it end up on the BBC website?
I was supposed to be travelling to London but trains were all cancelled and the roads blocked, so I was reading the Local BBC twitter feed to find out what was running. By chance a new tweet pop up asking for any photos of the flooding and I thought… why not. The local BBC retweeted my photo and a few minutes later I was contacted by a lady from the BBC website asking if they can use my photo.

Did you get paid?
In this case I didn’t ask to be paid and to be honest payment was the last thing on my mind.

Do you usually work for free?
No I don’t. Had I been commissioned to photograph or video the flooding then it would be another matter but this was simply me sharing a piece of the history of Copthorne.

Would you do it again?
Absolutely I would.

Did the BBC alter your photo?
My original photo is below. It’s a multi image panorama made up of 7 or 8 photos and cover a field of view that’s just under 180 degrees. I sent the BBC a high res version with permission that they could crop it as required and that’s exactly what they did.

Copthorne-Flooding-blog
So how bad was the damage?
It looked worse then it was, no one was injured and although the road and a few gardens were flooded, the houses were mostly fine. Some damage was self inflicted when a couple of drivers decided to brave the flooded road. A big mistake!

Did you get flooded ?
No we were just fine.


Do you under or overexpose?

exposure compensation CanonIt’s a question I haven’t thought much about since the days when I shot JPG images only. Now that’s a long time ago. Back then if you lost the highlights in your image you’d basically lost the image, so it was general practice to underexpose the JPG by 2/3rds of a stop from the cameras meter reading. Yes every photo was a little dark but that could be fixed in Photoshop and you still had highlight detail.

With RAW there’s a lot more exposure latitude and worries about clipped highlights in day to day photography are almost a thing of the past. In fact there’s so much hidden image information in the highlights of a RAW file I know plenty of photographers who will deliberately over expose their images knowing they can recover it in post-production.

Why overexpose?
In a word, noise, and the theory goes something like this. Noise is very evident in the dark, shadowy areas of a photo that are made lighter when processing. But as RAW files have all this hidden highlight detail, if you start off with RAW files that are a bit too bright and make them darker, you won’t add any more noise.

Sounds crazy right? Well, believe it or not it really works… but keep reading because there’s a catch.

over-under-1

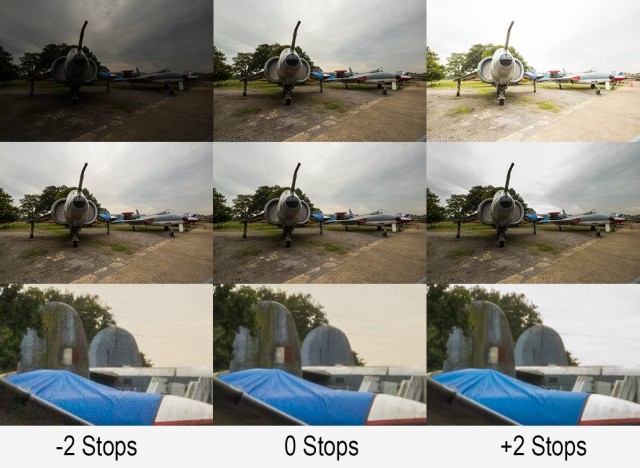
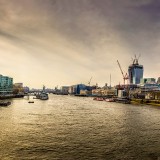
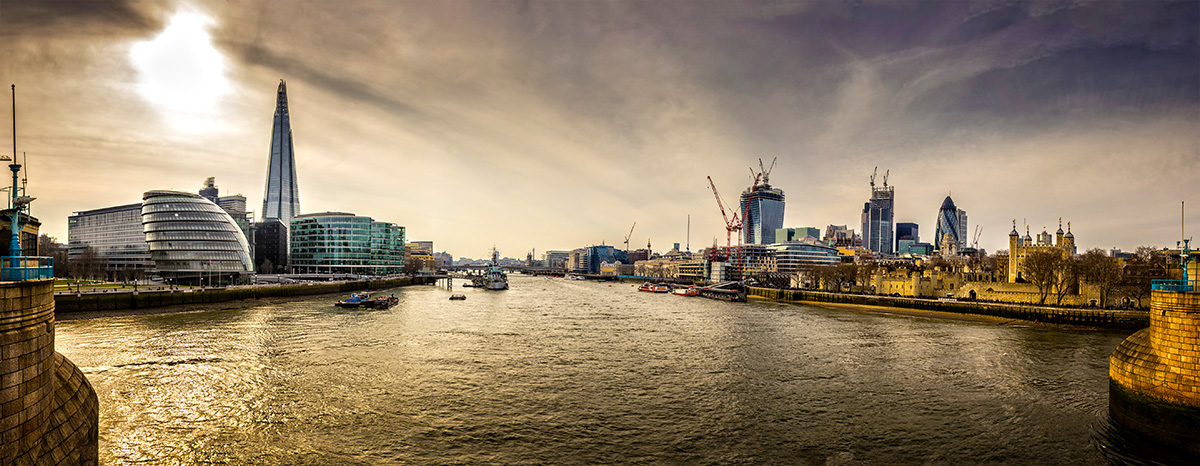
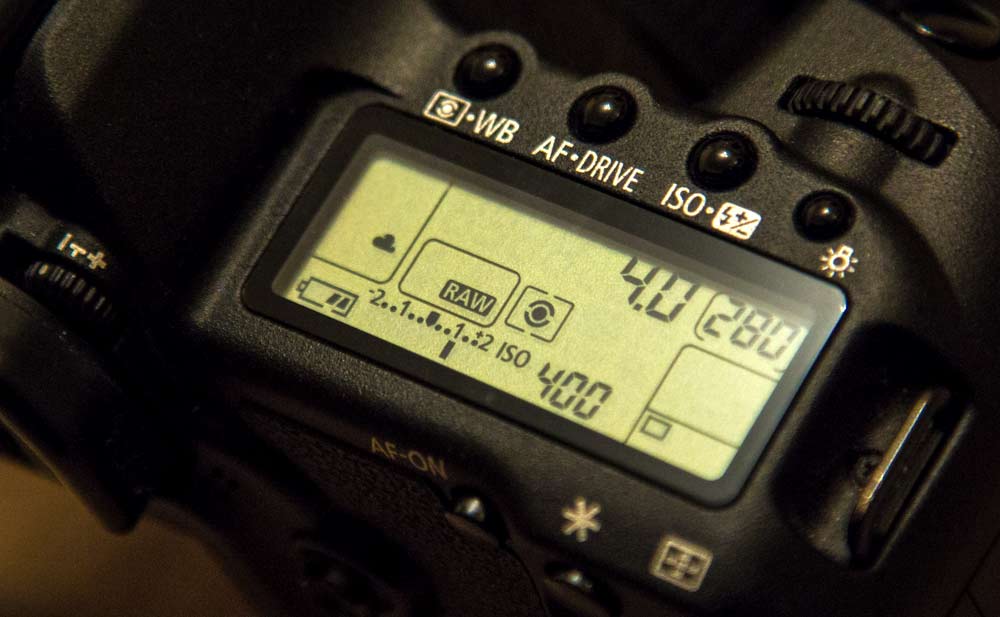
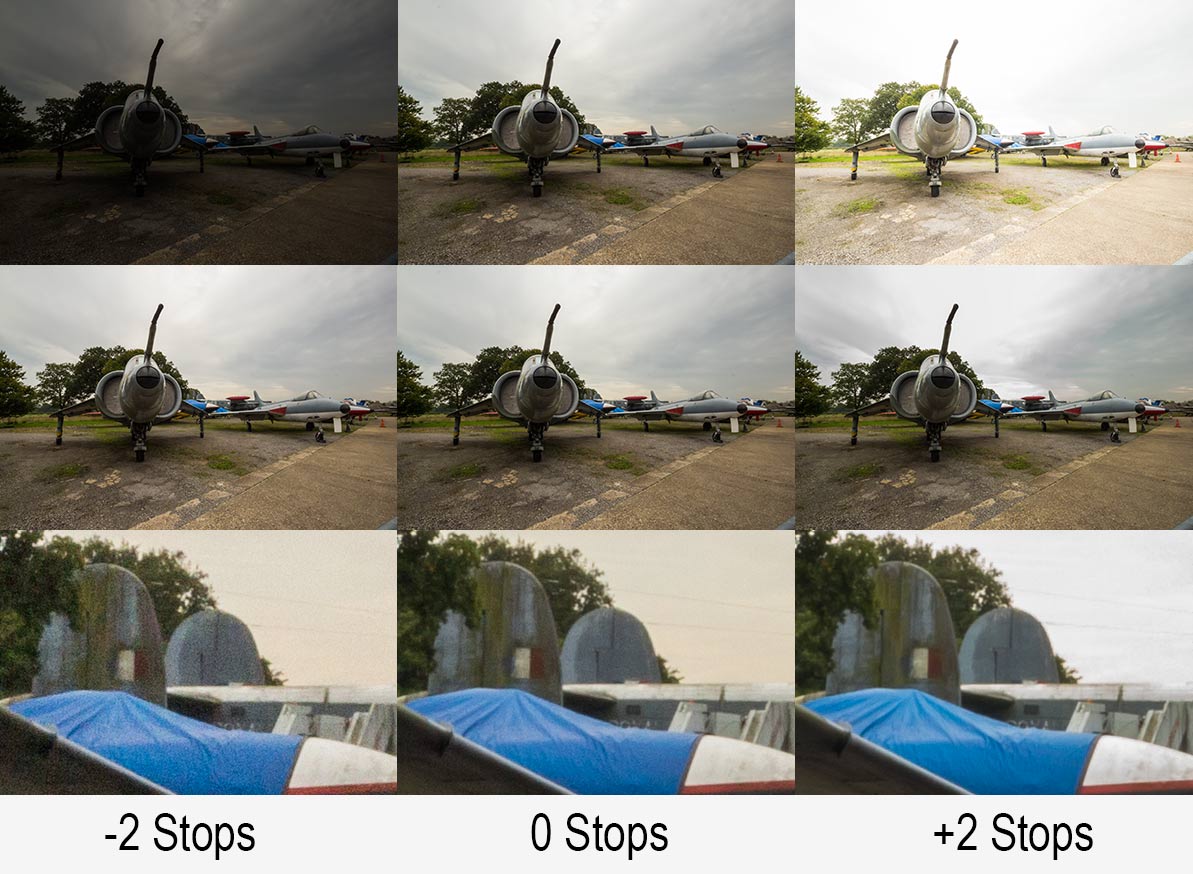
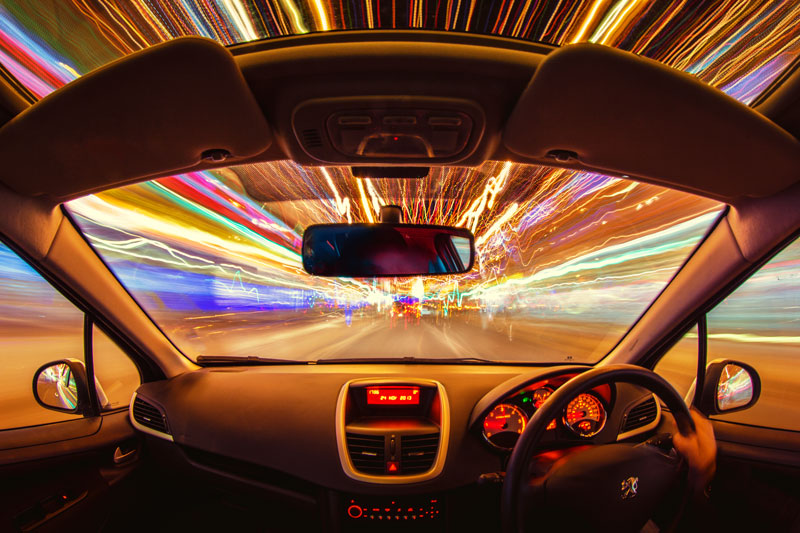
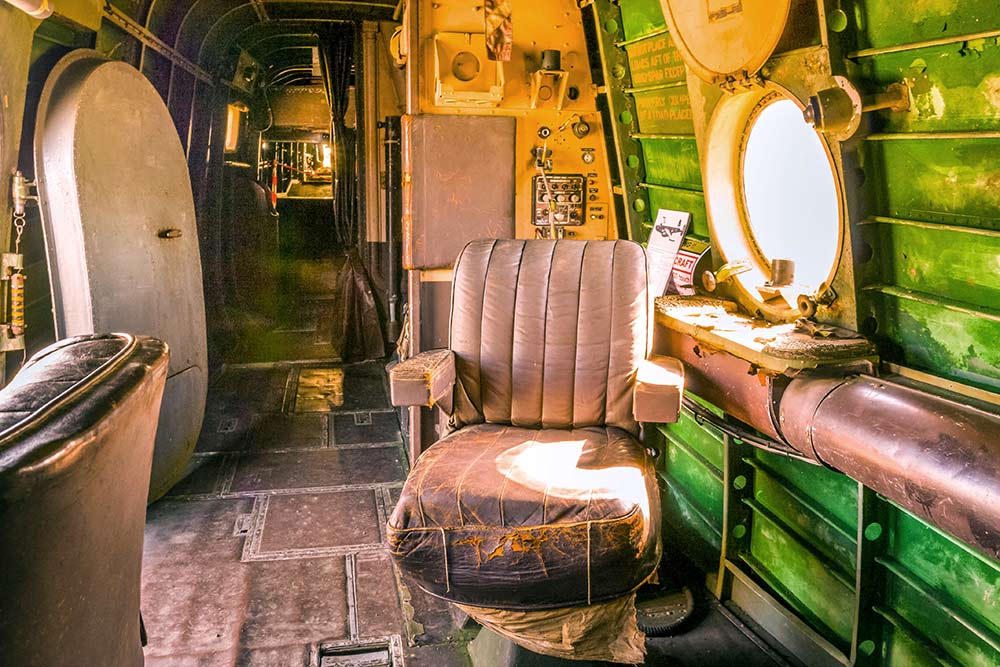
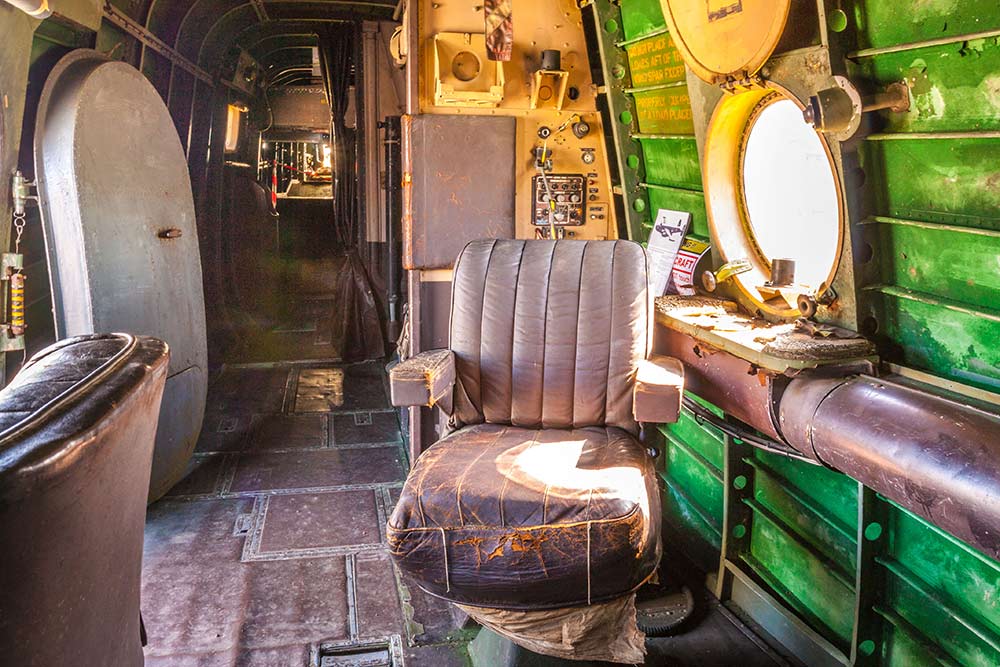
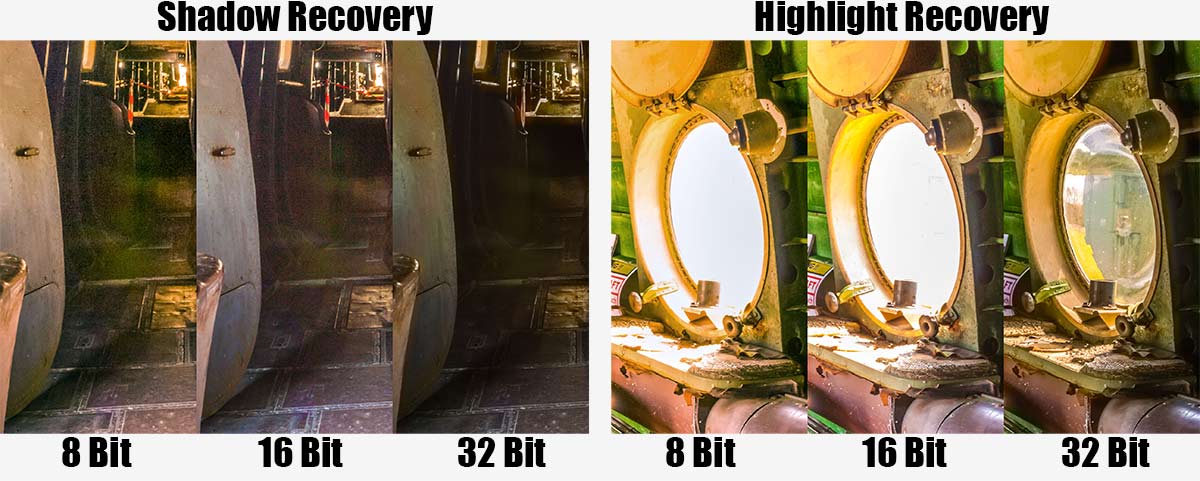
Take a close look at the image above, you’ll need to click it to really see what’s going on.

I shot the same scene at three different exposure (Top Row) I then brought all three RAW files into Adobe Camera RAW and edited them so they looked more or less the same (Middle Row). From a distance the three images in the middle row all look the same but a close up says otherwise (Bottom Row).

The bottom row confirms the theory. Brighten an under exposed image and they’ll be more noise evident but darken an over exposed RAW image and the noise is about the same as the correctly exposed image and may be even slightly less!

The catch
So you may be think that I’m going to say from now no you should over expose your images by a stop… well I’m not.

You see, although the lower noise is brilliant there are other things to think about.

over-under-2

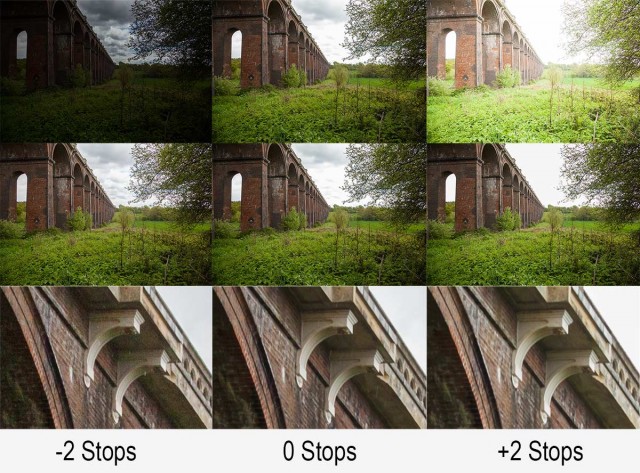
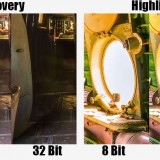
First there’s the question of just how much highlight detail you can recover. Take a look at the photo above and you’ll see the problem. Where’s the sky gone on the right hand (overexposed) image? The correctly exposed image (middle row) struggled to keep highlight detail so over exposing is asking just a bit too much, even in RAW.

That’s not all. One stop over exposure means your shutter speed is twice as long and that could be the difference between a sharp shot and a blurred shot. You might be able to counter that by opening up the aperture if the lens / depth of field allows it and of course you could double your ISO but that rather defeats the purpose doesn’t it.

Over, under or as metered?
As is so often the case there’s no rights or wrongs that will apply to every situation and camera meters are prone to errors by design. However for me, I’m sticking to the as metered reason unless there’s a valid reason to do otherwise and I’d recommend you to do the same.

2014 Exciting Times Ahead

With the new year upon us it’s time to say goodbye to 2013 and hello to 2014 and all the exciting opportunities that it brings. Whatever your plans for the coming year, I hope 2014 proves to be a year to remember for all the right reasons.

2014-Poster-Wine

I’ve got some great plans for 2014. A workshop in New York City, live streaming videos from my studio and a bunch of new and exciting workshops here in the UK are all on the cards. Details will be here on my blog and also on my Facebook page and you can be sure I’ll be tweeting about it too.

By the way the 2014 image above is a montage of six splash photos taken in my studio specifically for the shot. You can find out how it’s done by watching my video for Adorama TV.

Three photo ideas for Christmas

Christmas-Lights--CarIt’s Christmas day and if you were lucky enough to get some new camera gear today you’ll probably be itching to try it out, at least that’s what I always want to do. So here are three of my festive themed video tutorials to give you some photo inspirtation.

There’s a mix of inside and outside tips and tricks for bothe beginner and the more advanced photographer, so grab your camera and shart shooting!

Balance Flash and Christmas Lights
In this video I take on a challenge of balancing low powered Christmas fairy lights with flash. Dragging the shutter, as the technique is also known, is one of those camera skills that every photographer with a speedlite should master and this is a great way to hone your skills. Scale up the technique just a little and the exact same skill will worth with portraits too.
[youtube]http://www.youtube.com/watch?v=TuCeNQrCmVE&feature=youtu.be[/youtube]

Shoot Christmas lights from your car
Got a new tripod for Christmas? Then this is the perfect photo challenge for you! Grab your widest angle lens or if you have one, a fish eye lens is just perfect. Part II is come soon.
[youtube]http://www.youtube.com/watch?v=bie4zQVoN-0[/youtube]

Shoot great bokeh
Bokeh is an optical effect that can create stunningly beautiful photos, it’s also really easy to do once you know the basics and that’s exactly what I show in this video.
[youtube]http://www.youtube.com/watch?v=iKqd7R-v2qo[/youtube]

Christmas PSD Template

Christmas-Template-GavtrainWith Christmas rapidly approaching this weeks Friday Freebie couldn’t come at a better time. It’s perfect if you need to make a last minute Christmas card or simply want to show off one of your festive photos.

Full download instructions are below but you can also
Click Here To Christmas PSD template

If you were one of the lucky few who were in the right place at the right time, then you will recognise this template as the one I photographed whilst testing the new live broadcast facilities in my studio. If you missed it never fear, details of my live streaming events in 2014 are coming soon.

I finished the template using the new Perfect Photo Suite 8 from Onone. The colour and texture were added in one click using the “Nicely Toasted” preset.

With several layers and lots of fine textured detail, this weeks Friday Freebie PSD template comes in at around 76mb. If you’re not on a fast internet connection if might take a few minutes to download.

As always, if you create a photo using the Friday Freebie then let me (and everyone else) know by leaving the link in the comments below.

Usage rules
The image is copyright Gavin Hoey 2013. Use is limited to any personal but non-commercial purposes. Please share the Friday Freebie by linking back to this page. Do not redistribute the original image without my permission.

Download instructions
Click the link http://adobe.ly/1koSnxj

1. Click the Download button download_icon

2. The download should start automatically

3. Save the template to your hard drive

4. Open in Photoshop or Photoshop Elements

5. Paste your photo above the “Your Photo Here” layer

6. Use Free Transform (CTRL+T) to adjust the size of your photo

8 bit, 16 bit or 32 bit?

When it comes to the technology that surrounds digital photography I’m really not interested in how things work. All I want to know what things work and which is best for me. So if you’re looking for an article about how 8 bit is technically different to 16 bit then this isn’t it. However it you want to know how much better looking 16 bit images can be compared to 8 bit then read on.

UneditiedWhy does bit depth matter?
In a nutshell the bigger the bit depth the more data is in the image and the more adjustment you can make to that images shadows and highlights. Not only that, the adjustments will be less damaging to the image too.

In order to see how bit depth affects the image I’ve taken this test photo which I have in both 8, 16 and 32 bit and pushed them to the max in Adobe Camera RAW. That means I’ve pulled out all the highlight and shadow detail that I can, way beyond what would be considered acceptable. Click the small image to see the unprocessed original.

8 Bit
Do you shoot jpg images? Are your images destined only for the internet? Is the size of the file important to you? If the answer to any of the questions is yes 8 bit images are for you. 8-bit8 bit has enough information to show colour images with smooth tones and even has a little bit of wiggle room to tweak exposure a little bit. It’s possible to pull detail out of a photos shadows but the results become noisy very quickly. Highlight recover is much less effective and as a result many people who shoot JPG choose to slightly under expose or darken the image.

8 bit images are great if the image you shoot needs little or no exposure adjustment in post processing.

16 Bit
Although technically not a true 16 bit image I’m basically talking about the RAW files from your digital camera. 16 bit files are packed with a lot more information then your standard 8 bit JPG and that means a lot more space to make adjustments to the exposure.16-bit

Shadow areas of an image can be made slightly lighter without adding noise to the image but heavy adjustment (as seen in the sample image) will still look terrible. As with the 8 bit image recovering highlight detail is less effective then shadow but once again the extra data can yield more detail.

Saving your 16 bit images as JPG’s isn’t possible, so TIFF or PSD are your top options to save as. It’s also worth noting that not all of Photoshop is compatible with 16 bit images, for example some of the older filters will be greyed out.

32 Bit
The new kid on the block is 32 bit. To date no consumer cameras can capture 32 bit images, at least not in one click. However by blending 3 or more differing exposure inside of Photoshop you can create a 32 bit image that contains a vast amount of image data.
32-BitAdobe Camera RAW in Photoshop CS6 and Lightroom 4 (or newer) can open and edit 32 bit files. Best of all you can choose to have the highlight detail from the dark exposure and shadow detail from the light exposure. Now if that sounds a little bit like HDR (HighDynamicRange) you’re not wrong.

Because 32 bit is so new don’t expect much to work with it. Photoshop can open the files but almost everything will be greyed out. It’s also worth noting that your 32 bit TIFF files will be enormous, they can easily be 10 times bigger in memory size then RAW files but they’re worth it!

shadow-highlight-recovery

How To Photograph Through Fences

british-wildlife-centre-2Shooting through fences and bars is never the ideal way to take photos but there’s plenty of times when it’s the only choice if you want to keep taking photos. It’s a problem that’s going to be familiar to anyone who’s been to a motor sport shoot or ever tried taking photos at a zoo.

The good news is, with a little bit of camera knowhow, it’s perfectly possible to shoot through fences as if they were never there. You don’t need any fancy equipment, all you need to do is follow the step by step plan I set out in the video.

Once again I’d like to thank the British Wildlife Centre in Surrey for allowing me to film in their amazing venue. I enjoyed it so much I’ve taken out an annual membership so I can explore what it has to offer at my leisure.

[youtube]http://youtu.be/-rlPEl2Yy84[/youtube]

Products used in this video (linked to Adorama)

HOYA 58mm HMC NXT UV Filter

Pro Optic 58mm Rubber Lens Hood

Canon EOS 60D Digital SLR Camera

Canon EF 70-300mm f/4-5.6 IS USM Autofocus Telephoto Zoom Lens

Adobe Photoshop CS6

To give you an idea of just how much looks can be deceiving, here’s a photo of one of the Scottish Wildcats taken at an earlier visit.

british-wildlife-centre-1

Countdown To Christmas Freebie

christmas-countdown-sampleHere’s a little bonus freebie for you which could well be the perfect tool to help plan your time in the run up to Christmas.

At this time of year it can be very easy to lose track of what needs to be done and when, that’s where this little planner could be really handy.

As well as filling in your important events you can add vital dates such as the last posting dates for your orders and christmas cards. I’ve designed the countdown planner so there’s more room for you to fill in the important reminders as the big day approaches and of course, the biggest space is reserved for Christmas day itself.

You can download it from www.gavtrain.com/free/christmas-countdown.zip

The planner is A4 in size, so it’s perfect for home printing. Happy planning 🙂

christmas-countdown-sample2