SD Memory Card Group Test

SDHC-Group-Test
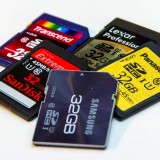
There was a time when any old memory card would do but today there’s a huge range of SD memory cards to choose from and the price per gigabyte is ever falling. In this group review I’ll be looking at five 32GB SD cards which all claim to offer super fast speeds and all retail for less then £26.00.

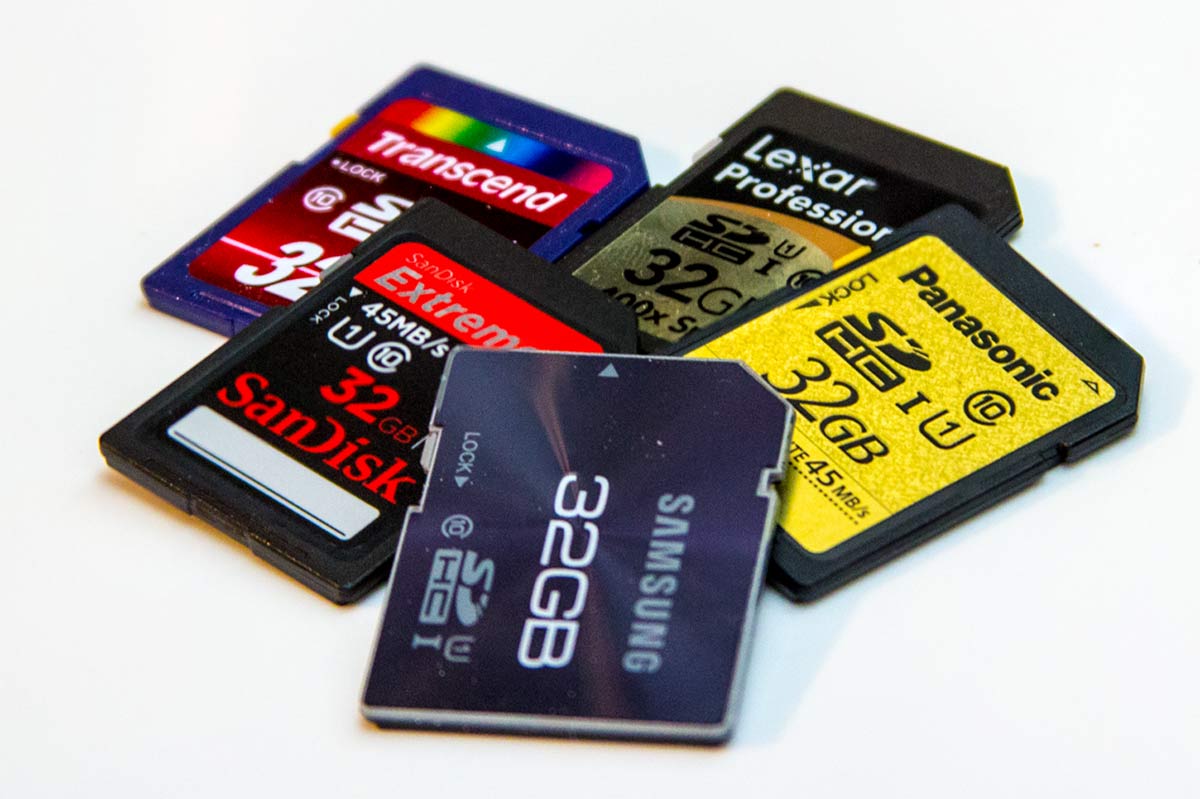
At first glance all these class have very similar specifications. They all offer class 10 performance which in itself isn’t that impressive now a days. In fact they all claim to offer write speeds of around 45MB/s which makes them the perfect choice for DSLR video and shooting bursts of RAW still images.

All the cards also read speeds of at least 60MB/s and that’s good news for everyone (with a USB3 card reader) as it massively reduces the time spend downloading images and videos from the card.
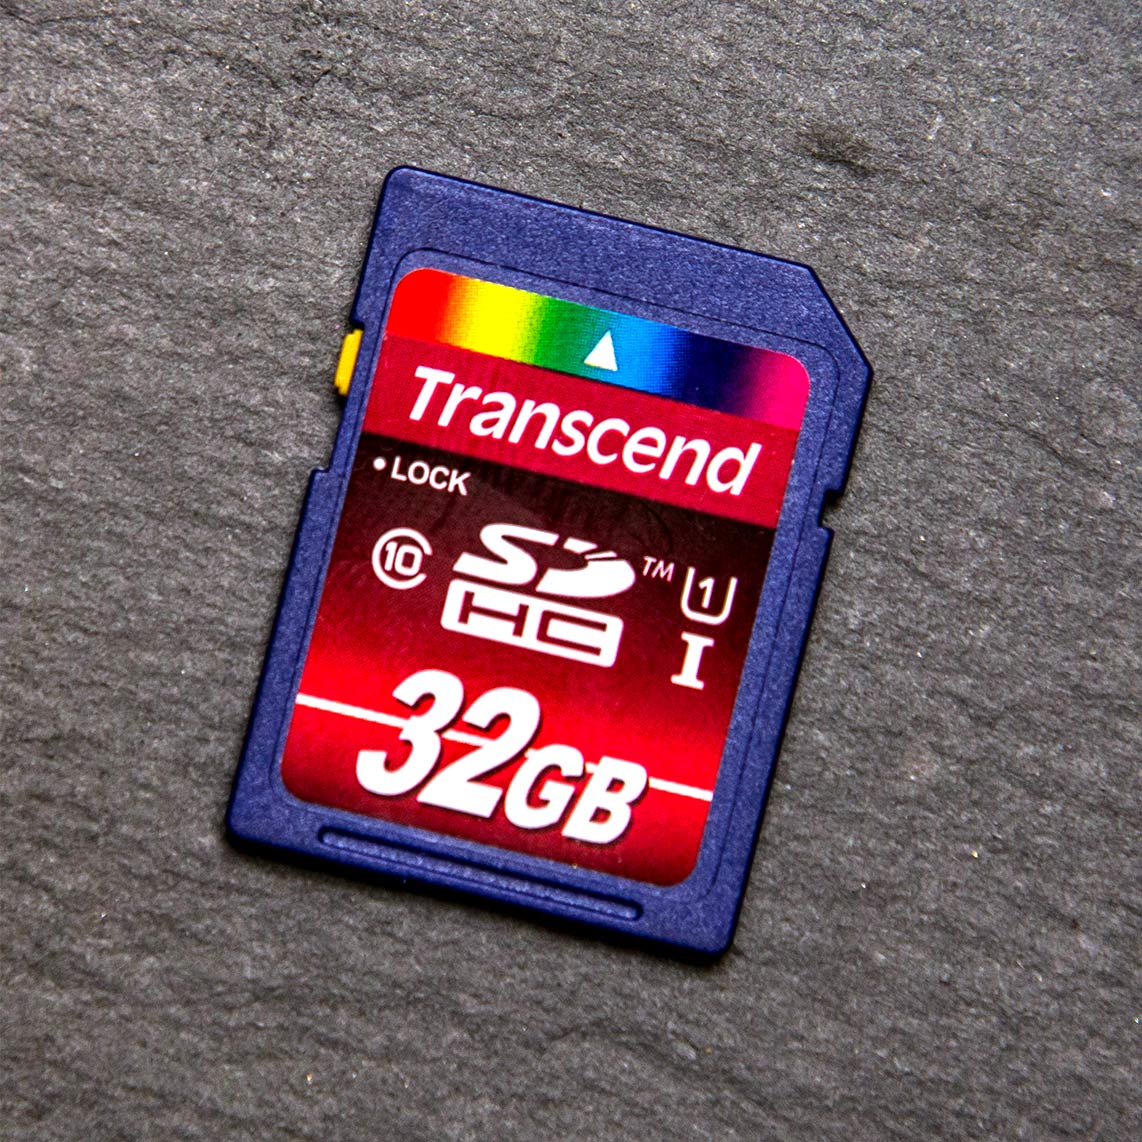
Transcend-SDTranscend 32GB WINNER

Write Speed ~ Claimed 45MB/s ~ Actual 61MB/s
Read Speed ~ Claimed 85MB/s ~ Actual 84MB/s
Recovery Software ~ Yes (1 year licence)
Protective Case ~ No
Retail Price UK £21  (My Memory)
Retail Price US unkown

On paper this card looked every bit the winner and it doesn’t disappoint.

Transcend claim a respectable write speed of 45mb/s which is average for the group but the claimed read speed is nearly double at an eye watering 85mb/s. That’s a big claim which testing proved to be 100% correct. Not only that but my tests the write speed smashed Transcends claim and all the opposition by hitting a whopping 60mb/s

Transcend also add in a 12 month licence for RecoveRx recovery software extra piece of mind. The only blot on the Transcend’s copy book is a lack of protective case but with super fast speeds and a bargain price tag it’s an oversight that’s easily forgiven.


Panasonic-SD
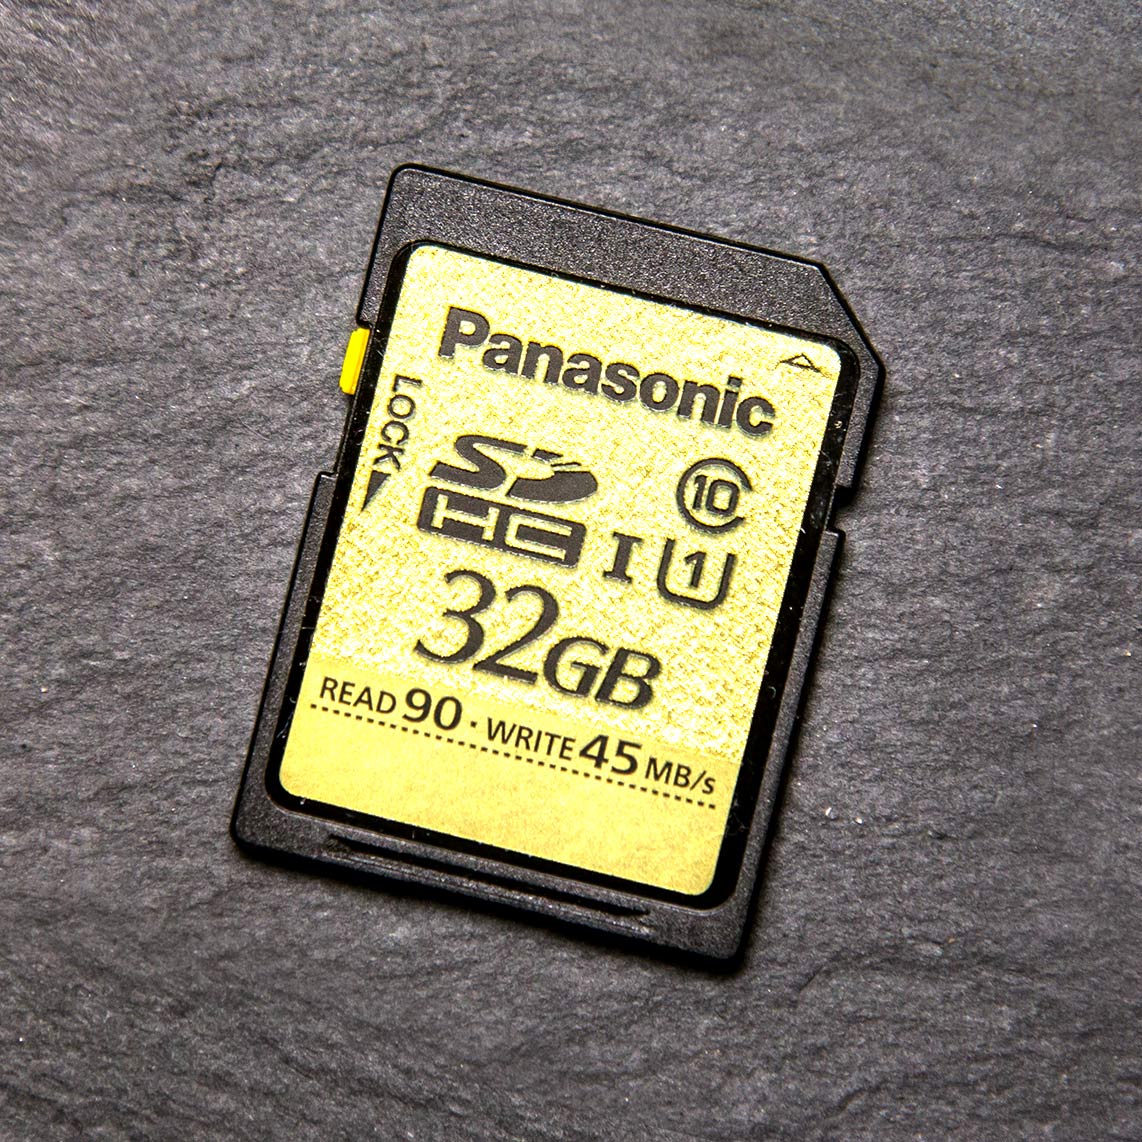
Panasonic Gold  32GB – Runner Up

Write Speed ~ Claimed 45MB/s ~ Actual 51MB/s
Read Speed ~ Claimed 90MB/s ~ Actual 84MB/s
Recovery Software ~ No
Protective Case ~ No
Retail Price UK £25  (My Memory)
Retail Price US $110   (Adorama)

Panasonic is not a name I previously associated with memory cards but it is a brand that’s well known. The memory card itself performed rather well with some excellent results. Sure the read speed missed the claimed 90MB/s but the write speed was better then claimed by the exact same amount.

Sadly there’s no recovery software or protective case here although if the claims on the packaging are to believed you’ll never need it. Panasonic say it’s resistant to water, shock, magnets, x-rays, electrostatic and temperature. I’ll let you test all those claims out but it certainly with stood the usual treatment I dish out to my cards… as did all the other cards in this test.


Lexar-SD
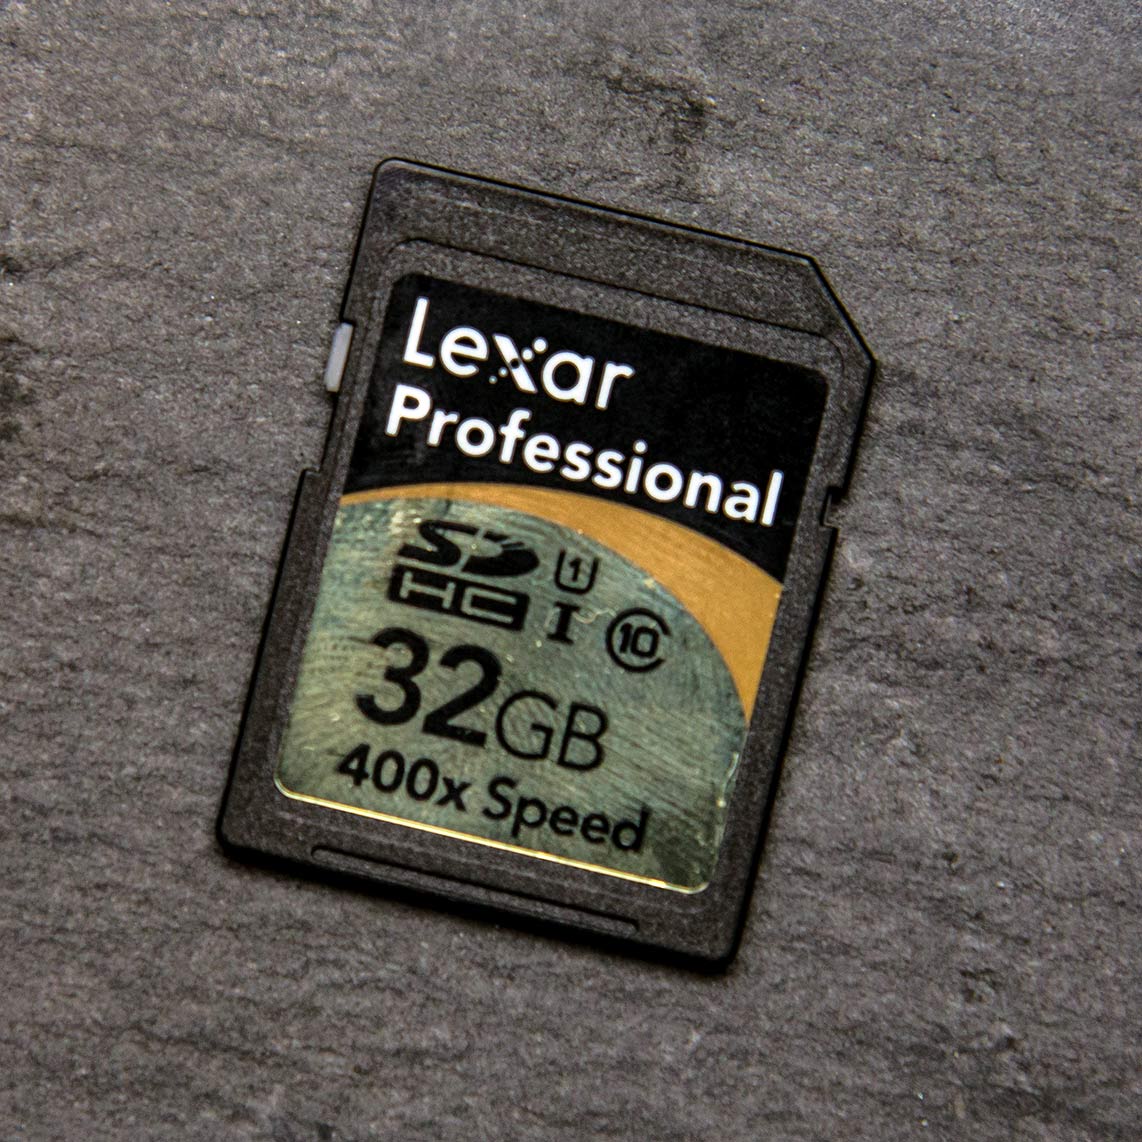
Lexar professional 400X 32GB – 3rd Place
Write Speed ~ Claimed 60MB/s ~ Actual 49MB/s
Read Speed ~ Claimed More then 60MB/s  ~ Actual 82MB/s
Recovery Software ~ Yes
Protective Case ~ Yes
Retail Price UK £25  (My Memory)
Retail Price US $33   (Adorama)

Lets start with the positive points. The Lexar card comes with both a protective case and downloadable data recovery software. There’s also a very fast read speed of over 80MB/s which puts it up with the best in the read department, which is odd as Lexar make no mention of read speeds on the box.

The box does promise a “guaranteed minimum write speed of 60MB/s” which sadly I wasn’t able to achieve. In fact the best I could get was a pretty average 49MB/s. To be fair Lexar does say, in the tiny small print on the back, that the minimum guaranteed speed depends on your equipment. That said it’s worth remembering, all my testing was done on the same machine with the same equipment.

Sandisk-SD
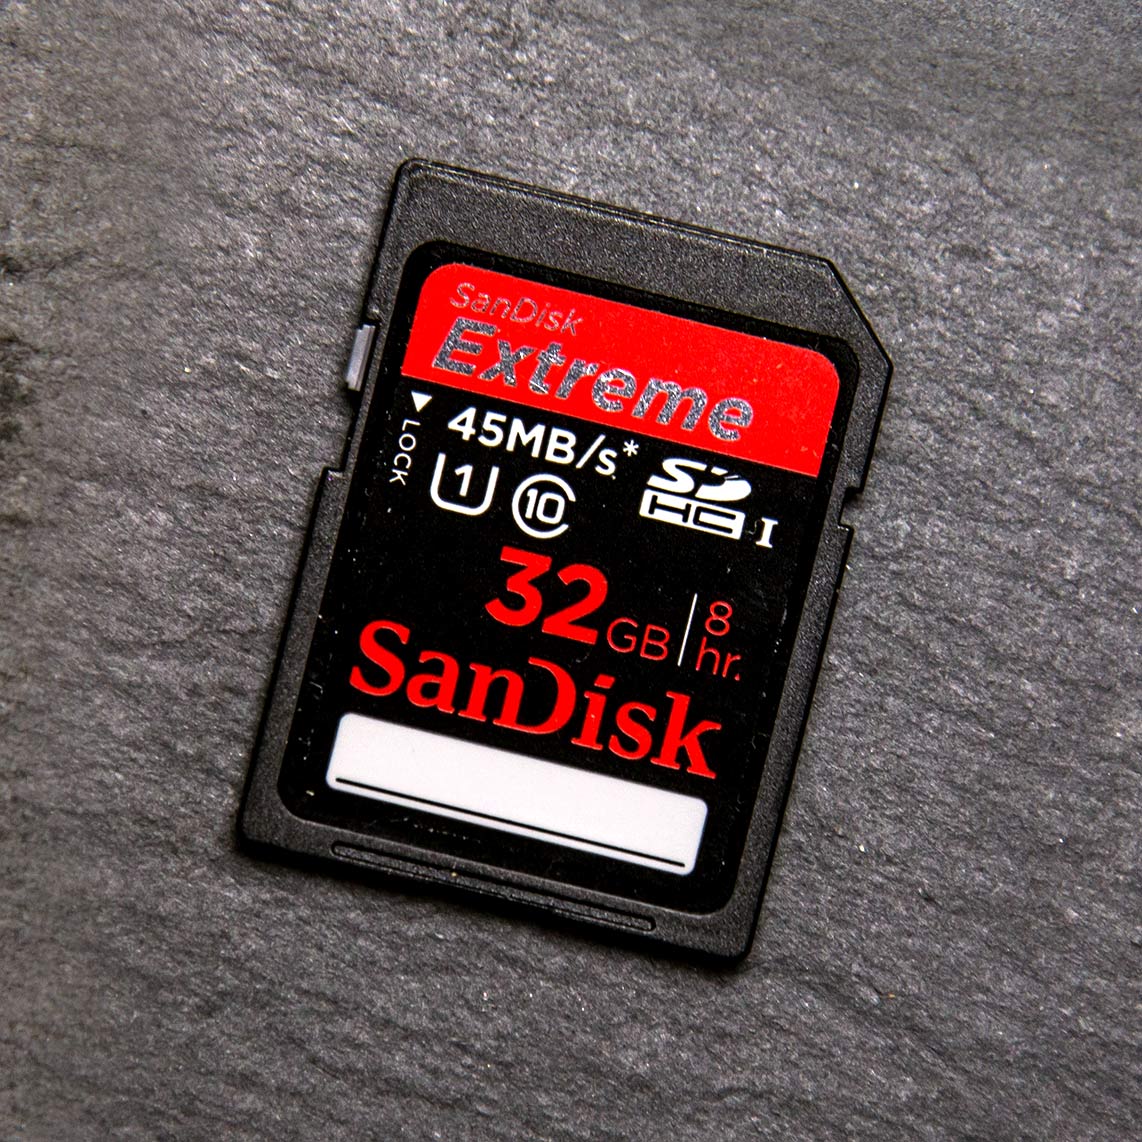
Sandisk Extreme Pro 32GB – 4th Place
Write Speed ~ Claimed 45MB/s ~ Actual 43MB/s
Read Speed ~ Claimed 45MB/s ~ Actual 45MB/s
Recovery Software ~ Yes (1 year licence)
Protective Case ~ Yes
Retail Price UK £26  (My Memory)
Retail Price US $32   (Adorama)

Sandisk has been the first choice of many professional photographers, me included for many years. However in this group review the Sandisk Extreme is looking a bit out of its depth.

The claimed write speed was very close the actual speed but unlike all the other cards in this review, the read speed is no faster then the write speed. To be fair to Sandisk it is exactly what they said it would be but it’s still almost half as fast as the best card in this review.

All in all the Sandisk Extreme is a safe bet but there are currently better options out there when it comes to read speeds.


Samsung-SD
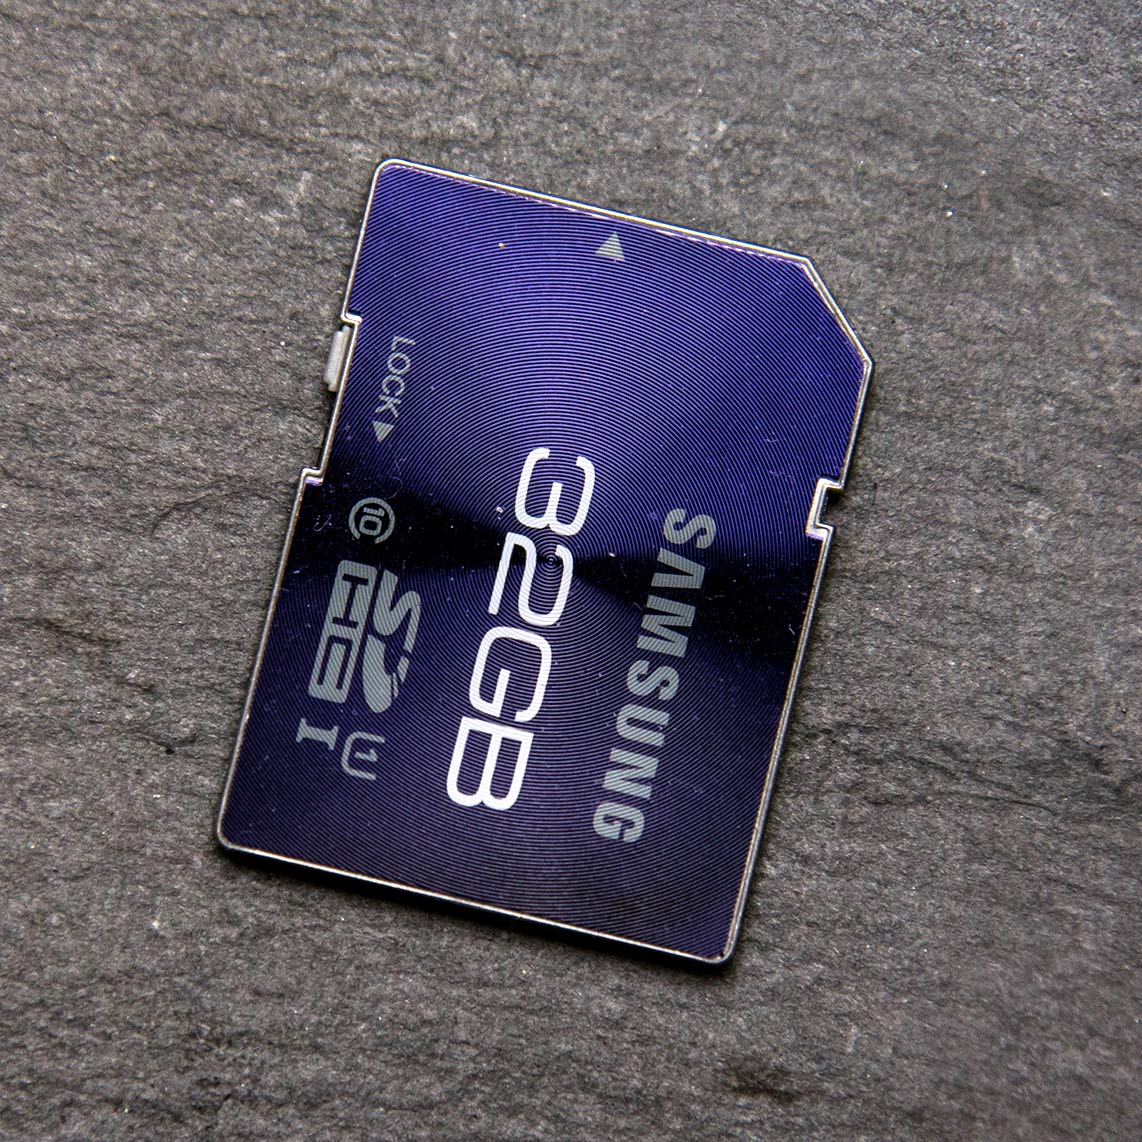
Samsung Pro 32GB – 5th Place
Write Speed ~ Claimed 40MB/s ~ Actual 39MB/s
Read Speed ~ Claimed 80MB/s ~ Actual 77MB/s
Recovery Software ~ No
Protective Case ~ No
Retail Price UK £26  (My Memory)
Retail Price US $120   (Adorama)

Someone has to come last and sadly, in this test, it’s the Samsung Pro. Not so long ago its 40MB/s write speed would have been top class stuff but now it looks, at best, very average indeed. The read speed is also slightly off the mark too.

No recovery software and no protective case don’t help matters either and when you discover the price is at the higher end of the scale it’s game over for the Samsung Pro. It’s also worth noting the eyewateringly high price for US buyers!

There is however one area where the Samsung beats all the other cards in this review and that’s in looks. I love the engraved surface on this card.

Click the image below to see the benchmark results for all the cards. Benchmark-SD-Cards

SplashArt Kit 2 ~ Review

I love photographing drips and over the years I’ve made one or two videos about how it’s done. However the SplashArt kit 2 offers to take drip photography to a professional level.

spashart-1
Verdict: The SplashArt 2 Kit is well designed and simple to use but best of all the photos it helps to create are just amazing. If you’re serious about photographing splashes then this is a must have accessory.
   
Overall Rating

5-Star

Design / Features 4-Star
Performance

5-Star

Price

5-Star

+ Plus Points
    + Everything you need in one kit
    + Repeatable splash photos
    + Choice of single or double drops
Minus Points
    No markings on controller
    Getting perfect splash can be frustrating

Price (at time of review) £179.00
Suppliers Website: http://www.phototrigger.co.uk/

Purchase from here

Getting good photos of water drips isn’t that hard to do, in fact one of my most watched videos covers how to get great photos of basic drips. However the one thing I’ve always wanted to capture is a collision and always failed to do so. The SplashArt kit promises to do exactly that with precise control.

8024524670_38ed353bcf_cWhat’s in the kit
The good news is the kit contains everything you need, all you need to do is add water and a camera of course. The heart of the splashArt kit is the controller which is used to trigger the camera and release the drips. The other vital part of the kit is the solenoid which is basically an electronic tap but you also get all the cables you need including the trigger cable that’s compatible with your camera model.

If you’re a UK buyer you can also buy the kit with a metal retort stand and arm. The retort stand took me straight back to my days in the chemistry lab at school and the arm does look like something out of a plumbers merchants but it works perfectly.

In use
Setting up the SplashArt kit was very simple with some nice touches. For example there are three cables to be connected but each cable has a different connector, so there’s no chance of accidently wiring your camera to the mains!

splashart-2My only complaint is that none of the four dials on the controller are labelled or have scale markings. That made getting up to speed with the unit a little more tricky for the first time user like me.

Of course the big question is how did it perform? Well, after an initially frustrating 10 minutes of missing the magic collision I managed to find the perfect combination of settings for the dials and I was off.

20 minutes later I had dozens and dozens of amazing collision shots in the bag.

Part of the allure of a kit like this is the predictability of the system and the SplashArt kit excelled here. Take a look at the six photos below. They were taken one after the other and although each is different the timing was perfect shot after shot. Just don’t change anything once you have the look you want!

SplashArt-3Click to enlarge

Who’s it for
At nearly £180 this kit is great value but it’s not for everyone. You’ll need to be fairly serious about your splash photography in order to warrant the money. Moreover, once you’ve mastered the art of capturing splash collisions you’ll need to be resourceful in the creativity department to come up with more uses.

That said there are plenty of alternatives for you to explore. Water can be replaced with milk, paint or any coloured liquid you can get your hands on. Each has it’s own style of splash.

SplashArt-4I can imagine the SlashArt kit would be a brilliant investment for a small group of photographers who can share the skills and the price amongst themselves.

Conclusion
I loved using the SplashArt 2 kit and it’s a keeper for me. At £180 it’s not cheap but it’s hardly expensive either. OK so there’s no markings on the dials and from time to time it would miss a drop but in the space of 30 minutes I went from never having captured a splash collision to having dozens of them… and they were all brilliant!

Photo Director 4 ~ Review

In the world of photo editing Adobe have had very little in the way of serious competition. Photo Director 4 from Cyber link would love to change that so let’s find out if it’s got what it takes.

PD4-1
Verdict: PhotoDirector 4 is surprisingly good at what it does. It borrows heavily from the design and interface of Adobe Lightroom 4 and it even throws in some neat tricks of its own. It’s just a shame that PhotoDirector can’t match the image quality gained from using Lightroom 4 that it mimics so closely.
   
Overall Rating

4-Star

Design / Features 4-Star (2)
Performance

3-Star

Price 4-Star (2)
+ Plus Points
    + Fully featured photo editor
    + Wide range of editing tools
    + Excellent pseudo HDR effect
Minus Points
    Image quality could be better
    Controls can be sluggish
Price (at time of review) £72.00
Suppliers Website: http://www.cyberlink.com

As a die hard fan of Photoshop it seems very strange using a bit of software that doesn’t come from Adobe but PhotoDirector 4 has a uncanny familiarity about it. In fact if someone had told me that this was a beta version of “Lightroom Elements” I’d have totally believed them.

At its core PhotoDirector 4 is a photo organiser and photo editor that can handle pretty much any photo format you can throw at it, including RAW files. The program is split in to five modules which are the Library, Adjustment, Edit, Slideshow and Print sections. You move from one section to another making changes as you go.

You can see Photo Director 4 in action by watching my overview video below.

In use
Editing your photos is PhotoDirector 4 is a pleasant experience. There’s lots of controls at your disposal and adjustments are applied live to the image on screen. The changes appear almost instantly, although there is a momentary delay before the full resolution effect is seen on screen. I did find one annoyance however, the interface had a habit of regularly not moving the slider I was dragging.

PD4-2In the Adjustment section there’s a great selection of preset effects on offer with the option to create your own too. Sadly you can’t make presets for other sections, such as Print, which is a shame.

Unique features
It’s impossible to use PhotoDirector without comparing it to Lightroom but there’s also a bit of Photoshop Elements in there too. There’s a Liquify brush, a skin smoothing brush and a teeth whitening brush. There’s also a brilliant Pseudo HDR effect which was possibly my most favourite feature and not something you’d find in either Photoshop Elements or Lightroom.

Conclusion
PD4-3If you’ve no wish to use an Adobe product then I can whole heartedly recommend Photo Director. If you’ve tried Lightroom and found it lacking in features, I can honestly say Photo Director is well worth a go.

It’s the image quality that really matters of course and here PhotoDirector 4 held it’s head high on most adjustments. Processing RAW files gave some great results with noise free images with good sharpness and colour.

It all sounds and looks great… until you compare it to the image quality obtained in Lightroom or Photoshop. Sadly much as I liked PhotoDirector, I can pull far more out detail from the shadows and highlights in Adobe Camera RAW. I can also add much more clarity and the experience of doing so is far more fluid. That said Adobe need to watch their back as the gap between them and the competition is closing.

Carry Speed FS-Pro 2 ~ Review

Much as I love my Black Rapid sling straps I’ve never been 100% happy with them. So I was keen to find out how the Carry Speed FS-Pro 2 measured up.

CarrySpeed1
Verdict: There’s no denying that Carry Speed FS-Pro 2 is a well designed and well built piece of kit. The inclusion of a folding, tripod mountable plate is ingenious but only if you fit it correctly to your camera.
   
Overall Rating

4-Star

Design & Features 5-Star
Performance

4-Star

Price

4-Star

+ Plus Points
    + High levels of comfort
    + Clever mounting plate
    + Front Quick Adjustment
Minus Points
    Locking “O Ring” can slip
    Easy to fit back to front
 
Price (at time of review) £56.00 ($70.00 USD)

Suppliers website www.carryspeed.com

The Carry Speed FS-Pro 2 is really a strap of two parts. First there’s the very cleverly designed F1 foldable mounting plate and the strap itself and I’ll tell you right now, they’re both brilliant.

The Strap
The first thing I noticed about the FS-Pro was it’s huge shoulder pad and to be honest I wasn’t keen on it initially. If, like me, you normally like your camera gear to be discreet then I’d suggest looking at the Carry Speed FS-Slim as a more subtle alternative.

But this strap isn’t trying to hide away, this strap is designed to make light work of carrying heavy cameras and to that end it’s amazing. In fact I’d go so far as to say it’s possibly the most comfortable camera strap I’ve ever used.

CarrySpeed2The comfort factor comes from the shoulder pad being made from a combination of stretchy neoprene and rubber. The strap can be adjusted in length to suit your size, although if you’re particularly tall or wide you might want to contact Carry Speed to check the exact length.

On the front of the strap is a couple of D-Rings for attaching links like the included uni-strap which helps spread the load of long lenses by attaching the strap to both the lens and camera body’s tripod mounts.

One of my favourite features is the front quick adjustment. Here’s how it works… when I’m not shooting with the camera and I want to keep it close to my body, all I have to do is give a sharp pull on a D-Ring and the strap instantly tightens up. Clever stuff!

The mounting plate
CarrySpeed3I’ve used sling straps for years and much as I love them, things like not being able to put the camera down flat are an annoyance. But having to remove the strap before I can use a tripod is probably top of my gripe list.

With the F1 mounting plate, Carry Speed have side stepped both those problems because it folds down flat AND it has six tripod holes meaning you can attach pretty much any quick release plate and still use the strap. The design may not be pretty but they work really well.

It’s not all good news though. The mounting plate is attached to the strap by a ball and socket which is huge! I also had concerns about the thread on the ball joint unscrewing. Carry Speed have added a rubber O-Ring which is supposed to prevent accidental unscrewing but it doesn’t. Fortunately in all of my testing I didn’t have any issues but I did keep a weather eye on the ball joint… just in case.

One really important thing to note is that the mounting plate MUST be fitted the correct way round and as there’s no clues on the plate as to which way is the correct way, it’s easy to get it wrong (just like I did the first time). When the plate is fitted back to front the whole system is worse then useless as the folding ball joint will poke you in the face. Ouch!

Conclusion
There’s so much to like about the Carry Speed FS-PRO 2. It’s super comfortable in use, very well made and supports the camera well. I do have some reservations about the design of the ball joint but that’s not enough to stop this strap becoming my “go to” sling strap for use with heavy gear.

Kingston Ultimate 600X ~ Review

In this review I’m looking at the Kingston ultimate 600X, it’s a compact flash memory card that promises to really pack a punch when it comes to speed and capacity. Lets see how well if fares in the real world.

Kingston-600x-gavtrain
Verdict: The Kingston ultimate 600x performed very well in terms of its speeds. In real world use it’s proved itself to be very dependable. Just make sure you have a compatible camera and card reader.
   
Overall Rating

4-Star

Design & Features 4-Star
Performance

4-Star

Price 5-Star
+ Plus Points
    + High Capacity
    + Excellent value
    + Very fast Speeds
Minus Points
    USB 3 reader required for max speed
    May not be suitable for older cameras
    32GB maximum size available
Price (at time of review) 32GB around £60.00 $80.00 from Adorama 

Suppliers Website: www.kingston.com

The Kingston ultimate 600x is not the newest card on the block nor is it the fastest but it’s certainly one of the best value cards around. It uses UDMA technology which is short for Ultra Direct Memory Access and that means it’s quick. All UDMA cards can achieve a write speed of at least 45MB per second but with the ultimate 600x Kingston is claiming a read and write speed of a whopping 90 MB/s. Add to that the inclusion of a lifetime limited warranty and access to Kingston’s mediaRECOVER software via a download (activation key is in the box) and this card is shaping up very well indeed.

Capacity
The Ultimate 600x comes in two sizes, 16GB and 32GB. Which you prefer will depend on the pixel count of your camera, if you shoot in RAW or JPG format and your personal feeling about whether having more photos on less cards is safer then having less photos on lots of cards.

Using my Canon 5D Mark II photos as a guide a 32 GB card stores around 1050 RAW files or 4900 JPG’s.

Speed Tests
If you need to shoot lots of photos very quickly without camera buffering then this card is aimed squarely at you. That said fast cards are not just for the Kingson 600x speedsports shooters amongst us, we all have to download images on to our computers and when we do a fast card will reward you handsomely.

If technical charts are your things then the ATTO test will give you a fair idea of the speeds the card can reach. A quick glance at the chart will show you that the write speeds were very consistent at around 76 MB/sec and read speeds were slightly better at 88 MB/sec

The read speed is where the the biggest time saving comes when transferring files from the card to your computer so faster is definitely better here.

The write speed is a little disappointing as it misses the advertised speed of 90 MB/sec, however the read speed is bang on. It’s worth noting that there will be  slight variation in speeds results from one computer to another and I’m sure a top line computer in lab conditions would meet the claimed speeds with ease.

To test the card in the real world I copied 4GB of data from my SSD equipped PC to and from the card and found the writing 4GB of data to 70.5 seconds whilst reading it took 53.5 seconds.

Performance
I’ve used this card for a few weeks now in a number of photo situations including damp, cold landscape sessions and fast paced studio portrait shoots. Always shooting in RAW I can happily report that the card had no problems dealing with the conditions. There was no buffering, no missing files and no corrupted images.

Potential issues
Just when you thought that everything was going well there’s a snag… well actually there’s two but neither are specific to the Kingston Memory card on test here but you should be aware of them none the less.

First there’s the read speed. In order to transfer the photos at their maximum speed you need a card reader that can handle UDMA compact flash cards and it will have to be USB 3. If not then the read speed will drop considerably and the speed advantage you thought you would be getting becomes lost.

The second issue could be a deal breaker. UDMA technology comes in a couple of different flavours and not all cameras support all UDMA cards types. My Canon 5D Mark II had no issues with the Kingston card but it’s well worth checking with your camera manufacturer to see if your camera is compatible with this memory card. I’ve checked with Kingston who also assure me that the card is now fully compatible with Nikon cameras too.

Conclusion
The Kingston Ultimate 600x is a seriously fast memory card at a price that’s almost half that of some of it’s competitors. That alone makes this a great deal but do check you have the correct equipment to handle all that speed.

There’s no shortage of choice when it comes to memory cards but getting the wrong one could result in slower performance for your camera and more time sat in front of the computer. The Kingston Ultimate 600X isn’t the fastest or newest card around right now but that means you’ll find some brilliant deals out there. I say grab one while you still can.

Photoshop Elements 11 ~ First look

I’ve always had a soft spot for Photoshop Elements. It’s 90% cheaper then Photoshop, its bigger brother, and yet it still does 90% of everything I need Photoshop to do.

Elements-1Traditionally Elements is updated every 12 months and in the past it’s fair to say some of those updates have been rather meagre… but not this one. From the moment you start Elements 11 it’s obvious things have really changed this time.

The first thing you’ll notice is the new light grey interface but look a little closer and you’ll notice a raft of other changes both big and small.

The default editing setting is now “Quick” rather then “Expert” (formally known as Full), the options bar has moved from the top to the bottom and many of your favourite features aren’t where you left them. These may be superficial changes but they all add up to make Elements 11 feel very different to Elements 10.

So what’s new?
Elements-2Well, there are lots of new features in Organiser but the good news for me is that it remains totally optional and that’s the best thing I can say about it.

Moving into the photo editing section of Elements the star of the show in my book is the new Refine Edge feature which is shamelessly lifted lock, stock and barrel from Photoshop CS5. If you’ve never experienced Refine Edge before then you’re in for a treat. As of now making complex selections of things like hair in Elements is as easy as using a paint brush.

Elements-3Elements has had a slimmed down version of Adobe Camera RAW for some time but sadly it’s never had the advanced tools of Lightroom and Photoshop like the brilliant Adjustment Brush. There’s no change on that score but Elements 11 does get the update to Adobe Camera RAW 7.1 which has all the latest and greatest adjustments like the wonderfully enhanced Clarity slider… have I ever told you that I love a bit of Clarity?

It would have been great to get some form of local adjustments in RAW but maybe that’s asking too much. On the plus side the noise reduction options in Adobe Camera RAW have been brought up to spec with the same options as Photoshop and Lightroom.

Guiding lite
The biggest number of changes in the editor can be found in the guided section. New step by step effects include creating the “perfect portrait”, adding vignettes around photos and creating a reflection below a photo.

Elements-4As with all the guided techniques these are not new tools but they’re designed to remove the skills barrier required to achieve the effect and to that end they’re very successful.

My favourite new guided effect has to be Tilt-Shift. The whole effect can be created in just two clicks and on the right photo, it’s very convincing.

Other new guided edits include Hi-Key and Low-Key effects and worthy of a mention is the new Actions panel which makes loading and playing (still no recording) actions a whole lot easier.

Not in Photoshop
Elements-5Yes you read that right. Elements 11 gives you not one but three new filters that you won’t find in Photoshop. If you don’t like filter effects you may say that’s a good thing but I know from experience that filter effects are always popular with a large number of Elements and Photoshop users alike.

The three filters are all found under the Sketch section, which gives you an idea where these are heading. They are Comic, Graphic Novel, and Pen & Ink filters and although they are all different the effects are all variations of a similar style and are a welcome addition

Conclusion
From the moment you launch Photoshop Elements 11 it’s clear Adobe have worked hard to make this version appeal to it’s target market of amateur and serious amateur photographers. Anyone moving up from a previous Elements will find the changes take a little time to get used to but before too long you’ll feel right at home.

The new and improved features of Elements 11 are all very welcome and whilst it would have been nice to find a few more of Photoshops newer tricks filtering through to Elements it’s really not missing that much.

You can try it yourself right now for free by downloading the 30 day trial http://www.adobe.com/uk/products/photoshop-elements.html

Skyline Lightroom 4 presets ~ Review

sky-3When it comes to editing my photos, I love anything that can speed up the process whilst at the same time maintain the quality I’m looking for. That’s why I love creating actions in Photoshop. In Lightroom the processes of automation is called a preset and once you’ve discovered the power of presets there’s no going back because they’re a huge timesaver.

But that’s only half the story, because not only can Lightroom presets reduce your editing time, they can also give you access to new techniques, styles and effects that you might otherwise never have tried. It’s as easy as clicking a button.

Recently I tried some new Lightroom presets from Skyline Media. These are commercial presets but at prices that really won’t break the bank. In fact my favourite preset pack (The Classic Preset pack) is just £7.99 and has over 45 different effects to choose from.

Installing
Installing Lightroom Presets can be a bit challenging, even for those of us who are fairly clued up on computers. Thankfully Skyline Media included an idiot’s guide to installing Lightroom presets along with the download. By following the instructions I had my new presets working just minutes after downloading.

Using the presets is super simple. Just head over to the develop module, open up the preset list and click on the effect of your choice. With most preset packs I’ve tried, clicking from one preset to the next is the best way to discover what they do. The Skyline presets are no different in that respect and although the differences between the presets is sometimes fairly small, it does mean that you can be very selective about the strength of the effect.

sky-2Of course the results will vary from picture to picture but I quickly found some of the effects suited my style of photos better than others. For example, I like stronger effects which may explain why I was drawn so strongly to the Classic Preset pack. Names like 80’s pop, B+W Superpunch and Clockwork Orange should give you a good idea of what to expect.

Skyline Signature
These two preset packs are from John G Moore and Colin Prior, two of the UK’s top photographers in the field of portraits and landscape. Both preset packs had a very comprehensive collection of effects. Colin’s seem to focus more on film and camera types where John’s offered a wider range of looks.

sky-1

I’m no landscape photographer but using the Skyline signature presets made a big improvement to my images and set me on the right road to getting the look I was after. The only problem is, I’ll now have revisit some of my older photos, just so I can run the presets on them. Who knows how many great photos I may have missed.

Conclusion
You might look at the results from any Lightroom preset and think ”… but I could do that myself” which is possibly true but it’s also missing the point. Presets give you ideas, inspiration and the freedom to experiment in ways which you almost certainly would not normally do. With an almost never ending range of preset effects and local adjustment presets there’s something for everyone in the Skyline presets packs.

Not all the preset packs are the same and some I found better (for me) then others, so I recommend looking closely to choose the pack (or packs) that best fit your photography. However… When you add into the mix their sensible real world pricing, the Skyline presets represent unbeatable value for money.

For more example visit the Skyline media website

Studio Clamps

If I asked you to come up with a list of the top 100 gadgets you would buy for a photographic studio, I’m pretty sure the studio clamps would fall somewhere towards the end. Let’s face it clamps are clamps right? All they do is hold things in place, job done.

Well yes that’s true, but that’s not the end of the story. In fact if I had to make a list of the most essential gear you’ll need in a studio, I’d put clamps somewhere towards the top just after lights, backgrounds, and light modifiers. Come to think of it, that might explain why I have so many of them.

So here’s the three types of clamps I use…

DIY store clamps
aIMG_5176You can pick these things up almost anywhere. I’ve found them on market stalls, in the local pound shop and even at the supermarket. From my experience, the cheaper they are the quicker those little orange jaws will break off. That said I have dozens of these things kicking around the studio and they’re great. I have giant ones for attaching backgrounds to large poles, medium sized ones for clamping reflectors to light stands and tiny ones for… actually I don’t use the really tiny ones.

Pros: Cheap to buy and readily available
Cons: Don’t expect the cheapo ones to last too long


Gorilla Studio Clamps
aIMG_5182These things are a big step up from the DIY store clamps. First up they’re made of metal, not plastic, so should stand up to years of use and abuse. The clamp action is seriously strong, so watch your fingers when snapping them closed. Each side of the clamp is lined with a rubber, which helps reduce the risk of marking delicate surfaces. These rubber strips can be removed and frustratingly, they do have a habit of falling off at the wrong moment. As the name suggests the gorilla clamps are super strong and I’ll use a couple of them to attach heavy material to a background support pole or as quick way of clamping and object to one of the many supports I have in the ceiling.

I got mine from my good friends at Smick LINK

Pros: Very strong and built to last, with a price that won’t break the bank
Cons: One day those rubber grips will fall off and get lost


Multi Clip

aIMG_5179It’s a clip not a clamp, so don’t expect this to hold anything too heavy. Even so this has to be the favourite clamp I own. It’s basically a couple of two inch bulldog clips joined together but it’s secret weapon is its ability to move each clip independently. This thing is great for making an impromptu barn door. Simply clip a piece of black card to one end and attach the other to a light stand. I’ll use these clips all the time to stop something wobbling, falling down or blowing away. At around £7 they’re not cheap but they’re so useful, every studio should have one. As before, mine came from Smick LINK

Pros: Small but ever so useful, this little gadget will be used time and time again
Cons: It’s not going to hold anything heavy for too long and the price is fairly high.

Wireless Flora Lightbank ~ Review

Back in September 2011 I reviewed the Flora Light Bank from Linco and found them to be excellent for video work and not so bad for photography too. Now the people at Linco have come up with a new wireless version. So lets find out if the addition of a remote control is a revolution or just a gimmick.

Flora1The most obvious change from the old Flora to the new is snappy new colour scheme. White and green have been replaced by black and red, which looks very smart indeed. The colour may have changed but the design has not. The Flora was and still is a well designed and well built piece of equipment. The main body is made from flame proof heavy duty plastic and the lamp holders are ceramic.

In fact the only significant improvement that I could find was the addition of a foam handle that doesn’t fall off, a marked improvement from the original

So if you’re in the market for a Flora Light then the question must be do I need the wireless feature?

You get two remote controls with each light bank. Each remote has the same two buttons and each button switches three of the six bulbs on or off. They work even if the main switch on the back of the Flora is turned off.

Linco 2Personally I would have liked to have seen the ability to switch on the bulbs one at a time, via the remote. This would give a lot more control over the lighting for us photographers and I dare say for videographers as well.

Perhaps the biggest issue you might have with the remotes is that they’re tied to the light bank they came with. The idea being that you can separately control multiple light banks. However if you lose or break the remotes then you’re stuck. Also if you have multiple lights you’ll need to carry around multiple remotes which all look the same, but only operate one light bank.

So which would I recommend, wireless or original? For me in my little studio with just one or two lights the original light bank is best suited. However if you have a video setup with the lights in less accessible heights, then I can see the sense in going wireless.

Flora Light Banks are available from www.lincostores.com Linco ship to US addresses only.

WhiBal Grey card ~ Review

Col2When it comes to getting very accurate colours in your photos, you’ll need to start with a known colour reference. That’s where a grey card comes into it’s own.

I’ve used several grey cards in recent years, but the WhiBal from Michael Tapes Design USA is my current favourite. The WhiBal cards come in several sizes ranging from Studio sized 8”x10” sheets, right down to the dinky keyring sized Whibal Card. They’re all made from plastic which means they’re waterproof and fairly durable, although I suspect the keychain version would get scuffed up quite quickly.

It’s worth noting that these are the sort of grey cards that are used for getting perfect colour balance rather then the kind of grey cards that are used for getting perfect exposure. As such the WhiBal cards are all light grey in colour, although to be technically accurate they have no colour at all, as they are certified colour neutral.

Colour Accuracy
Col1So how does the WhiBal perform?  Like all good tools these things make a mundane, everyday task, simple and predictable. In this case it’s job is  to get the colours accurate and to that end it’s faultless.

You might not be able to see much difference in the photo opposite (click it to enlarge) but trust me, when it comes to something like skin tones, the difference between getting the colours almost right and getting the colours spot on is vast.

Added bonus
IMG_7786All the WhiBal cards have a couple of nice touches… a ruler scale along the edge, Black and white patches and a star burst shaped target. Now personally I don’t find most of these that useful, but I’m sure others will. However the star burst target is a great way to check and remove lens chromatic aberrations.

In the next blog post I’ll show you exactly how I’ve integrated the WhiBal into my studio workflow.

Prices & availability
At $20 for my favourite “credit card” sized WhiBal card, these things aren’t disposable but unless you loose it, I’m sure it will last for a very long time. Sadly the WhiBal cards are a US import only, although mine arrived within a week and without any problems with customs charges. Details and prices can be found on the Michael Tapes Design website.