Shooting Zombies (with a camera)

It’s Halloween and that means lots of people are dressing up in scary costumes, which in turn makes Halloween a great photo opportunity.

A few weeks back I was lucky enough to be invited to photograph a world record attempt to gather the most Zombies in one place ever. It was held at Tulleys Farm in Sussex where their Shocktoberfest has become one of the biggest Halloween attractions in the UK.

This video was originally planned as a new 15 minute photo challenge but I got carried away with the photography and didn’t stick to time… well that’s what happens when you’re shooting zombies!

[youtube]http://www.youtube.com/watch?v=Q3mP-OrBIgc[/youtube]

As you can see from the video, the place was packed full of zombies and the more effort they’d put into their costume the happier they were to be photographed.

Here are a few of the images I shot at Shocktoberfest.

IMG_9667

IMG_9630

IMG_9627

IMG_9552

IMG_9559

IMG_9565

Untitled_Panorama1

Friday Freebie ~ 4×4 template

This weeks Friday freebie is my 4×4 template which is super simple to use and gives some pretty amazing results and all you need to get started is four great images and my 4×4 template.

Kingscoat-ColourYou can download the free template from this link:
www.gavtrain.com/free/4×4-template.zip

Once you have it opened in either Photoshop or Elements you’ll see that there are four white rectangles. Each rectangle is a holder for a photo and each is in the ratio of 3:2 which is the same as most DSLR cameras.

How to use the template
To add your own photos, first select and copy the photo you want to add. Then jump over to the template, select a white rectangle with the magic want tool and choose Edit – Paste Into (Edit – Paste Special – Paste Into in Photoshop CS5 & CS6)

You can then resize the photo before pressing enter to committing to the change.

You’ll need two images in upright (portrait) format and two images in horizontal (landscape) format. The space for each photo is 4000 pixels on the longest edge, so if you’re using smaller images you might want to resize the template before starting.

4x4-template

Usual rules apply. The action is copyright Gavin Hoey 2012. You may use it for personal, non-commercial purposes only and please do not redistribute without permission. Thank you and enjoy Smile

The making of a great landscape photo

I’ve been keen to visit the coastal town of Selsey ever since I saw a great photo of the RNLI lifeboat house and last week I got my chance. I was in the area to present a talk on photography and Photoshop so a headed off early to get a couple of hours at the location.

Selsey-FBGetting this beautiful landscape photo required more then just turning up and taking the shot, it started long before I arrived at the location. For me that means starting with research and that comes in several forms.

Planning and research
First thing I did was work out how long it would take for me to get to the location and where I was going to park once I arrived. Google Maps and Google Street View proves invaluable for this. Next I checked the sunset and tide times as I didn’t want to get to Selsey and find the lifeboat house high and dry or worse still, miss the best light of the day.

The next thing I tend to do is look at a website like Flickr to see how other photographers have interpreted the scene. I only had one chance to visit Selsey and only an hour or two of shooting time, so looking at other photographs of Selsey helped me work out what might work and what I wanted to avoid shooting.

IMG_8352First Impressions count
Despite all the advance planning the weather will make or break a landscape photo and here I got really lucky. I had blue skies with fluffy white clouds on the horizon. Perfect!

Grabbing my camera bag and tripod I walked down to the lifeboat house, set up my camera and started shooting long exposure photos with my Hoya ND400 9 stop neutral density filter. Sometimes the first view that draws your attention is the best one… but not this time.

IMG_8355Often I find moving my position even a tiny bit will improve the photo. So as the first spot wasn’t doing it for me I moved a few feet to the other side of the groyne hoping to use it as a lead in line to walk the eye into the picture. Unfortunately the groyne seems to be acting as a visual barrier more then a lead in line.

I also noticed that the low sun was casting long shadows which was causing my shadow to appear in the photo. In this photo I walked away during the 30 second exposure but you can still see the tripods shadow. Time for a rethink.

Moving along
Over the next 45 minutes I slowly walked along the shore line getting closer and closer the the lifeboat house, taking lots of photos as I went. I tried shooting with different focal length lenses but I preferred the extreme wide angle view of my Sigma 10-20mm.

IMG_8367Eventually I ended up shooting from what I thought would be the wrong side of the scene. At the widest end of the Sigma lens I was pretty much shooting into the rapidly setting sun. It was causing a bit of lens flare but also left the lifeboat house back lit which I was sure wasn’t going to work.

Never give up hope
The lighting really wasn’t working for me and I was ready to move on but then a little bit of magic happened. Just before the sun dropped below the horizon it was reflected off the wet pebbles and for a few amazing minutes the beach glowed in the evening light.

The photo opposite is the straight shot off the camera. The photo at the start of this post is the same one but has been run through Photoshop.

One last photo
IMG_8390Once the sun disappeared behind the houses on the coast the amazing light was gone. I hung around for a few more minutes just in case there was going to be a glorious autumn sunset but it soon became clear that wasn’t going to happen.

To show you how important great lighting is here’s a photo taken just a few minutes after the last one. Now the pebbles look flat and the lighting has taken on a much cooler tone.

So there you have it. A combination of careful planning, good camera technique, a little bit of patience and a spade full of luck all added up to make a great photo.

Friday Freebie ~ Sketchy Action

For this Friday Freebie I thought it would be fun to do another Photoshop Action. If you’re into Photoshop actions then you can still grab my sticker action from a few weeks back.

Sketchy-finalThis week the action creates a kind of sketchy effect and although it will work on any image it’s best suited to photos with a strong, graphic subject matter. If you find the effect doesn’t work on one photo just grab another and try again.

At the end of the action you’ll get the option to give the contrast a bit of a kick. This can be a bit hit and miss so if don’t like the contrasty results just press CTRL+Z to undo it. Alternatively click Edit-Fade Brightness/Contrast as soon as the action finishes to blend the effect to any level from 0% to 100%.

You can download the action from here www.gavtrain.com/free/sketchy.zip

The action should work fine with Photoshop CS3, CS4, CS5 and CS6. I’ve also tested it with the brand new Elements 11 and it worked perfectly. Sorry it won‘t work on Elements 10 or before.

As you can see from the image below the effect is quite dramatic.
Sketchy-Before-After

Usual rules apply. The action is copyright Gavin Hoey 2012. You may use it for personal, non-commercial purposes only and please do not redistribute without permission. Thank you and enjoy Smile

Four ways to use a polarising filter

A polarising filter is one of the few filters I still own and more importantly use on a regular basis. It was also the first type of filter that I ever bought but that was way back when I first started photography 25 years ago. Since then the humble polarising filter has hardly changed at all, in fact the only real difference is that there’s now two types; linear polarisers (for film cameras) and circular polarisers (for digital cameras).

If you’ve ever used a polariser then you’ll already know how they work. Assuming you have the screw on variety you simply attach it to the front of the lens, look through the viewfinder and rotate the polarising filter until you see the desired effect. What you see is what you get. So here’s four great uses for a filter that every photographer should own.
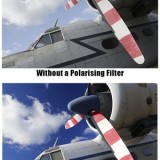
polarising filter - 1

1. Deep blue skies
OK, so this is the bread and butter effect of the polarising filter and the reason most people own one. Back in the days before digital if you wanted super saturated colours or the deepest blue skies in your photos, a polarising filter was your best option. Obviously Photoshop has changed things somewhat but it’s still a great thing to do.

It works like this. On a sunny day find a view point that’s 90 degrees to the sun. In other words you want the sun on your shoulder. At that angle you’ll get the maximum polarising effect and your sky will be a gorgeous deep blue colour. The effect is far less intense with the sun behind you and non-existent when shooting towards the sun.

Get it right and you’ll be rewarded with great colours straight out of the camera.


2. Long exposure
polarising filter - 3Polarising filters are dark just like a pair of sunglasses. In camera terms they usually reduce your exposure by 2 or 3 stops of light and if you’re shooting in aperture priority mode that can sometime cause issues with camera shake as your shutter speed will be 1/4 or even 1/8th its usual value.

Now on a sunny day that probably won’t be a problem but on a dull day or during the evening, you can use this exposure loss “problem” to your advantage.

Let’s say your exposure is ½ sec, f/22 at ISO 100. Adding a polarising filter will drop that to 4 sec, f/22 at ISO 100 and that’s the kind of long exposure speed that can add creative blur to your images. OK it’s not as effective as a really dark neutral density filter but in the right lighting it works brilliantly.

polarising filter - 2

3. Less reflections
When photographing shiny or wet surfaces you’ll often get colours that look washed out or unwanted hot spots of bright light. That’s when it’s time to reach for the polarising filter.

It may take a bit of careful positioning but when you get it right the polarising filter can drastically reduce or even remove the surface glare from things like roads, water and even wet leaves. The end result is an instant increase in contrast, punchy colours and far better photos.

Now you may be thinking that you could do the same thing in Photoshop so why bother with the polarising filter. Well if you shoot RAW then something like the recovery slider or the new highlights slider can help reduce glare but nothing beats getting it right in camera.

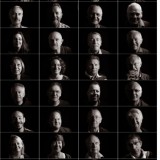
4. Cross polarised photos
polarising filter - 4It’s a little known fact that most LCD screens, like computer monitors, produce polarised light. Does that matter? Well no, not usually. However that fact becomes very useful when you get the urge to be creative with you camera without leaving your computer.

Simply create a blank white document in Photoshop and then press F a couple of times to leave just the image on screen. Then press CTRL and + key to zoom in on the image, until your screen is filled with white.

Now take anything that’s made of clear plastic such as disposable cutlery and hold it in front of the computer screen. Look through the cameras viewfinder whilst rotating the polarising filter until you see the background go jet black. Press the shutter!

September Photo Challenge ~ The Results

The theme for the September photo competition was “Planes, Trains and Automobiles” which is essentially three themes in one. I’d like to thank Print Yours for sponsoring the competition by supplying the winner with a giant print of their winning photo.

As always you all produced some excellent work but I was really pleased with the wide range of images that were entered. I’d like to thank everyone that got into the spirit of the competition. You can view all the entries by going to the Flickr group page.

I looked at all 117 entries very carefully and over the course of a few days I whittled down the number. Whilst it wasn’t a rule I did mention at the competition launch that I was hoping to see new work rather then recycling your old photos. So the first photos I rejected were those which were several years old. That reduced the number a little but with so many amazing photos it all comes down to personal taste (mine in this case), so I selected my favourite photos and the best of those made it into the top 10 as seen below.

This month the winner is…The Trice – Bo’ness Hill Climb Revival 2012 By NorthernXposure which I felt had amazing drama and perfect timing.

The Trice - Bo'ness Hill Climb Revival 2012

NorthenXposure will be getting a copy of his print made by my good friends over at Print Yours.

Near Misses…
The runners up in no particular order are below. Click on an image to view it large on Flickr. If you didn’t win this time there will be a new challenge. Details are coming soon.

Lightroom Preset – Soft Sepia Portrait

RPS-groupAs part of my talk to the digital Imaging group of the Royal Photographic Society last Sunday I set myself a mini challenge to photograph as many of the attendees as possible during the lunch break. It was a brilliant idea only marred by the fact I hadn’t anticipated that most people would be eating out.

None the less I managed to shoot around 40 portraits in under 30 minutes. That’s not bad but was less then half the audience.

The easy bit was processing the photos which, thanks to the power of Lightroom 4, I was able to do in just a few clicks.

Using Lightrooms sync option I demonstrated just how simple it is to apply the same effect on dozens of photos in one click.

If you fancy trying my Lightroom 4 settings then you can download my Soft Sepia Portrait from here:

www.gavtrain.com/free/soft-sepia-portrait.zip

It works best on a dark or black background.


Click to enlarge image

And if you’d like an idea of the lighting set up it was as my super simple single speedlight set up. You can get a fair idea of how it works by looking at this behind the scenes snap. The only difference is the white background was flipped over so I could use the black background.

BTS-RPS

Photo by Will www.willgenix.com

Friday Freebie ~ 10 Polaroid’s

It’s Friday again, which is lucky because I’ve just finished another Friday Freebie exclusive to gavtrain.com.

10 PolaroidsThis week it’s a PSD template that has a scattering of 10 Polaroid style frames. Being a PSD template it’s nice and simple to use (see below). It’s also 100% compatible with Photoshop and the more recent versions of Photoshop Elements.

You can download the 30mb high res file from here

Go to the bottom of this post if you need help downloading.

How to use the template:
10 Polaroids-HOWTOOpen the template in Photoshop. Open the image you’d like to add and Press CTRL+C to copy it.

Return to the template and press CTRL+V to paste it. Use Free Transform (CTRL+T) to resize the photo so it covers the polaroid frames.

Photoshop:
Drag the layer mask from the RED layer and drop it on to the layer with your photo.

Elements:
Click on the visibility icon of the red layer, then Alt click the mask,
Press CTRL+ A then CTRL+C
Click twice on the visibility icon of the red layer
Make your photo the active layer by clicking the layer thumbnail
Add a layer mask and then ALT click the new white mask.
Press CTRL+V and then click the layer thumbnail for the photo… done!
Thanks to Julie for the tips here

If you do use the template and create an image that you share on Facebook, Flickr, 500px, Google+ etc. then remember to leave the link in the comments below.

Usage rules
The image is copyright Gavin Hoey 2013. Use is limited to any personal, non-commercial purposes. Please share the Friday Freebie by linking back to this page. Do not redistribute the original image without my permission.

Download instructions
Click the link https://drive.google.com/file/d/0B_Mmmm3K1utNR2RyVGE5ajV1aWM/view?usp=sharing

1. Click the Download button download_icon

2. The download should start automatically

RPS DI Southern Group – All day workshop

RPSWhen?
Sunday 7th October 2012
10.00am – 4.00pm

Where?
Greyfriars Community Centre
44 Christchurch Road
Ringwood BH24 1DW

More info
http://www.rps.org/region/southern/events/view/2650

Booking Info
http://www.rps.org/resources/workshops/Booking_form_7_October.pdf

Something for everyone – beginners to advanced
There’s still time to book a place on my all day workshop for the Royal Photographic Society. I’m really excited with the agenda we have planned for the day. The workshop will be a mixture of live photography and post processing using Adobe Elements 10 and Photoshop CS5 and CS6

The day will Including:-

• processing images using the new Adobe Camera Raw

• new features in Photoshop CS6

• Live photography and recorded photo shoot with post processing

• Audience participation including a photo challenge for those who wish to join in.

 
View Larger Map

Friday Freebie ~ Sticker Action

There are only two things that you need to know about the Friday Freebie. First they’re only announced on a Friday and second… well you can probably work that one out for yourself.

Sticker - www.Gavtrain-2For this Friday freebie I’m giving away a Photoshop action. First up let me say sorry to the Elements users as this really is an action for Photoshop only but it should work on just about any version of Photoshop with the CS name.

To download the action from here: www.gavtrain.com/free/sticker-action.zip

So what does this action do you may be asking. Well it takes your image, crops it to a square and then makes a round sticker effect, complete with a peeling edge. Depending on the speed of you computer it takes a minute or so to run so please be patient.

It will work on any image but size matters as the effect will vary a little. I recommend a minimum size of 1000 pixels on the SHORTEST edge but ideally 2500 pixels on the shortest edge.

Usual rules apply. The action is copyright Gavin Hoey 2012. You may use it for personal, non-commercial purposes only and please do not redistribute without permission. Thank you and enjoy Smile

Sticker - www.Gavtrain