Usually my email inbox is full of the usual junk mail, spam and the odd bizarre suggestions for videos (but that’s another story). Every now and then an email arrives that’s a bit special and when I read the email from Geoff, I had a big smile on my face.
Geoff wanted to arrange a training session, but rather then meeting at one of my usual locations Geoff had arranged passes to the Goodwood Revival. The weekend long event is a spectacle of 40’s 50’s and 60’s vintage racing cars, bikes and aircraft. That in itself would make it a worthwhile event, but these cars aren’t here to be looked at, oh no, the cars are here to RACE!

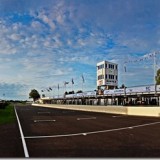
6 shot panoramic of the Goodwood race track
I had arranged to meet with Geoff and his friend Dan at Goodwood just as the gates opened, which made it a very early start, but there were a couple of benefits. Being at the venue early meant we avoided some of the huge crowds that attend the Revival, but the really big bonus of being early was getting access to the race track.
Geoff, Dan and I spent our time on the track perfecting the art of panoramic shooting whist avoiding being run over by some vintage Rolls Royce cars which were cruising round the track.

Traffic control, Goodwood style
One of the unique features of the Goodwood Revival is that almost everyone is in vintage costume (including myself, Geoff and Dan). Even the chaps who were ensuring we didn’t become photographic road kill were dressed for the occasion. In fact on the odd occasion I did see someone in jeans and a t-shirt they looked strangely out of place.


Details of cars
Our next stop was a visit to the paddock. This was where the very best cars were on show and when I say best I actually mean unique and priceless. At one point we found a line of a dozen Ferrari Grand Prix cars. In fact there were so many amazing cars packed into the paddock area that getting a good picture of a single car proved to be very difficult, but going in close and capturing the details was very rewarding.

Reflections on a fuel tank
One of the great things about being able to wonder around an event like this is the chance to spot photo opportunities that I might otherwise have missed. The photo above is such an example. It’s the reflection on the fuel tank of a BSA motorbike. To get both the reflection and the badge in focus I took two shots. The first shots had the badge in focus and the second had the reflection in focus. Photoshop was used to align and combine the images into one photo.

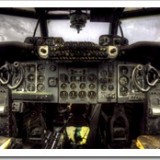
Lotus Cockpit in HDR
I’m always keen to make the photographers that come out with me try something different. Although both Geoff and Dan had tried HDR before it seemed they had found the results to be mixed. So we all had a go a shooting a three shot HDR image handheld. The secret of course, is to use Auto Exposure Bracketing and continuous shooting to minimise the movement from one shot to the next.
This shot above of the cockpit of a Lotus gives you an idea of just how close you could get to all of the cars. I couldn’t believe that I was allowed to dangle my DSLR a few inch’s above a million pound Ferrari.

Racing for real
The sound of the cars racing round the track was both deafening and exciting and eventually we could stand it no more and headed off around the track to find a location to try our hand at panning. As I mentioned at the start of this post, the cars were here to race and the drivers were really pushing the cars to the absolute limit.
I’d packed a 70-300mm lens for this part of the day which proved to be a good choice. It took us all a bit of time to get the setting right, but eventually I settled on a shutter speed of 1/250th second as the perfect panning speed to keep the car sharp and background and wheels blurred.
As I often tell my training students, you won’t get a perfect photo every time you press the shutter and when it comes to panning that’s doubly true. There were plenty of soft photos or photos with only half a car in the frame, but practice makes perfect.

HDR and colour spotting
Eventually all good things come to an end and my time with Geoff and Dan came to an end. I had a great time in their company and I’m sure they went away with a headful of photo ideas. On the way back to car I took a quick detour to a part of the track we hadn’t visited and found a display of classic cars. By now the sun really bright and the shadows very deep, so HDR shooting was the order of the day.
I noticed this lady in a 60’s style Union Jack coat and as luck would have it she was standing next to a bright red car. Getting down low I fired off three photos (2 stops apart) and hoped for the best. After running the images through HDR Pro in Photoshop CS5 I used colour range to select just the reds. Everything else was toned sepia to create the image above.
Goodwood Revival was a blast of sights and sounds. It’s a feast for photographers and petrol heads alike and I hope to return for a longer visit next year.

 Google+ finally went public around a week ago, which throws open the doors to the newest social networking platform. At this stage I’m undecided about how this new player will fit in to my life, but if you fancy following me on Google+ (known as adding me to a circle) I’m right here.
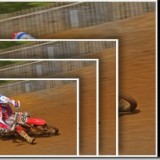


")
")
")

 There are seems to be an endless choice of lighting options available to the modern photographer, but the choice often boils down to either flash or continuous light sources. Personally I like and use both on a regular basis, it all depends upon what subject matter I’m shooting.