Raw Double Process – HDR Effect

Ever since I posted the last 15 minute photo challenge video I’ve been constantly receiving questions like… How did you make the images look so good, what did you do in Photoshop, are they all HDR… and so on.

Now, normally I don’t show the Photoshop techniques I use to create the photos from the 15 minute challenge photo challenge. Please understand, that’s not for any reasons of secrecy, I just think you would be very disappointed at how little I actually do to the images. On the few occasions I show people they often end up saying… “and that’s it!”

However such was the lighting at the Gatwick Aviation Museum, where I filmed the photo challenge, that Photoshop played a much bigger role in the image creation. So here’s a short video demonstrating one of the techniques I employed.

And here’s the final image:

Gatwick Aviation Museum (9)

Hasselblad H4D – Experience and thoughts

Let’s get something clear right from the word go… I love my Canon cameras and lenses and have no plans to buy a Hasselblad any time soon. OK with that out of the way I’ll briefly explain why I’m not using Canon for the photos in this post.

A few weeks back I received an email from Hasselblad offering me the chance to get hands on experience with their H4D medium format digital camera. A few emails and a brief meeting later, I’d arranged to shoot a couple of studio lighting videos at Hasselblads shiny new studios in London. They’re coming soon, but for now here’s my thoughts on the camera.

Dream camera?
Hasselblad is a name I’ve been familiar with since my earliest days in photography. It’s a brand that many photographers aspire to and comes with a price tag to match. But for some professional photographers the initial cost isn’t an issue when quality is all that counts and I tell you right now the H4D produces images with amazing sharpness and detail, far in excess of my usual Canon 5d Mark II.

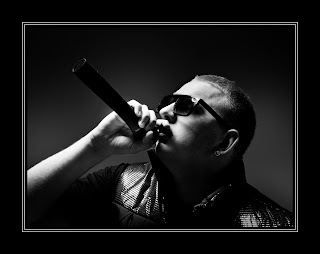
For my day in the studio I’d lined up Delaney, an up and coming rapper, to be my model. Hasselblad had promised to loan me a H4D-31 for the shoot. It has the smallest sensor in the H4D range, but at 30 million pixels small is a relative term. However when I arrived the H4D-31 was unavailable, so instead used the midrange H4D-50 which packs a massive 50 million pixel sensor. Other then a bigger sensor the two cameras are identical.

If it’s heavy it must be good
First impressions of the H4D is that it’s a big, heavy camera, but surprisingly comfortable to hold. When I swapped the standard 80mm lens for a 35-90mm zoom, the H4D became very heavy indeed, which may explain why so many Hasselblad owners prefer to use a tripod.

In use the H4D was as easy to operate as any DSLR camera. All the usual shooting modes are there (Aperture, Shutter Priority and Manual). Half pressing the shutter button will lock focus and exposure just like my DSLR. Perhaps my favourite feature was the “True Focus” function, which allowed me to retain focus on a subject even after I’ve recomposed the shot. Believe me it was clever stuff.

Pressing the shutter button is a satisfying experience. A half press will focus, which isn’t fast, but it works just fine. Fully press the shutter button to take the shot and you’ll hear a very satisfying clunk. The image pops up on the cameras LCD almost immediately for review.

The drawbacks
So it’s good news all the way then? Well no. The 50 million pixel sensor produces a 75mb RAW file, so you’ll need lots of memory cards, lots of hard drive space and a fairly beefy computer to process them all. You’ll also need a spare battery for the camera as they drain surprisingly fast.

Such is the clarity and resolution of the camera that every little detail is visible. So for example on portraits, every minor pimple, dry skin patch or makeup mishap will need retouching. Don’t believe me? Take at look at this actual pixel view… Click to enlarge. The yellow square shows you the area I’ve enlarged. No sharpening has been added, this is straight from the RAW file.


So would I buy one… No. Good as the camera and lenses are, it’s really not going to suit by style of photography. However I’d definitly use one should the need arise, but I’d opt for the hire service that Hasselblad offer on their gear.

Would I recommend one? Well that depends on what sort of photography you do. If you shoot sports, wildlife, need high ISO or prefer to travel light then no, stick to a DSLR. If you shoot landscapes, portraites or still life work, and demand nothing but the best quality images, then this camera should be on you’re radar.

And Finally…
I recorded a couple of videos whilst at the studios. This shot of Sam is a test shot I snapped whilst I figured out one of the lighting set ups. We all loved the background which is made of large pieces of foam. It’s the stuff that’s usually used to sound proof music studios. I’m pretty sure most of it would have mysteriously disappeared had it not been firmly glued to the wall. Great idea that.

Selective colour in five steps

Selective colour is one of those little Photoshop tricks that’s well worth keeping up your sleeve. The effect is hardly new, cutting edge or revolutionary, but it can still make an eye catching image providing it’s used sparingly.

The basic idea is simple enough. First find a standard colour image that contains a bold area of a single colour. That done you’ll need to select the colour and turn everything else black and white. OK, that sounds easy enough doesn’t it, but how do you select just one colour from an image?

Take a look at the image opposite to get an idea of the direction I’m headed. So let’s begin.


Step One
First open your image, apply any processing you wish and if your image has multiple layers save a copy and then click Layer – Flatten Image to collapse all the layers down into a single background layer.

Step Two
Click Select – Color Range to open the color range selection tools. If you’ve never used this tool before don’t worry it’s all nice and straight forward. Moving your cursor over the image will turn it into a colour sampler tool. Click on the colour you’d like to select, in this case red lettering, and have a look at the result on the Color Range window. White shows the selected areas and black shows unselected areas of the image.

Step three
Either increase the fuzziness to enlarge the range of similar colours sampled or click on the Add to Sample eyedropper and click on more areas of similar colour. Continue until the area of colour you want to select has turned white in the preview window and the majority of the remaining image is black. Remember CTRL+Z will undo your last click… handy to know if you accidentally sample in the wrong spot.


Step Four
Now this is the bit that seems wrong, but trust me it’s important. Click Select – Inverse.
The chances are there will be areas selected that are the same colour as the thing you wanted to selected, but are not part of it. Remove these using any selection tool you like (free hand lasso is a good choice). Remember to hold Shift as you draw your selection.


Step five
Click Layer – New Adjustment layer – Black & White and the colour will disappear from the image except the area you selected. The back and white areas can be adjusted by moving the sliders on the Black & White adjustment layer to create a mono look that compliments the image.

So there you have it, selective colour in five easy steps.

Out of bounds effect made simple – Photoshop

It’s high time I made another Photoshop video tutorial. After a few minutes scratching my head thinking what I should do, I took a quick look back through your Quick Shot Questions. One Photoshop question kept coming up which was this… “How did you make that pop up image at the end of the abstract background tutorial?”

The technique is known as out of bounds and as the name suggests the idea is to make part of the image poke out from the frame.

Despite appearances the technique is fairly straight forward when it’s broken down into a few simple steps as you’ll see in this video.

5 photo motivations tips

If one of your new years resolutions was to take more and better photos, you’re not alone. I say exactly the same thing every year and happily I can report that it’s one resolution I stick to. So what’s my secret?

As with any new years resolution the key in hitting your goal is planning and enjoyment, so here are five of my top tips for making 2011 your best ever photo year.

Make some folders
The more photos you take the more you’ll learn about your camera equipment and as your confidence grows your pictures will improve. That’s all well and good, but how do you keep the motivation going?

My trick is to make twelve new folders and name them Jan-2011, Feb-2011, Mar-2011… And so on.

Now stick them somewhere you’ll see them regularly to remind you that they need filling up!

Camera at the ready
When the moment strikes, how quickly could you be ready to take photos? Is you camera to hand and if so is it loaded with a blank memory card and charged battery?

Of course carrying a heavy SLR and a bunch of lenses around just in case a great photo opportunity comes your way isn’t really an option for most people, that’s why I have a small compact camera I leave in the car. I’ll even reach for my phone to take a snap if needs be, just as I did for the photo above.

Take a course
There’s not a photographer on this planet who doesn’t want to improve their skills, so it makes sense to take a training course every now and then.

But there’s more to training then just training. Group training can be a social occasion, a chance for you to meet up with other photographers, swap tips, try gear and make friends with people who share your passion for photography.

Out of your comfort zone
What do you shoot primarily? Is it landscapes, portraits, wildlife or sports? Whatever your speciality it’s very easy to get stuck in a rut and when that happens (and eventually it will) the fastest way to break out is by doing something different.

A great example was when I got the chance to shoot a motocross event last year. I’m not a sports photographer, nor do I plan to be one but I had a great day and learned a lot in the process.

So if you’ve never shot a portrait before, make 2011 the year you give it a whirl. Conversely if you spent the whole of 2010 locked in the studio, then get outside and do a wildlife shoot.

If you’re a social media type why not ask around to find someone who doesn’t do your type of photography and would be willing to take you out to share their knowledge for a few hours. In return you could invite them into your world and share your skills with them.

Borrow, hire, buy.
I love getting my hands on new lenses, but it’s an expensive business especially for exotic things like fish eye’s or super telephotos. A great alternative to buying is hiring. Not only does it give you the chance to experiment with something new and different, but you can really test the lens and decide if it’s a lenses you really need or not.

Having something on loan for a short period should also encourage you to use your camera and in reality it’s taking more photos that will improve your photography.

So there you have it, that’s just a few ideas to get you going. If you have any more suggestions feel free to add them to the comments below.

Gavin & Jared – Photo hook up

It’s all well and good working on your own as a photographer. I’m my own boss, I work the hours I want (unless someone is paying me of course) and I get to have lots of time with my family. Now, good as that all is there is one major down side. In a word it’s Creativity

When you’re the only ideas guy there’s no one else to brainstorm with, no one to push your creativity and no one to compete against that understands and thinks with the same photographic mind as you

So get around this I like to spend time with other photographers. I use training days, trade shows and photo walks to recharge my creative batteries as well as networking opportunities.

So when the chance to hook up with Jared Polin from Fro Knows Photo came along I said yes. Unfortunately the 3500 mile distance between us made a physical meet up rather tricky, but thanks to the wonders of Skype and video calls that problem was removed.

So in the end what happened was I took the photos and sent them to Jared to process. U unfortunately for Jared, the image out of the camera was a little to good and didn’t need much adjustment, none the less Jared did a great job.

Best of 2010

With 2010 drawing to a close I though it might be a good time to look back at some of the videos I’ve made this year. I’m not 100% sure exactly how many Photoshop tutorials and photography tips videos I made this year but for the purposes of this posy I’ll stick to the publicly available content on my YouTube Channel.

So from the 28 videos I uploaded to you tube here are the top videos in various categories…

Longest video – The 10 minute Emergency Christmas Card Photoshop Technique

Made for my friends at tip squirrel.com I originally planned to call this the 5 minute Christmas card technique, but I quickly realised it was going to take much longer then I had planned hence the name


Shortest video – Star Rotation Effect – Photoshop CS5 New Action.

This was a video I made for the Next Photoshop Evangelist competition. Part of the entry requirements was the video had to be less then 2 minutes long and feature the concept of twenty. See if you can spot it!

Most Commented – Grey background lighting tips and tricks — Quick Shots 08

Another studio/portrait tutorial but this time I demonstrated three lighting tricks with one grey background cloth.

Most Viewed – How to shoot an unusual self portrait.

Me, myself and I get together to make a very strange self portrait. The opening minute was great fun to make and was a learning curve on how to use Adobe Premiere Elements to creatively edit videos.

And finally my favourite video of 2010

To be honest I’ really happy with almost all of my videos, but there are a few that stand out.

Of the 15 minute challenges my last video of the year, filmed at Winchester Cathedral, is high on my favourites list. It produced some of the best images I’ve taken this year and was a location I intend to return to later in the year. The 15 minute challenge in Kens Field was a real tough challenge photographically, so coming back with anything worth showing is a success.

Teaming up with Jared Polin from Fro Knows Photo was a fun thing to try and may be repeated again in 2011 either with Jared or other photographers / Photoshop experts.

But if I had to pick just one video it would be Long exposure technique. It combines some useful photography tips with a bit of fun and produced a stunning photo. Incidentally there is an extended version of this video on the Photo Beach Teach DVD which includes the part where my cable release fell into the water!

So that’s it for 2010. Look out for more Photoshop videos, more Photography tips videos, more review videos and more 15 minute photo challenges videos in 2011.

15 Minute Photo Challenge – Winchester Cathedral

It’s time for another 15 Minute Photo Challenge. In a change from my previous outdoor locations I decided to do this challenge inside the amazing cathedral in Winchester. Why inside? Well partly because it’s an excellent location brimming with photographic potential but mostly because it was cold, grey and snowy outside.

As always I had just 15 minutes to take the photos, however if I’m honest the timing went out the window slightly. Not my fault, honest.

As I was wondering around taking photos I was approached by one of the Cathedral staff. I was really expecting to hear the usual “no photos allowed here” comment, but instead the very understanding gentleman offered us a quick tour round the Crypt. How could I refuse…
 
Click the images to enlarge…
Winchester Crypt(2)

The statue (Silence II) is by Anthony Gormley and when the crypt floods, which if often does, the statue and its reflection look stunning. Fortunately or unfortunately, depending on your perspective the crypt was dry so we were able to walk inside.
Winchester Crypt(1)
At the back of the crypt was an early first world war grave marker. Most of these have been lost, destroyed later in the war or rotted away.