Teaser ~ 15 Minute Photo Challenge

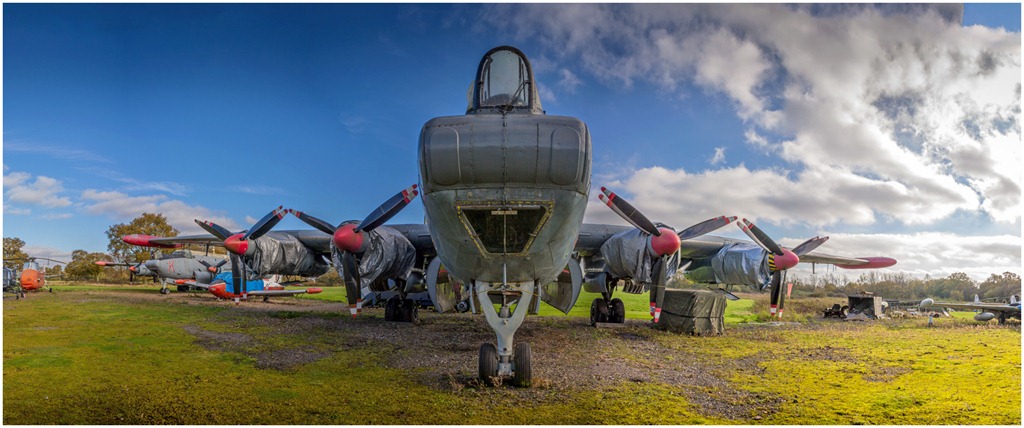
I keep getting asked to make more 15 minute photo challenge videos and I keep promising that I will. So here’s a short teaser clip from a brand new 15 Minute Photo Challenge video that will we filmed last week at one of my favourite places to visit.

This video was made possible by the kind assistance of Canon, who loaned me a new EOS M camera for the day (full review is coming soon) and Adorama who are my video sponsors.

But the biggest thanks has to go to Gatwick Aviation Museum who were kind enough to let me loose at their museum once again. It’s a fabulous place to visit and every time I go there’s something new to photograph.

The full Video will be released later this month but as you can see from the teaser video and the photos below, it’s going to be worth the wait!

Gatwik-2

Gatwik-1

Kingston Ultimate 600X ~ Review

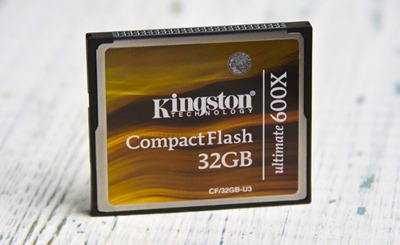
In this review I’m looking at the Kingston ultimate 600X, it’s a compact flash memory card that promises to really pack a punch when it comes to speed and capacity. Lets see how well if fares in the real world.

Kingston-600x-gavtrain
Verdict: The Kingston ultimate 600x performed very well in terms of its speeds. In real world use it’s proved itself to be very dependable. Just make sure you have a compatible camera and card reader.
   
Overall Rating

4-Star

Design & Features 4-Star
Performance

4-Star

Price 5-Star
+ Plus Points
    + High Capacity
    + Excellent value
    + Very fast Speeds
– Minus Points
    – USB 3 reader required for max speed
    – May not be suitable for older cameras
    – 32GB maximum size available
Price (at time of review) 32GB around £60.00 $80.00 from Adorama 

Suppliers Website: www.kingston.com

The Kingston ultimate 600x is not the newest card on the block nor is it the fastest but it’s certainly one of the best value cards around. It uses UDMA technology which is short for Ultra Direct Memory Access and that means it’s quick. All UDMA cards can achieve a write speed of at least 45MB per second but with the ultimate 600x Kingston is claiming a read and write speed of a whopping 90 MB/s. Add to that the inclusion of a lifetime limited warranty and access to Kingston’s mediaRECOVER software via a download (activation key is in the box) and this card is shaping up very well indeed.

Capacity
The Ultimate 600x comes in two sizes, 16GB and 32GB. Which you prefer will depend on the pixel count of your camera, if you shoot in RAW or JPG format and your personal feeling about whether having more photos on less cards is safer then having less photos on lots of cards.

Using my Canon 5D Mark II photos as a guide a 32 GB card stores around 1050 RAW files or 4900 JPG’s.

Speed Tests
If you need to shoot lots of photos very quickly without camera buffering then this card is aimed squarely at you. That said fast cards are not just for the Kingson 600x speedsports shooters amongst us, we all have to download images on to our computers and when we do a fast card will reward you handsomely.

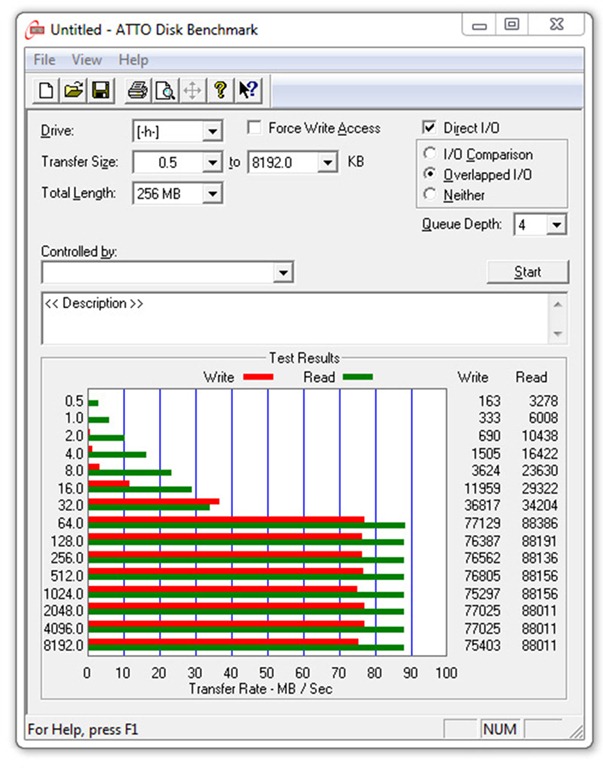
If technical charts are your things then the ATTO test will give you a fair idea of the speeds the card can reach. A quick glance at the chart will show you that the write speeds were very consistent at around 76 MB/sec and read speeds were slightly better at 88 MB/sec

The read speed is where the the biggest time saving comes when transferring files from the card to your computer so faster is definitely better here.

The write speed is a little disappointing as it misses the advertised speed of 90 MB/sec, however the read speed is bang on. It’s worth noting that there will be  slight variation in speeds results from one computer to another and I’m sure a top line computer in lab conditions would meet the claimed speeds with ease.

To test the card in the real world I copied 4GB of data from my SSD equipped PC to and from the card and found the writing 4GB of data to 70.5 seconds whilst reading it took 53.5 seconds.

Performance
I’ve used this card for a few weeks now in a number of photo situations including damp, cold landscape sessions and fast paced studio portrait shoots. Always shooting in RAW I can happily report that the card had no problems dealing with the conditions. There was no buffering, no missing files and no corrupted images.

Potential issues
Just when you thought that everything was going well there’s a snag… well actually there’s two but neither are specific to the Kingston Memory card on test here but you should be aware of them none the less.

First there’s the read speed. In order to transfer the photos at their maximum speed you need a card reader that can handle UDMA compact flash cards and it will have to be USB 3. If not then the read speed will drop considerably and the speed advantage you thought you would be getting becomes lost.

The second issue could be a deal breaker. UDMA technology comes in a couple of different flavours and not all cameras support all UDMA cards types. My Canon 5D Mark II had no issues with the Kingston card but it’s well worth checking with your camera manufacturer to see if your camera is compatible with this memory card. I’ve checked with Kingston who also assure me that the card is now fully compatible with Nikon cameras too.

Conclusion
The Kingston Ultimate 600x is a seriously fast memory card at a price that’s almost half that of some of it’s competitors. That alone makes this a great deal but do check you have the correct equipment to handle all that speed.

There’s no shortage of choice when it comes to memory cards but getting the wrong one could result in slower performance for your camera and more time sat in front of the computer. The Kingston Ultimate 600X isn’t the fastest or newest card around right now but that means you’ll find some brilliant deals out there. I say grab one while you still can.

The making of a great landscape photo

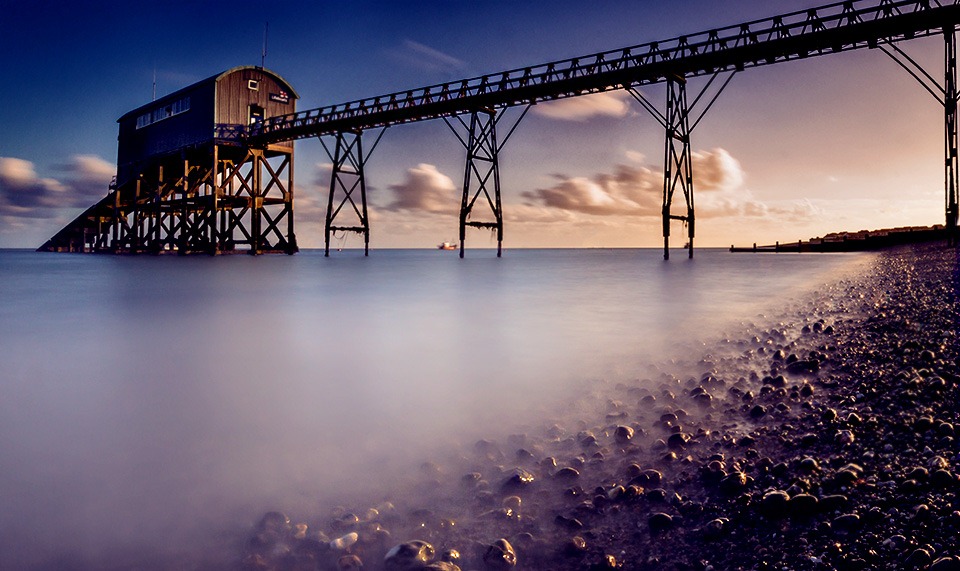
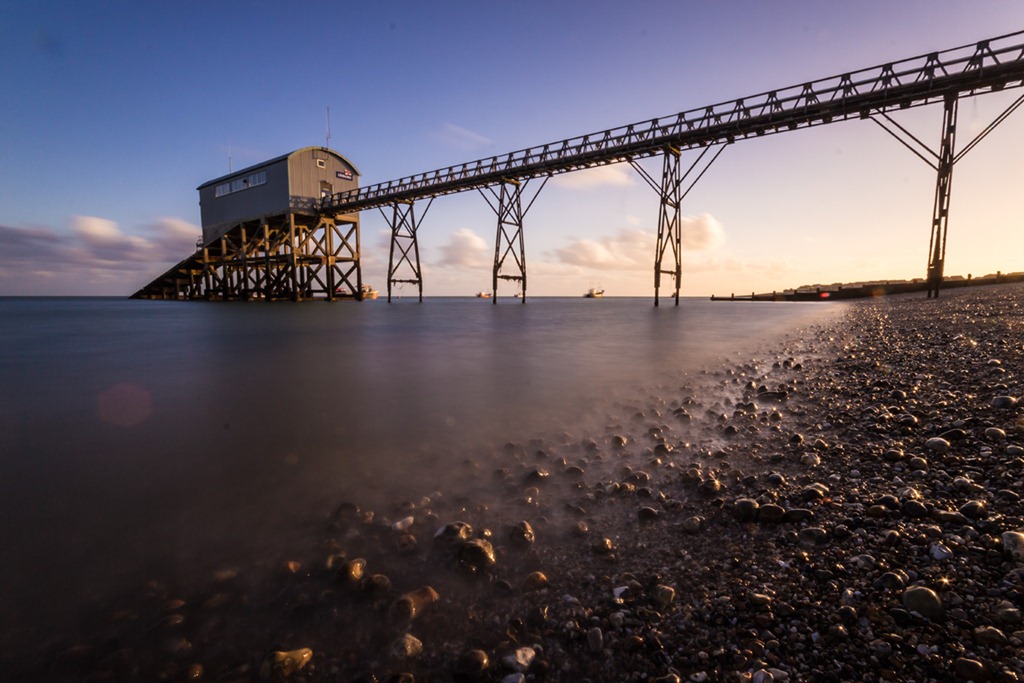
I’ve been keen to visit the coastal town of Selsey ever since I saw a great photo of the RNLI lifeboat house and last week I got my chance. I was in the area to present a talk on photography and Photoshop so a headed off early to get a couple of hours at the location.

Selsey-FBGetting this beautiful landscape photo required more then just turning up and taking the shot, it started long before I arrived at the location. For me that means starting with research and that comes in several forms.

Planning and research
First thing I did was work out how long it would take for me to get to the location and where I was going to park once I arrived. Google Maps and Google Street View proves invaluable for this. Next I checked the sunset and tide times as I didn’t want to get to Selsey and find the lifeboat house high and dry or worse still, miss the best light of the day.

The next thing I tend to do is look at a website like Flickr to see how other photographers have interpreted the scene. I only had one chance to visit Selsey and only an hour or two of shooting time, so looking at other photographs of Selsey helped me work out what might work and what I wanted to avoid shooting.

IMG_8352First Impressions count
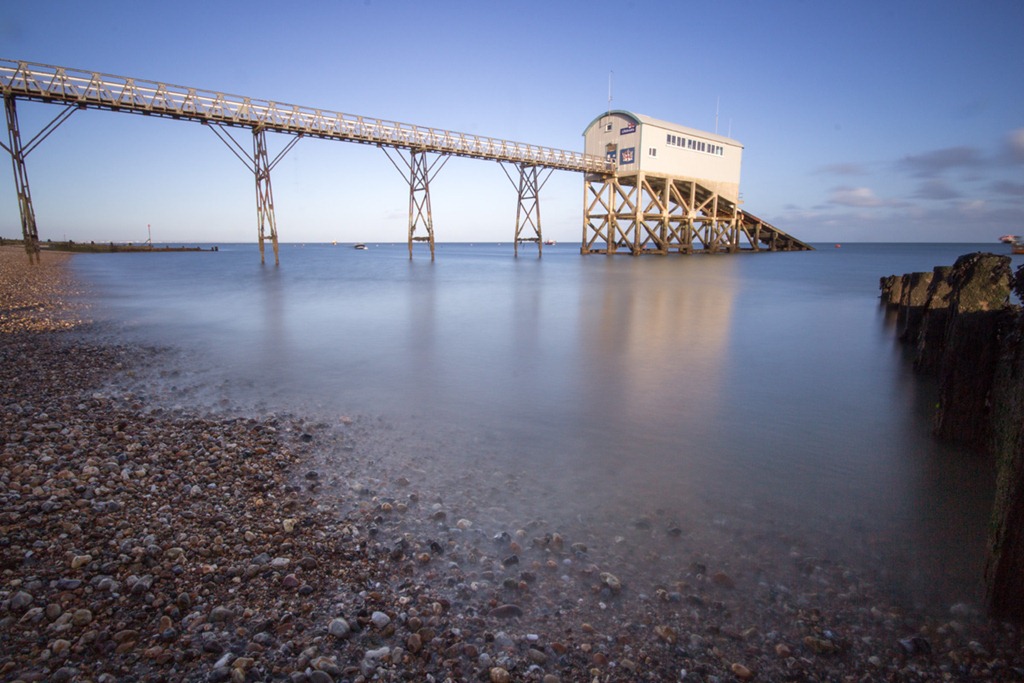
Despite all the advance planning the weather will make or break a landscape photo and here I got really lucky. I had blue skies with fluffy white clouds on the horizon. Perfect!

Grabbing my camera bag and tripod I walked down to the lifeboat house, set up my camera and started shooting long exposure photos with my Hoya ND400 9 stop neutral density filter. Sometimes the first view that draws your attention is the best one… but not this time.

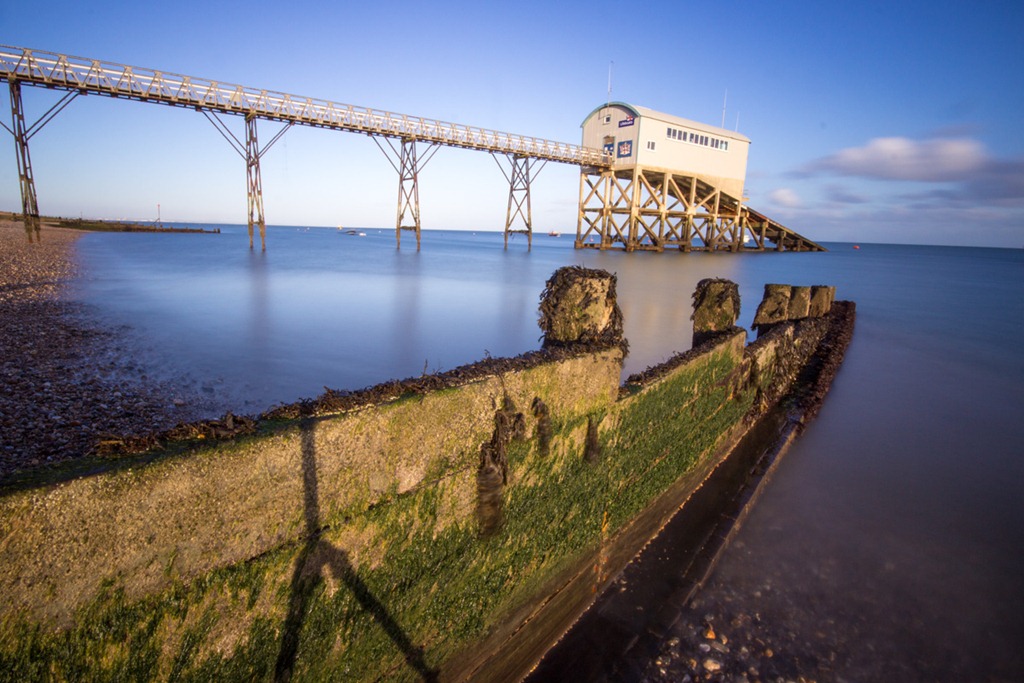
IMG_8355Often I find moving my position even a tiny bit will improve the photo. So as the first spot wasn’t doing it for me I moved a few feet to the other side of the groyne hoping to use it as a lead in line to walk the eye into the picture. Unfortunately the groyne seems to be acting as a visual barrier more then a lead in line.

I also noticed that the low sun was casting long shadows which was causing my shadow to appear in the photo. In this photo I walked away during the 30 second exposure but you can still see the tripods shadow. Time for a rethink.

Moving along
Over the next 45 minutes I slowly walked along the shore line getting closer and closer the the lifeboat house, taking lots of photos as I went. I tried shooting with different focal length lenses but I preferred the extreme wide angle view of my Sigma 10-20mm.

IMG_8367Eventually I ended up shooting from what I thought would be the wrong side of the scene. At the widest end of the Sigma lens I was pretty much shooting into the rapidly setting sun. It was causing a bit of lens flare but also left the lifeboat house back lit which I was sure wasn’t going to work.

Never give up hope
The lighting really wasn’t working for me and I was ready to move on but then a little bit of magic happened. Just before the sun dropped below the horizon it was reflected off the wet pebbles and for a few amazing minutes the beach glowed in the evening light.

The photo opposite is the straight shot off the camera. The photo at the start of this post is the same one but has been run through Photoshop.

One last photo
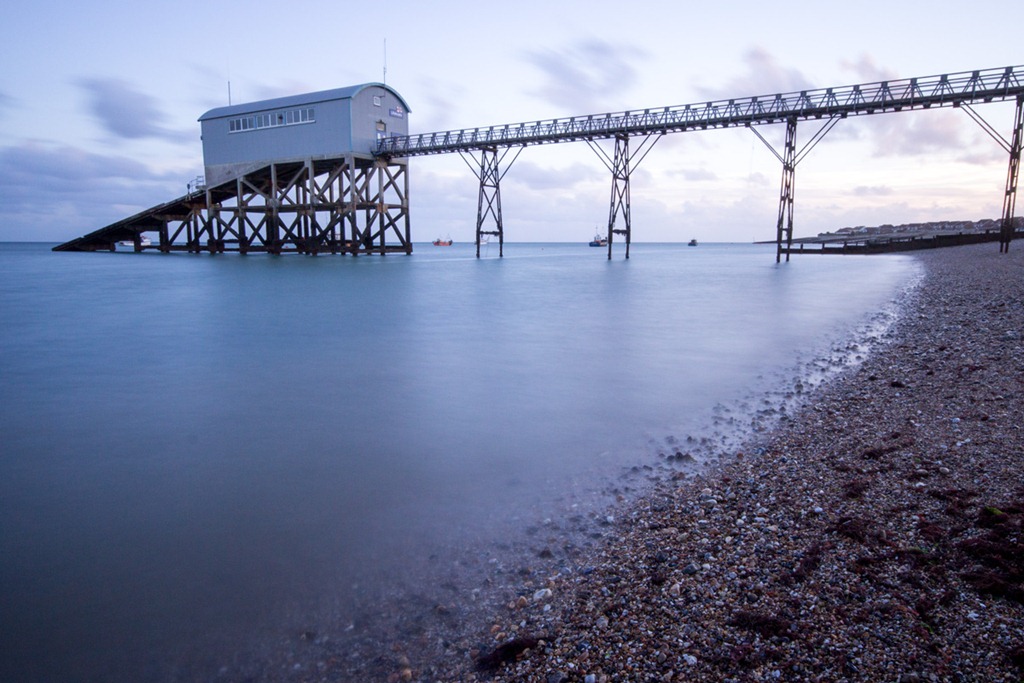
IMG_8390Once the sun disappeared behind the houses on the coast the amazing light was gone. I hung around for a few more minutes just in case there was going to be a glorious autumn sunset but it soon became clear that wasn’t going to happen.

To show you how important great lighting is here’s a photo taken just a few minutes after the last one. Now the pebbles look flat and the lighting has taken on a much cooler tone.

So there you have it. A combination of careful planning, good camera technique, a little bit of patience and a spade full of luck all added up to make a great photo.

Four ways to use a polarising filter

A polarising filter is one of the few filters I still own and more importantly use on a regular basis. It was also the first type of filter that I ever bought but that was way back when I first started photography 25 years ago. Since then the humble polarising filter has hardly changed at all, in fact the only real difference is that there’s now two types; linear polarisers (for film cameras) and circular polarisers (for digital cameras).

If you’ve ever used a polariser then you’ll already know how they work. Assuming you have the screw on variety you simply attach it to the front of the lens, look through the viewfinder and rotate the polarising filter until you see the desired effect. What you see is what you get. So here’s four great uses for a filter that every photographer should own.

polarising filter - 1

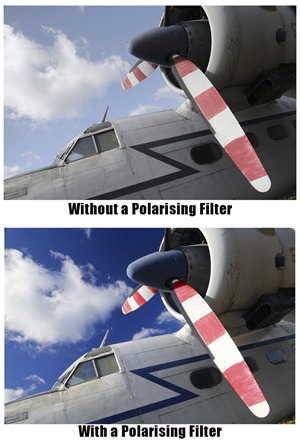
1. Deep blue skies
OK, so this is the bread and butter effect of the polarising filter and the reason most people own one. Back in the days before digital if you wanted super saturated colours or the deepest blue skies in your photos, a polarising filter was your best option. Obviously Photoshop has changed things somewhat but it’s still a great thing to do.

It works like this. On a sunny day find a view point that’s 90 degrees to the sun. In other words you want the sun on your shoulder. At that angle you’ll get the maximum polarising effect and your sky will be a gorgeous deep blue colour. The effect is far less intense with the sun behind you and non-existent when shooting towards the sun.

Get it right and you’ll be rewarded with great colours straight out of the camera.


2. Long exposure
polarising filter - 3Polarising filters are dark just like a pair of sunglasses. In camera terms they usually reduce your exposure by 2 or 3 stops of light and if you’re shooting in aperture priority mode that can sometime cause issues with camera shake as your shutter speed will be 1/4 or even 1/8th its usual value.

Now on a sunny day that probably won’t be a problem but on a dull day or during the evening, you can use this exposure loss “problem” to your advantage.

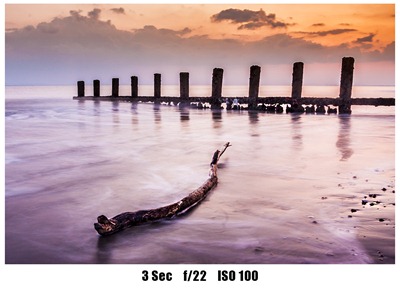
Let’s say your exposure is ½ sec, f/22 at ISO 100. Adding a polarising filter will drop that to 4 sec, f/22 at ISO 100 and that’s the kind of long exposure speed that can add creative blur to your images. OK it’s not as effective as a really dark neutral density filter but in the right lighting it works brilliantly.

polarising filter - 2

3. Less reflections
When photographing shiny or wet surfaces you’ll often get colours that look washed out or unwanted hot spots of bright light. That’s when it’s time to reach for the polarising filter.

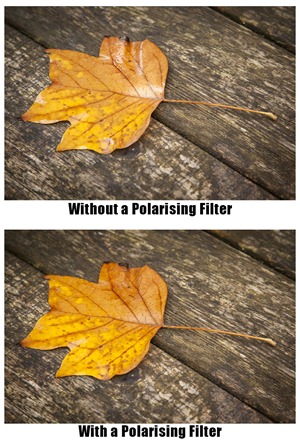
It may take a bit of careful positioning but when you get it right the polarising filter can drastically reduce or even remove the surface glare from things like roads, water and even wet leaves. The end result is an instant increase in contrast, punchy colours and far better photos.

Now you may be thinking that you could do the same thing in Photoshop so why bother with the polarising filter. Well if you shoot RAW then something like the recovery slider or the new highlights slider can help reduce glare but nothing beats getting it right in camera.

4. Cross polarised photos
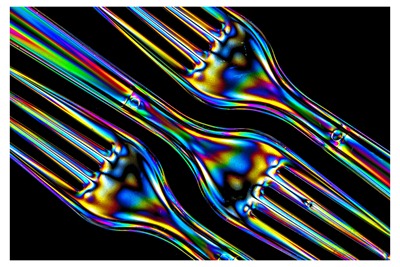
polarising filter - 4It’s a little known fact that most LCD screens, like computer monitors, produce polarised light. Does that matter? Well no, not usually. However that fact becomes very useful when you get the urge to be creative with you camera without leaving your computer.

Simply create a blank white document in Photoshop and then press F a couple of times to leave just the image on screen. Then press CTRL and + key to zoom in on the image, until your screen is filled with white.

Now take anything that’s made of clear plastic such as disposable cutlery and hold it in front of the computer screen. Look through the cameras viewfinder whilst rotating the polarising filter until you see the background go jet black. Press the shutter!

September Photo Challenge ~ The Results

The theme for the September photo competition was “Planes, Trains and Automobiles” which is essentially three themes in one. I’d like to thank Print Yours for sponsoring the competition by supplying the winner with a giant print of their winning photo.

As always you all produced some excellent work but I was really pleased with the wide range of images that were entered. I’d like to thank everyone that got into the spirit of the competition. You can view all the entries by going to the Flickr group page.

I looked at all 117 entries very carefully and over the course of a few days I whittled down the number. Whilst it wasn’t a rule I did mention at the competition launch that I was hoping to see new work rather then recycling your old photos. So the first photos I rejected were those which were several years old. That reduced the number a little but with so many amazing photos it all comes down to personal taste (mine in this case), so I selected my favourite photos and the best of those made it into the top 10 as seen below.

This month the winner is…The Trice – Bo’ness Hill Climb Revival 2012 By NorthernXposure which I felt had amazing drama and perfect timing.

The Trice - Bo'ness Hill Climb Revival 2012

NorthenXposure will be getting a copy of his print made by my good friends over at Print Yours.

Near Misses…
The runners up in no particular order are below. Click on an image to view it large on Flickr. If you didn’t win this time there will be a new challenge. Details are coming soon.

RPS DI Southern Group – All day workshop

RPSWhen?
Sunday 7th October 2012
10.00am – 4.00pm

Where?
Greyfriars Community Centre
44 Christchurch Road
Ringwood BH24 1DW

More info
http://www.rps.org/region/southern/events/view/2650

Booking Info
http://www.rps.org/resources/workshops/Booking_form_7_October.pdf

Something for everyone – beginners to advanced
There’s still time to book a place on my all day workshop for the Royal Photographic Society. I’m really excited with the agenda we have planned for the day. The workshop will be a mixture of live photography and post processing using Adobe Elements 10 and Photoshop CS5 and CS6

The day will Including:-

• processing images using the new Adobe Camera Raw

• new features in Photoshop CS6

• Live photography and recorded photo shoot with post processing

• Audience participation including a photo challenge for those who wish to join in.

 
View Larger Map

Photoshop Elements 11 ~ First look

I’ve always had a soft spot for Photoshop Elements. It’s 90% cheaper then Photoshop, its bigger brother, and yet it still does 90% of everything I need Photoshop to do.
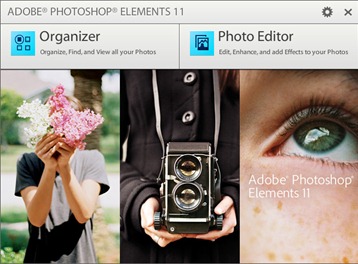
Elements-1Traditionally Elements is updated every 12 months and in the past it’s fair to say some of those updates have been rather meagre… but not this one. From the moment you start Elements 11 it’s obvious things have really changed this time.

The first thing you’ll notice is the new light grey interface but look a little closer and you’ll notice a raft of other changes both big and small.

The default editing setting is now “Quick” rather then “Expert” (formally known as Full), the options bar has moved from the top to the bottom and many of your favourite features aren’t where you left them. These may be superficial changes but they all add up to make Elements 11 feel very different to Elements 10.

So what’s new?
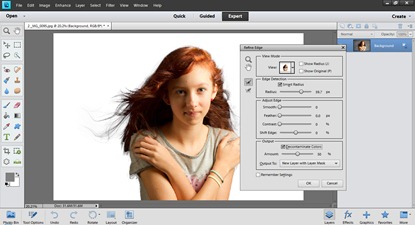
Elements-2Well, there are lots of new features in Organiser but the good news for me is that it remains totally optional and that’s the best thing I can say about it.

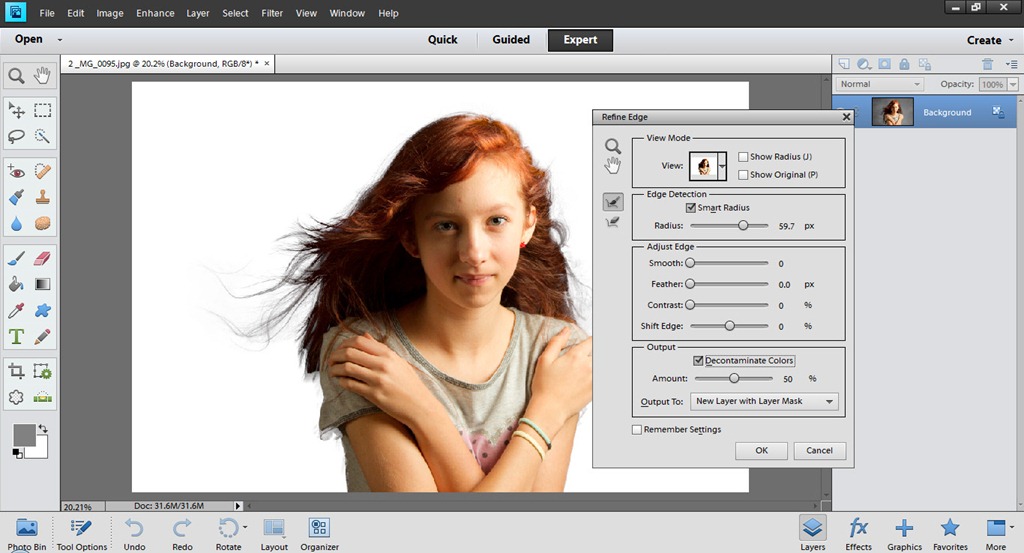
Moving into the photo editing section of Elements the star of the show in my book is the new Refine Edge feature which is shamelessly lifted lock, stock and barrel from Photoshop CS5. If you’ve never experienced Refine Edge before then you’re in for a treat. As of now making complex selections of things like hair in Elements is as easy as using a paint brush.
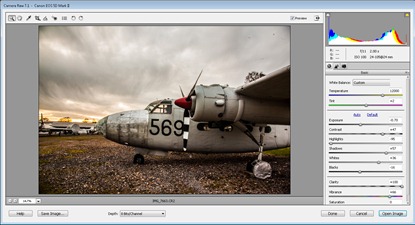
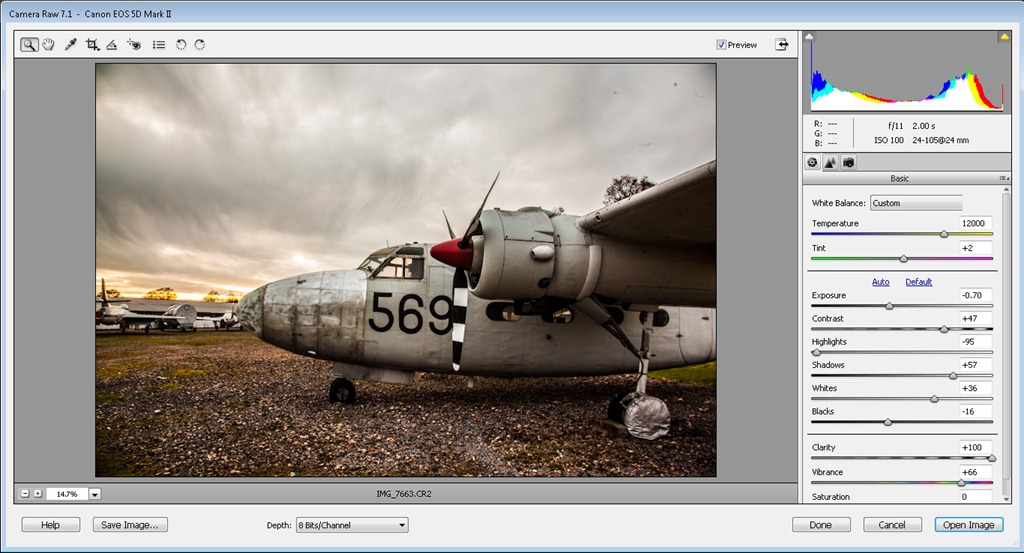
Elements-3Elements has had a slimmed down version of Adobe Camera RAW for some time but sadly it’s never had the advanced tools of Lightroom and Photoshop like the brilliant Adjustment Brush. There’s no change on that score but Elements 11 does get the update to Adobe Camera RAW 7.1 which has all the latest and greatest adjustments like the wonderfully enhanced Clarity slider… have I ever told you that I love a bit of Clarity?

It would have been great to get some form of local adjustments in RAW but maybe that’s asking too much. On the plus side the noise reduction options in Adobe Camera RAW have been brought up to spec with the same options as Photoshop and Lightroom.

Guiding lite
The biggest number of changes in the editor can be found in the guided section. New step by step effects include creating the “perfect portrait”, adding vignettes around photos and creating a reflection below a photo.
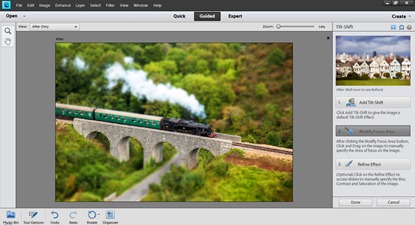
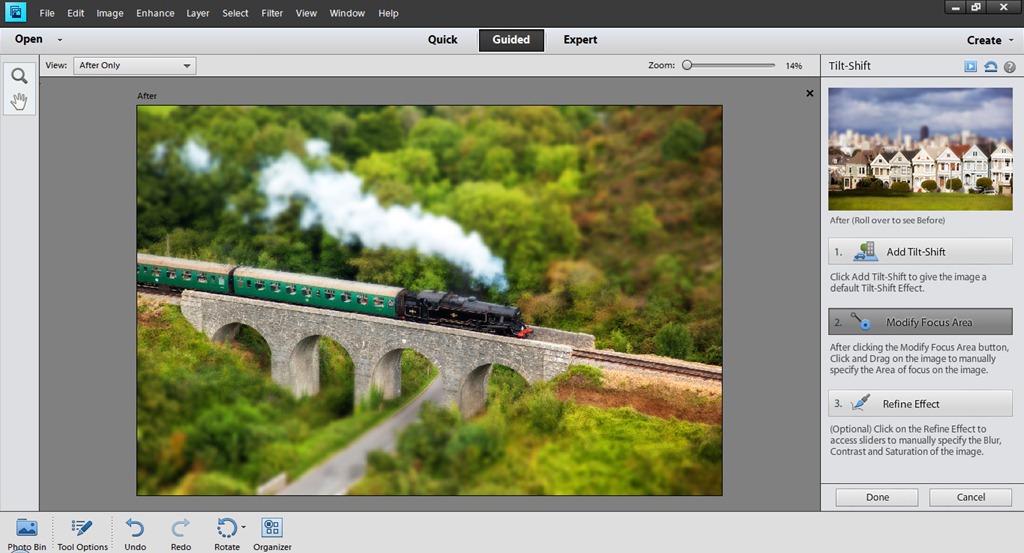
Elements-4As with all the guided techniques these are not new tools but they’re designed to remove the skills barrier required to achieve the effect and to that end they’re very successful.

My favourite new guided effect has to be Tilt-Shift. The whole effect can be created in just two clicks and on the right photo, it’s very convincing.

Other new guided edits include Hi-Key and Low-Key effects and worthy of a mention is the new Actions panel which makes loading and playing (still no recording) actions a whole lot easier.

Not in Photoshop
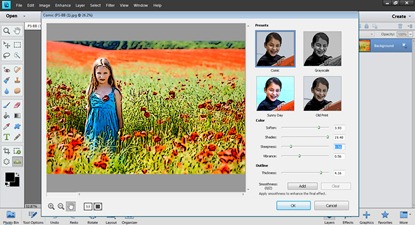
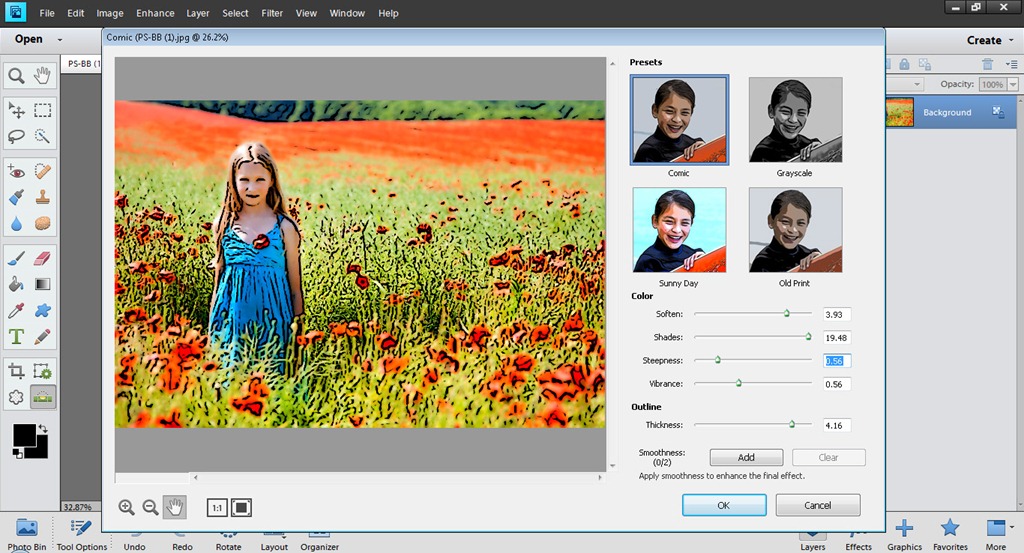
Elements-5Yes you read that right. Elements 11 gives you not one but three new filters that you won’t find in Photoshop. If you don’t like filter effects you may say that’s a good thing but I know from experience that filter effects are always popular with a large number of Elements and Photoshop users alike.

The three filters are all found under the Sketch section, which gives you an idea where these are heading. They are Comic, Graphic Novel, and Pen & Ink filters and although they are all different the effects are all variations of a similar style and are a welcome addition

Conclusion
From the moment you launch Photoshop Elements 11 it’s clear Adobe have worked hard to make this version appeal to it’s target market of amateur and serious amateur photographers. Anyone moving up from a previous Elements will find the changes take a little time to get used to but before too long you’ll feel right at home.

The new and improved features of Elements 11 are all very welcome and whilst it would have been nice to find a few more of Photoshops newer tricks filtering through to Elements it’s really not missing that much.

You can try it yourself right now for free by downloading the 30 day trial http://www.adobe.com/uk/products/photoshop-elements.html

RAM vs Photoshop

Recently I wrote about how swapping a traditional hard disk drive with a modern solid state drive or SSD for short. If you missed it, you can catch it here but in short it speeded up Photoshop by 30% and made using Windows 7 a lot more snappy.KngstonhyperX
Many people suggested that adding more RAM would also speed up Photoshop and they’re right. RAM is a cheaper and easier upgrade then adding a SSD but the question I wanted to answer is, how much RAM do you need and what are the real world speed benefits?

Thanks to the good people at Kingston Technology, who supplied me with some RAM sticks, I was able to test various RAM configurations.

The Test
Once again I’m using my now infamous Photoshop Speed Test action to push the computer and it’s RAM to the max. The test computer is my PC which runs Photoshop CS6 with an Intel i7 processor and a speedy new SSD. To standardise things, I removed the overclocking I usually use.

Basically the only thing that will change for each test run will be the amount of RAM.

I started with 4GB of RAM which is a very common amount of RAM found in many shop bought PC’s. I then continued to add RAM at a rate 4GB at a time, each time running the speed test several times and averaging out the results.

The Results
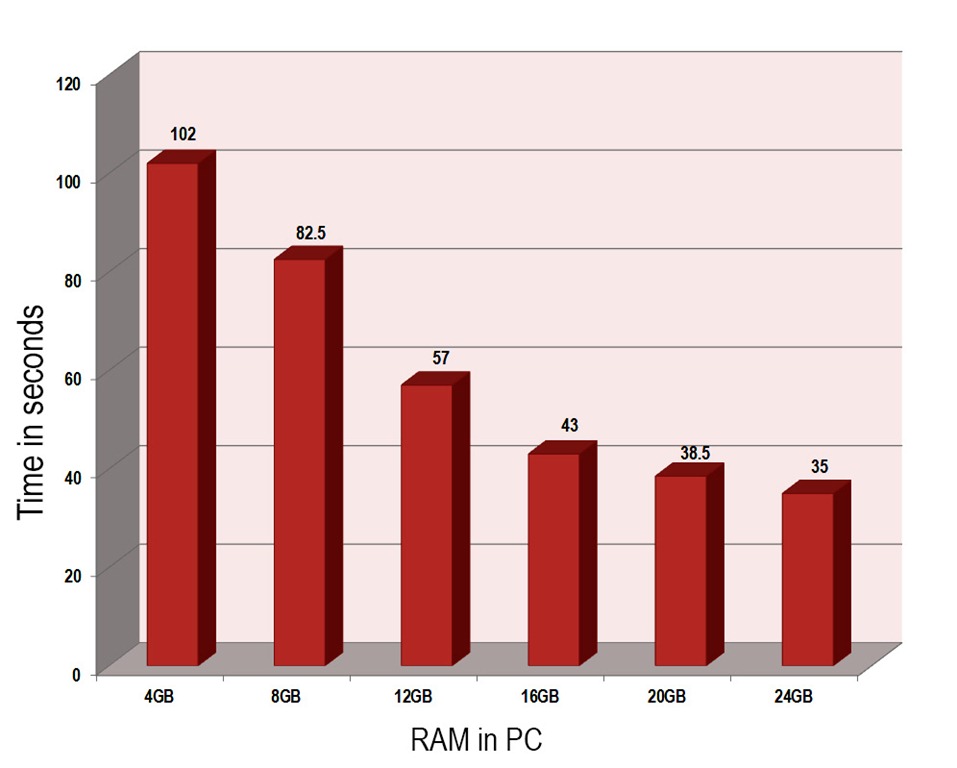
I could write reams of information but the graph below says it all.Speed test RAM

Not surprisingly Photoshop ran faster as more RAM was added. But look closely and you’ll see it’s not a straight line.

How much RAM?
Between 4GB and 16GB the speed gain with each new 4GB RAM stick is fairly consistent. However the improvement in Photoshop performance between 16GB and 24GB is much less impressive.

If you’re currently running 4GB of RAM and you want to double the speed of Photoshop you need to jump to 16GB of RAM. To me 16GB of RAM seems to be the perfect level for balancing price and performance.

About the RAM
memory finderFor this test I used 4GB sticks of Kingston HyperX DDR3 memory. It’s rated at a speed of 1866MHz which means it’s very fast but not the fastest memory around. Fitting the RAM was as easy as opening the PC case and pushing in the RAM stick. If you’ve never tried it before, adding more RAM is the easiest upgrade you can make.

You can find out more about Kingston RAM and other products by visiting their website

I’d also suggest taking a look at Kingston’s support page if you are unsure about what RAM your PC or motherboard can support

Conclusion
There’s no doubt that Photoshop performs better with more RAM but looking at the results I can draw two possible conclusions. Either my speed test action doesn’t push the RAM hard enough or there is a diminishing return from adding more RAM.

Either way it’s worth remembering that a 64bit operating system is required in order to access Ram beyond 4GB.

For me it would appear that 16GB of RAM is the perfect amount to run Photoshop with speed but it also had an unexpected benefit. The speed tests run at 4GB and 8GB gave the widest range of times which indicates that using Photoshop at lower RAM levels left it open to slow downs caused by the operating system taking priority for RAM access. By the time I hit 16GB the results were all within a few seconds of each other and by time I was up to 24GB the results were all within half a second.

So more RAM equals more Photoshop speed, plus a more stable operating system and therefore a more enjoyable time on the computer.

Shooting the show with Canon

Earlier this week and quite out of the blue, I received an email from Canon with an offer to shoot a fashion show during London Fashion Weekend. This wasn’t some PR event organised just for photographers, it’s a real fashion show, sponsored by Canon and shot by randomly selected Canon CPN listed photographers (which is how I got an in) and a group of photography students. They were a really great bunch of people with plenty of friendly banter. So what’s it like shooting a show with Canon?

IMG_8813

The briefing
The day started with a comprehensive briefing from the Canon team about what to expect, what to shoot and how to get the best results. It was a good idea, especially as more then half the 30 or so photographers were students studying for degrees in fashion photography and this would be their first taste of a professional assignment.

We were also given some great camera tips such as using ai servo to track focus on the models as they walked towards us. Canon recommended using just the centre focus point for older Canon cameras like my 5D mark II but for the more modern 7D, 5D mark III and 1Dx a larger centre cluster was suggested.

IMG_8877

Perfect Exposure
The Canon briefing made a big point about getting consistency from one image to the next… as you can see in the photos above. So to help out Canon had already worked out the ideal shutter speed, aperture, ISO and white balance. Now normally I prefer to shoot in Aperture Priority mode and auto white balance, however the whole catwalk was evenly lit with manmade lighting that didn’t change once the show had started. As a result I shot the show in Manual Mode and with a fixed white balance to ensure total consistency.

Hence every photo in this post was shot at 1/640th sec, f/4, ISO640 and with a white balance of 3000k

If you’re wondering why consistency is important, put yourself in the shoes of a fashion magazine or website editor. They’re not looking for creative flare from us photographers, they’re looking for photos that perfectly represent the outfits time and time again.

IMG_8687
Click to enlarge
Nailing the shot
Timing in photography is important in many types of photography but at a fashion show there’s no reruns and no second chances. So getting the perfect shot needs either lots of practice or a bit of luck. So to shorten the odds in my favour I worked in continuous shooting mode and shot in short bursts. Take a closer look at the five shots above. All but number 4 are duds but I only needed one good shot.

IMGP7694

The Pits
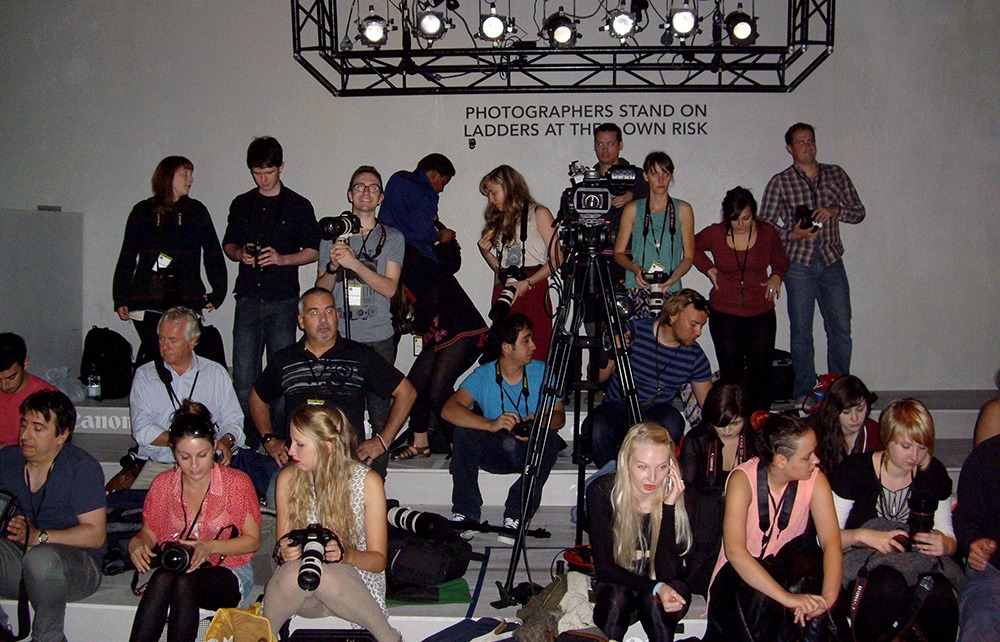
OK so above is a crappy shot from my compact camera but this is the photography “pit” where we were allowed to shoot from. Getting a spot in the centre i sthe goal of all the photographers as it gives the best angle to shoot from. See the gap just left of the video tripod… guess who bagged that spot Smile

The Gear
When it came to gear I kept it simple. All the photos were shot on my Canon 5D mark II with a Canon 70-200 f/2.8 IS lens. It proved to be the perfect combination for the day. I also packed my Canon 24-105L f/4 but that never came out of my bag.

I know from experience that the Canon 70-200m f/2.8 gets very heavy very quickly so I used my Giottos monopod all the time. I also spent a lot of time kneeling down so I was very glad I packed a small cushion, although with hindsight a folding tripod stool would have been even better as would a small step ladder… if you were prepared to take the risk.

I have to say my 5D mark II did a great job but  I could tell my autofocus wasn’t always tracking the action and the 3.5fps continuous shooting speed is very pedestrian. However the student next to me who was using a brand new 5D mark III was able to shoot at 5.5fps and even tweak the continuous focusing system to suit the situation… the results looked pretty darn good too!

IMG_8660IMG_8698

I need to say a huge thank you to Canon UK for making the day happen and for their perfect hospitality. If you ever get the chance to take part in a Canon event I suggest you either grab it with both hands or forward it on to me Winking smile

IMG_8787FB

September Photo Challenge

Yes it’s back again for another month. It’s the photo challenge and for September the photo challenge your theme is…

Planes, trains and automobiles

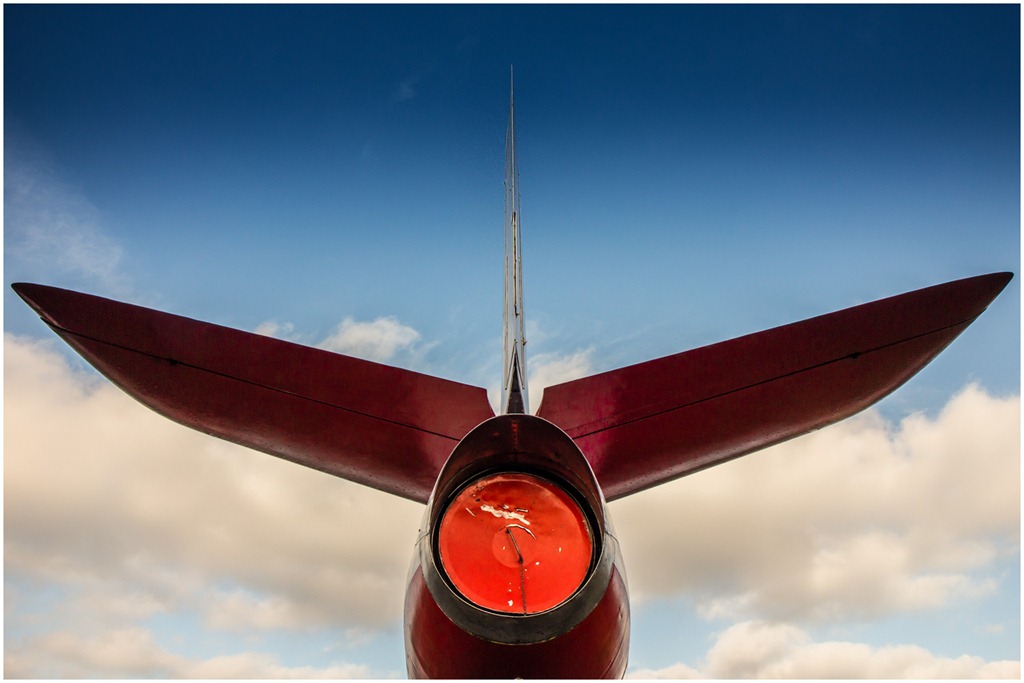
planes trainsHow you decide to interpret that theme is entirely up to you. Perhaps you’ll want to take it literally and enter a photo of a vintage aeroplane, a stream train or your favourite sports car. Maybe you’ll try something a little less obvious. Perhaps you’ll move in close and shoot an interesting part of the object or maybe you’ll find a reflection or shadow cast by your plane, train or automobile.

Once you’ve made your photo you’ll then need to do three things…

1. Check your entry meets with the rules at the bottom of this post.
2. Upload your image to the Flickr Group page at http://www.flickr.com/groups/2064982@N24/

REMEMBER: Although it’s not a rule, the idea behind the photo challenge is to encourage you to go out and shoot a new photo rather then entering an existing image.

I’m very happy to report that the Photo Challenge is once again being sponsored by Print Yours. They are an independent print lab who specialise in creating small run, high quality prints. Check out their web site for more information http://www.printyours.co.uk/

So what will the winner receive? Well, Print Yours have generously offered to print the winning entry on their 270gsm Photo Satin paper up to a whopping 24”x16”. That’s an £18 print for FREE! If you’re the lucky winner then all you need to do is send a high res version to Print Yours (via email) and they’ll do the rest.

RULES
One entry per person
Entries must be uploaded to the correct Flickr group by 3rd October 2012
Entrants agree to the use of their image on the Gavtrain webpage / Facebook page solely for the purpose of announcing the results
The image (including any manipulation or added elements) must be the sole work of the entrant
The winner will be selected by Gavin Hoey and his decision will be final
No alternative prizes are available
The winner will be notified by Flickr direct message.
Only the winning picture will be printed
The winner will be required to email a high res (printable) version of the winning image to Print Yours by
31st October 2012
The winner will be announced on the
Gavtrain Facebook Page during October 2012

Good Luck