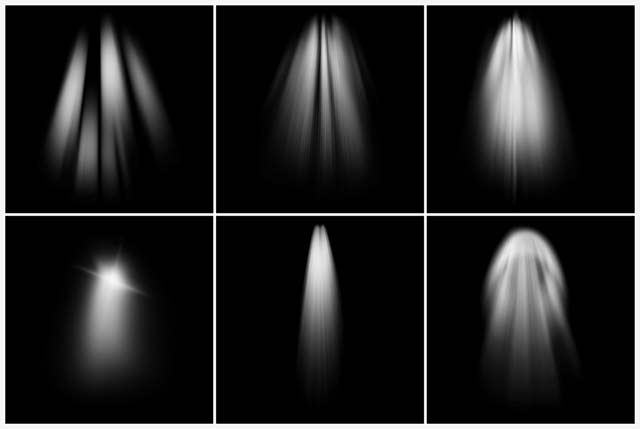
 This weeks Friday Freebie is a set of Photoshop Brushes that create amazing beams of light at the click of a mouse.
Full download instructions are below but you can also
Download the brushes for
Photoshop CS6 and Photoshop CC
Download the brushes for
Photoshop CS5 and earlier
(Also works with Elements)
If you’re wondering why there are two versions, maximum brush sizes in Photoshop CS6 (and in Photoshop CC) are twice as big as CS5 and earlier. To take advantage of this I’ve created two sizes of brush… be sure and download the correct one.
Once you’ve downloaded and unzipped the brushes they’ll need to be installed. The easiest way to do that is by opening the Brush panel and clicking the flyout menu in the top right corner. Click Load Brushes… and navigate to the light ray brushes that you downloaded and unzipped. Click here see a copy of the menu and information on where to click
If you create a photo using the Friday Freebie then let me (and everyone else) know by leaving the link in the comments below.
Usage rules
The brushes are copyright Gavin Hoey 2013. Use is limited to any personal, non-commercial purposes. Please share the Friday Freebie by linking back to this page. Do not redistribute the original image without my permission.
Download instructions
Click on the correct download link below to take you to the download page (no sign up is needed)
Download the brushes for
Photoshop CS6 and Photoshop CC
Download the brushes for
Photoshop CS5 and earlier
1. Click the link above
NOTE: You may see a message saying “There was a problem with the Network” Just ignore it
2. Click the Download button
3. Save the zip file to your hard drive
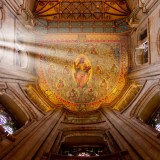
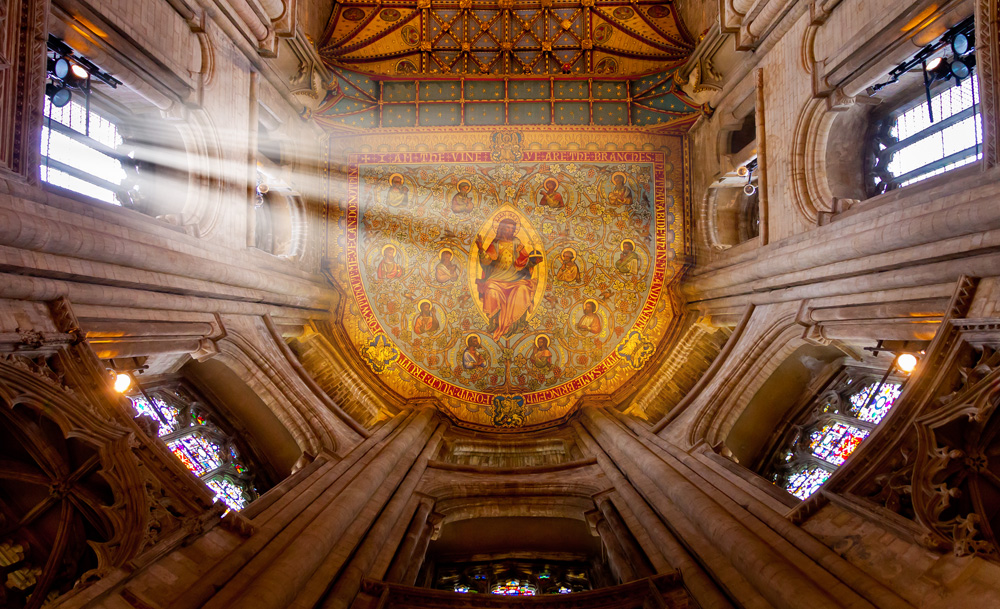
I love that picture with the light ray coming through the church window, Gavin. Is there a work round for these brushes in Elements 11?
The Photoshop CS5 or earlier should install just fine in all versions if Elements 🙂
Works GREAT with Photoshop Elements 7… shhhhh. Don’t tell anyone I’m still using it… dreaming of PS6 : )
Thanks Gavin!
On my photos-book – page 4/5 I used a light ray brush( one te top right)
You want to see ?, clic here :
http://www.photos-lys.fr/Livre/CommunionDePierre/index_00.html
Friendly
Obturatix
Well on one thank you to Gavin for his brushes, I think that at every time I shall make photos in a church I shall use them discreetly, I made tries also for undergrowth by colouring in them in various greens, Fantasy there is certainly others use which I am going to discover.
Thank you for the sharing
See the back page cover of my photos book
Obturatix
http://www.photos-lys.fr/Livre/CommunionDePierre/index_00.html
descargando
Gavin, your Friday Freebies are wonderful. Always well done and really useful. Thank you and keep up the fantastic work.
Wow…thanks so much Gavin. I appreciate it.
Muchas gracias por su aportación, un saludo.
Thanks a lot Gavin. Works great with Elements 10 and I think it improves this shot of my local woods. https://www.facebook.com/photo.php?fbid=10151713178345572&set=a.10151207967995572.510042.700235571&type=1&relevant_count=1&ref=nf
Fantastic brushes! Already used one to great effect. Love it. Thank you!
wow! very nice Sir Gavin as always.. I am learning so much from you. Keep it up! 🙂
Just great. Works perfectly and looks really great! Thank you very much Gavin.
Thanks for these brushes. I used it here http://www.flickr.com/photos/ratulm/8750014655/in/photostream
Muchas gracias! Saludos desde México. Te esperamos algún día por México? Sería genial verte en vivo. Un abrazo.
En México se celebra el Día del Maestro en mayo 15, debo felicitarte entonces, debido a que, sin que lo sepas, eres mi maestro de fotografía!
Can’t for the life of me get this to work on elements 11. How do you save the brush?
Sorry found it!!! Excellent thanks very much
Thank you so much for sharing these brushes with us. What used to be a little difficult is now so easy. I have used them with great success.
Thank you Gavin for the nice brushes and greetings from Hungary!
Thanks Gavin, love the freebees and always look forward to your next bit of help/info/hint (and your pics of course). 🙂
I had a go at using the ray brushes and chalk texture; think it works-
http://ppl.ug/Vy0bsNioAGo/
HO HO!!! Great brushes Gavin….I mean seriously…brilliant.
cheers Gavin … this is my first attempt at using your “light ray brushes” a little more experimenting with them I think, but not to bad for a first try.
http://www.flickr.com/photos/7wishes/8871998534/lightbox/
How do you rotate the brushes
ignore previous comment have worked it out
Just what was needed to lift my HDR shot from Peterborough Cathedral. http://www.flickr.com/photos/24120976@N03/8924018562/
Gav, I downloaded the Light Ray Brush app to my Windows hard drive and my Elements 11 opened up. Is the app automaticaly in Elements 11 and if so, where is it located to open it? Or is there another step that I need to do? As you can tell, I’m new to this whole thing.
Thanks
Google “How to load brushes in Elements 11” and you’ll soon find a solution 🙂
Got it. Thanks Gavin
Gavin, you are an amazing photographer ! Thank you for sharing this !
Thank you, Gavin! I learn so much from your videos that I go back over them numerous times. Thanks also for the brushes!
These brushes look like exactly what I need but being a relative novice at Photoshop can the color of the brushes be changed ?
Like all brushes in Photoshop their colour matches your choice of foreground colour. Normally you’d choose white for light rays but you your foreground colour is red the light rays will be red… disco time 🙂
Thank you for the great Brushes, This will save me a ton of time whenever I need Sun Rays in my photo. I never seem to get them the way I want when I create my own rays.
NSFW http://www.flickr.com/photos/alexmat/9044111573/
once again, a great gift from you 😉
http://www.flickr.com/photos/jonas400d/9000180217/
Thanks for the brushes Gavin..
Thanks for all your tutorials ..
You’re awesome dude ..!
Subject: Light Rays
As one of your hundreds of thousands admirers, I have followed you and your work for a several years now. Your photography and Photoshop (and Elements) videos/tutorials have really helped to improve my skills. Thank you!!!
Below is a link to a picture I recently took at a local restaurant here in Houston, TX with my small and very versatile Canon Power Shot S100 sub-compact camera. I edited it in Elements 11 and used two of your Light Ray files to enhance the light streaming in the window. I’m sure I will use your ingenious “rays” many times in the future!!
https://www.dropbox.com/home/Bell's%20Salt%20and%20Pepper%20w-Gavin's%20Light%20Rays
Light Rays
Further on my recent post today. Not sure if you can open the .psd file in Drop Box so here is another link with a jpeg picture of Bell’s Salt and Pepper shakers and Light Rays streaming in the background window.
https://www.dropbox.com/home/Picture%20with%20Gavin's%20Light%20Rays_this%20time%20with%20a%20jpeg
Thank You!
I d/l the light ray brushes, followed your instructions for installing and cannot seem to find the brushes in the brush pallet. Any suggestions.
In the light of the morning I found the brushes. I tried them but all I get is a black streak. Any instruction on how to use them would be appreciated.
I tried a blank layer above and then filled with white but nothing.
The colour you get is the same as your foreground colour. Set your foreground colour to white and you’ll have white light rays, set it to blue and you get blue light rays… and so on 🙂
Thank you for your quick reply; it is appreciated. I was did set the foreground color to white, as you suggested. It is still painting black…I’m sure I am doing soemthjing wrong. The blend mode is set to linear light (although I did try other blend modes). Your assistance is again requested. Thank you, in advance.
Hi Howard. Both the brush and the layer you’re painting onto need to be in Normal mode
One other thought… Make sure there’s not an “Invert” Adjustment Layer above the layer you’re painting on 😉
Gavin: I really thank you for your patience with a relative newbie. Using a Normal blend mode on both does work but I cnnot see a major difference even at 100% opacity. I will play with it using a different photo tomorrow. Again, any advice is certainly welcomed.
I started watching you video tutorials on Adorama and jsut love what you do.
Thanks for the nice light brushes; I just combined two of them to create the effect from the windows reflection. They are very useful, thanks again. Here, is the link of a HDR photo really enhanced with the rays. http://www.flickr.com/photos/carlosnass/9122143416/
Really useful tools. I used the light ray brush recently on a photo and enhanced it no end. Thank you. Macgeth
Thanks Gavin for all: http://www.flickr.com/photos/alexmat/9158426753/
Double effect…double pleasure 🙂 Thanks Gavin:
NSFW
http://www.flickr.com/photos/alexmat/9170968390/
Thank you again: http://www.flickr.com/photos/alexmat/9296629798/
When I click the download links, they take me to a adobe cloud webpage that says Page can’t be found. Are these no longer available?
Not sure what the problem was but it all seems to be working now.
Hi Gavin i had a go with the Light Ray brushes….thank you sooo much just brilliant 🙂 I dont have a web page to show you what i have done 🙁
These are fantastic! Thank you. How do you rotate them?
The easiest way is to add the light rays to a blank layer, press CTRL+T and rotate them with free transform. To avoid loosing the fine detail at the edges, start with the light ray in the centre of the image and free transform it into position.
Hi Gavin,
I downloaded these brushes in to CS6. But, I do not know how to apply them to a photo. Any chance that you can send me some step-by-step instructions? Or a short video wold be fantastic. I love your videos.
Thanks,
Marcus
Hi Gavin,
They worked perfect in PS CS5.
http://www.flickr.com/photos/63879278@N07/9598025525/
Thanks a lot from Uruguay!!
knock knock!!!!! hi,gavin i used to download your free light ray but wont work on my mac-ps6 Download the brushes for
Photoshop CS6 and beyond…..try to open it but error 17
Hi Gavin, Just wanted to say thank you sooooo much for this lovely gift. Your video on compositing is the bomb and I am so motivated to begin doing this with many of the landscape shots and portrait shots I have. Thank you for taking the time to share. Best to you, Sandy *:)
Hi Gavin
I finally cracked my inability to download from your creative cloud using W7 & IEv9 – I turned off the ‘Do not save encrypted files to disk’ option in IEv9 and can now access all your Friday Freebies. You arsked for links to images making use of the freebi so here is a link to a recent interior panorama I did of Horsham Parish Church and just added the light rays courtesy of your Light Ray brushes.
Many than for these.
https://www.dropbox.com/s/ib82n864t0iv57r/St_Marys_Church_Horsham_Final_Pano.jpg
Terry
Thank you very much, its perfect 🙂
Gavin,
Thanks for your tutorials & Friday Freebies. I was able to download the light brushes into CS6 on my computer. But, I can’t figure out how I am supposed to use them. If you (or anyone else) can give me a quick lesson on how to use/apply these brushes, I would be appreciative.
Marcus
Thank you, thank you, love it 🙂
I have downloaded your fantastic Ray of Light brushes – all great but I can’t seem to find where you mentioned how to change the direction of the light
Deborah,
Bring up the “Brush Panel” (icon looks like a miniature folder with 3 brushes sticking up out of it – mine’s located both at the top of the screen to the right of the brush shape selector, and also to the right of the screen in a collapsible panel). In there, under the “Brush” tab, you’ll see a circle with a cross through it, rather like a compass pointer. Rotating this changes the direction that the brush points in.
Phil
Can’t work out how to change the direction of the light….thank you
Are these brushes no longer available? When I click the link it goes to a blank page.
They seem to be downloading ok… give it another go 🙂
Gavin, a link to an autumn image using your light brushes; many thanks.
http://www.flickr.com/photos/88409432@N06/10581744085/in/set-72157633442228178
Cheers
Pete
Gavin
I love all your web sites and I have learned a lot about photoshop from your tutorials and I have used many of your techniques. Keep up the good work.
Here is a link to a photo manip using your light ray brushes:http://www.flickr.com/photos/52904639@N08/11899541434
Thanks
Mitch
Gracias 🙂
Hi Gavin
Thank you for all your knowledge and great way of explaining in
Ways every level user understands..
You love what you do and it shows I hope some day in the future I can share my limited knowledge with you.
Joe McVeigh
Hi Gavin,
Great site many thanks,
Please have a look at my picture from Wiggonholt near Pulborough 🙂
https://www.flickr.com/photos/refinedimages/13428465743/
Hi,
Here is another one. Really great!!
https://flic.kr/p/oKsJ8b
These are brilliant. Thank you for sharing 🙂
Gavin hi!
I tried to download this for PS 5, I am then taken to the cloud page and “loading” is stated but nothing happens?
Thanks,
William
I had this same problem. I had to try this 4 times. I was beginning to think I was doing something wrong. It did finally load. Boone
Thank you! I just love your work and learn so much from watching your videos.
Excellent work! Thanks for sharing.
Hi gavin how do i download your brush for mac operating system
Hi Gavin,
Thanks for the brushes wich I used in this picture :
https://www.flickr.com/photos/boskeun/16079849031/
Hi
I have installed the zip file on brushes, however when I apply a brush opacity is very high, I mean they apply very soft, almost transparent, even with opacity of layer @ 100%. Is there any option to apply them with less transparency?
Not works in my CC the Light Ray Brushes
I have photo shop CS 2 is possible to down load these freebies
I have always shied away from Photoshop for its complexity, but you make your videos easy to understand and I appreciate that. That you for these brushes, I will be using them on future sessions.
Hi, Gavin!
I have downloaded Light Ray Brushes
Could you please explain how to install that resource in Photoshop CC?
Thanks!
Hi,
I once signed up for a trial of Adobe CC, but decided not to use it (I already had PS5 and LR5). Despite having uninstalled it, every time I try to open your download it assumes I’m still using CC and tells me my trial has expired, and refuses to go any further. I don’t want to use my “CC trial” version – any thoughts on how I can make it use PS5 instead?
Thanks for making these brushes available. From the moment I saw them I knew exactly where I would use them. The combination of natural light and these brushes really helped my image. Thanks for the assit Gavin!
https://www.facebook.com/javy.diaz/posts/10153052248364549:0
Gavin…you are my favorite Photographer / Personality! Love your work. Your videos are really a “Bar Above”. Thanks for the Light Rays, they are so neat. (1960’s word) Thanks again.
Bill Boone
Hi Gavin, many thanks for the ideas and explanations you give via your youtube channel. The world needs more people like you 🙂
just a quick side note. If I were to use any of your Friday freebie brushes in my workflow and then sell the end product to clients. A) Is that allowed? and B) do you require a cut?
Many thanks again,
John Bishop
Well, after some research I’ve figured out how to make my own light rays but I can’t seem to make them into a nice brush like yours. Please, please, please if you have time, show your followers how to make one 🙂
Thanks again for your great videos and teaching style 🙂
John Bishop
Great brushes!! Much easier to create the sunrays than other solutions.
Many thanks!
Hans van den Berg
Light rays – You state for personal use and non-commercial, does this mean I am unable to sell my pictures using this plug in effect?
Yep, that would be commercial use. Hit Google and you find plenty of tutorials on how to make your own 🙂
Thank You Gavin!
hi ,is this available for lr5 ?
They’re for Photoshop and Photoshop Elements only.
Thanks Gavin, looking forward to using Light Ray Brushes
Here is my use of your Light Ray Brushes Mr. Hoey….
Thank you so much. This was my son in this shoot so its not for profit.
https://scontent-dfw.xx.fbcdn.net/hphotos-xap1/v/t1.0-9/11156203_384384685082040_6165623402729205823_n.jpg?oh=2f7a8fb7d64577f65dd0ed93b2760d24&oe=55D7F09C
Thanks for making these brushes its very good
Thanks for sharing i have learn a lot from ur red riding hood tutorial IDOL…
Hi Gavin,
Enjoyed your Red Riding Hood Tutorial. Thank you! Unfortunately when I click on the link to download the CS6 brushes I get this message: Sorry, this link is no longer active. Am I doing something wrong?
Hi Gavin do you do presets for LR 6?
thank you Gavin, Im new to photoshop, just 7 months into it, and appreciate the help for my hobby.
Hi Gavin, I loaded the Light Ray Brushes but they do not show up in the brush tool panel. I’m using Photoshop CC 2015 for Mac.
Thanks, Jim
Hi Gavin,
After several attempts, the brushes finally loaded. Thanks so much, they work great.
Jim
are the brushes comparable with mac?
Yes they are 🙂
hi, many thanks for the brushes you offer. Please are there any choise to move them in order to have different orientations?. Thanks, Horacio from Argentina
probably the best way to explain my question was to said if the brushes can be rotated.
Horacioi
You can either put the brush on a new layer and Free Transform (Rotate) that or… In the Brush Panel there’s a thing that look like a Compus, turning that will turn the brush 😉
Voila …!!! it’s done … The Light Ray Brushes are working fine in my photos … Thanks Mr. Gavin .. you are awesome …!!!]
Zip file not compatible with mac any suggestions please. 😀
Great tut Gavin, question what is the difference between the selective color in photoshop and the hsl sliders in Lightroom or ACR? I have read that the selective color in PS does not mess with your pixels or something like that, thanks for the brushes;)
You get two more colour sliders in ACR / Lighroom compared to inside Photoshop… more is good 🙂
When i try to unzip the file I get an error message about broken pipes and then cannot install them. Any ideas?
No idea, a question for Google perhaps?
Hi Gaven,
I just tried to download the light ray brush,brought to the cloud but all there is a white screen nothing there help> Can we still get them?
Try again, the Adobe hosted download page is usually very reliable but can go odd from time to time.
Great brushes very useful many thanks.
Loved the show on Tuesday at Ipswich received the DVD by post Top Man
Thanks Peter 🙂
Hi Gav, really nice video – esp. at the end.
What model Dell do you use? I’ve seen and used a few but not happy with them.
It’s a Dell U2415 monitor
Hey, Gavin! Thank you for your helpful tutorial on balancing flash with ambient light and for the free Light Ray Brushes. I am not sure what I am doing wrong, but after downloading the preset and finding it in my brushes, when I click on it on the layer, it does “let go” and stay on the image. Any thoughts? I would greatly appreciate it.
hi. Gravin is it possible to take light brush in lightroom environment….
Lightroom doesn’t have “brushes” in the same way Photoshop does, so sadly no.
Tnx Sir.
I downloaded ‘light brushes’, THANK YOU. I did follow an instruction on how to install it, no problem. However, how I will know which brushes are those which I downloaded from your site and which are part of PS?
Regards,
Waldemar
The ones that look like rays of light, or say “Light Rays” when you hover over them are the ones you downloaded 🙂
Gavin,
Thank you for your prompt reply. The name of the brush appears when the mouse pointer is above them and I found 6 light brushes from you, is it right?
Happy New Year 2016!
Gavin thanks a lot for the brushes, and your videos are awesome.
I am from India, learning thru your videos, thank you once again.
Regards
Kamal
Thank you so much for your generosity Gavin
or as we say in Sweden:
Tack så jättemycket! Heja Abba, IKEA och Björn Borg!… :o)
My name is Margareta, and I live in Sweden in a small place namned Lysekil!!, and I really like your videos I´ve learned soo much from You!!… Thank you for taking time to sharing!! <3
Have a wonderful 2016
Margareta
Thanks Gavin!! Used these light brushes in this picture taken in the Anglican Cathedral in Liverpool.
https://500px.com/photo/137434685/walk-in-to-the-light-by-lee-houston?ctx_page=1&from=user&user_id=14709349
Hi James. The light rays are only brushes and can’t mess with Photoshop. You can delete them by right clicking each brush thumbnail and choosing delete or by going to Preset Manager and deleting from there.
Thank you very much for your tutorials and freebies. I tried the light ray brush, it works like a charm. This is the image where you can see my first try:
http://zoom.nl/foto/full/dieren/konijn-op-rabbit-island–japan.2653708.html
Gavin
Thank you! I love learning new things!
Hi Gavin,I love your freebies but battle to get it installed in Elements 14.I can see the un zipped file in my documents and when i click on it, Elements 14 opens and then I am stuck……please help me with the installation
Elna
Google “how to install brushes in Photoshop Elements” and you’ll be sorted. That’s what I did and this came up… perfect 🙂 https://www.youtube.com/watch?v=nb2tlGtsJNQ
Excelente Gavin!!; Gracias por el aporte. un abrazo dondequiera que te encuentres.
Gavin,
I am struggling to load these into PS CC 2016? It does not recognise the new toolpr
Once unzipped you should be able to either drop the .abr brush file into Photoshop (with no images open) or load the brushes through the preset manager (Google is you friend here)
thank you very much! Your tutorials are great!
I extracted the files and I can still not get them into Photoshop CC. It says its not the right kind of document. Am I doing something wrong?
Another one.
https://www.flickr.com/photos/63879278@N07/27863662315/
Thank you so much – these are awesome!
Big thank you to Gavin for making these freebies and allowing us to experiment and use them: such a kind and talented photographer, cheers.
Late afternoon stroll today close to home and motivated to try a multi-image pano in Lightroom.
Thought the light-ray brushes might add the finishing touch but decided to keep it subtle so moderate opacity applied.
Here’s my effort:
https://www.flickr.com/photos/williamguthrie/30275446542/in/dateposted-public/
Gavin,
Thank you very much for your free Light-Ray brushes. It works like magic!
thank you so much , looks very good
I am new to photoshop. I have the brushes downloaded but when I add them to a layer they are grey and not “sunshine”. What do I do? Thanks
Is there any way to do this within LightRoom 6? If not, what about Gimp? I am resisting PhotoShop if at all possible. Thanks in advance…
How do you rotate the rays once you have placed them on your photo?
Applly the rays to a blank layer and then press CTRL+T for Free Transform 😉
Hallo Gavin, just to keep you informed, I have downloaded your light ray brushes today for later usage in my pics, thank you, Hans
good morning Gavin
I really enjoy your videos – love the way you explain concepts and end the video with photoshop techniques
I have photoshop cs5.1 I tried to unzip the light ray brushes today and I had an error message “failed broken pipeline”
Do you know what I should do?
thanks
Susan
Love this plugin, I am able to add some special effects to my suns wedding photos.
Have been a great admirer of Gavin for some years, back In the day of Digital Photo I learn’t so much. Thank you.
Have a question but only just registered so not sure where I can ask at this point..
I can’t seem to get the download to work on my cs6
any advice
Thank you Gavin for this tutorial and brushes. I really enjoy your presentations and tips
Thanks, Gavin, these and the Fog brushes are great! Much appreciated.
Thank you…. these are spectacular!!!!
Thank you!!!
Thank you !
Gavin you`re the best…. thank you
Thank you Gavin for your tutorials , inspiration and all you do!
Gavin, would it be possible to make a tutorial showing how to make the brushes? They are awesome BTW and thank you! ~ Ed
Tqvm for your light ray brushes. Its very useful and amazing…
Gavin, I absolutely love your videos. Your teaching methods are clear, to the point, and easy to understand. Thanks to modern technology we here in the United States are fortunate to have you at our disposal. You are simply amazing at what you do. I still do not own photoshop. In all honesty I tried taking a class at our local college only to leave just as confused as ever. Watching your videos has taken away those huge fears of photoshop. No longer terrified of this nemesis, my plans are to save and purchase photoshop. Thank you Gavin Hoey for all of your wisdom.
Gavin! I’m still using these in 2018.
Beautiful brushes amigo. How can I repay you?!
Great post about light ray brushes. Thanks for sharing with us.
I used the brushes for a woodland scene – undetectable really and they look great! https://500px.com/photo/278520253/golden-years-by-james-burke
I love these brushes. You can also use them in reverse, painting shadow streaks onto an image.
Here is a link to an image. https://gurushots.com/photo/40bfdfbf8537546e1aeac04cf89d36d8
Thanks so much.
Thanks Gavin Hoey for the tip you are smart and wish you all the best
will the brushes work in PhotoShop CC 2019?
Yes, they’re CC2019 compatible 🙂
Hi Gavin,
Ive just watched your Balancing Flash with Low Ambient Light, yet another super video you have done. Im just starting out in serious photography and I find your videos are a great resource for learning.
I have just downloaded the light ray brushes and had a play, brilliant effect.
Thank you very much
Regards
Shane
Thank you so much! I want to be like you when I grow up!
Will brushes work with ON1 photo raw 2021