Lexar USB 3 Card Reader ~ Review

USB-3-3Hopefully every photographer reading this already knows that the best and fastest way to get your images from a memory card to your computer is via a card reader. For the past few years I’ve been using either the internal card reader fitted to my PC or an external Compact Flash card reader. Both have been great, but all of a sudden they’re out of date!

So what’s changed? Well my new PC is fitted with the a couple of USB 3 sockets and on paper USB 3 is up to 10 times faster then USB 2 which powers my existing card readers. Now the important words in that last sentence were “on paper" and “up to” because as the saying goes… results may vary.

I really wanted to test the speed claims for USB 3 so I bought a Lexar USB 3 card reader, but before I get to the speed test, lets take a closer look at what I bought.

USB-3-1Lexar USB 3
There’s loads of card readers on the market, but the Lexar caught my eye for a couple of reasons. First up it’s a true USB 3 reader, so it should be fast. Next was the build quality, which from previous experience of Lexar readers I hoped would be excellent. Finally at £25 it’s sits nicely in the middle of the price range for card readers.

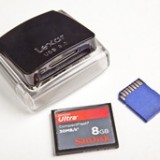
OK, I admit it’s hard to get excited about a card reader and the Lexar isn’t going to change that fact. For the record it’s a duel card reader accepting all types of SD and Compact Flash cards. It features a pop up design which Lexar says is to stop dust getting onto the contacts… Hold on, dusty contacts. Really? Marketing hype aside, the pop up / snap shut design is a nice fun touch.

It might just be me, but I’ve broken loads of Compact Flash card readers and the problem is always the same. Bent / broken pins.  The good news here is The Lexar USB 3 is more like a DSLR in as much as it keeps the pins deep inside the unit. It makes pushing the card in at an angle almost impossible, so the pins won’t get bent. That may not sound like a big thing, but trust me it is.

USB-3-2The USB Cable
I found two areas of concern and frankly neither is that bad. First is the use of shiny black plastic, which looks great of course, but it’s a dust and fingerprint magnet. Mind you half the gadgets I own have exactly the same problem. One day the matte finish will become fashionable again… I hope.

Then there’s the USB cable. At roughly 1 meter in length, it’s a bit short for me, but it also features a strange new connector. OK so the end that plugs into the PC is a normal USB plug but the end that connects into the reader is unique amongst my collection of cables (see update below). Not a problem unless like me, you’re planning to travel with the unit and you tend to lose cables.

UPDATE: It appears the cable is a new mini USB3 standard fit, so as this become more common losing a cable should be less of a problem.

Speed test
So I started this review by talking about speed and lets face it that’s why I bought the darn thing in the first place. As this is a USB 3 device you’ll need a USB 3 socket to take advantage of the increased speed. I should point out that it’s backwards compatible so will work on USB 2 but at a slower speed.

I tested the unit with a SanDisk 30MB/s card which is the fastest I own and represents the most common type of card I see photographer use.

USB-3UBS 3 Read speed (Ave.) 48 MB/s (megabytes per second)
UBS 3 Write speed (Ave.) 30 MB/s 
UBS 2 Read speed (Ave.) 24 MB/s 
UBS 2 Write speed (Ave.) 21 MB/s 

As you can see using the USB 3 socket halved the time it took to get my photos off the memory card. Pretty impressive considering the card isn’t expected to go that quick. Writing times were less impressive, but then that’s not something I do very often.

By the way my internal card reader (USB 2) only averaged 17 MB/s moving the same files, so even on a USB 2 PC there was a small speed benefit

Summery
The Lexar USB 3 is a great bit of kit, well designed, well built and I’d recommend it to anyone wanting a new external card reader.

However if you want the “speed” of USB 3 then you’ll need the right type of memory card such as UDMA Compact Flash and SDXC SD memory cards.

Yongnuo ST-E2 first look

ST-E2 (1)It seems that Canon have been rather slow in seeing the advantage in off camera flash. Until the introduction of cameras like the Canon 7D and 60D, if you wanted to fire an off camera speedlite and still enjoy the benefits of ETTL you’d need a second flash attached to the camera or a very long flash sync cable.

As I really don’t like cables being attached to my Canon 5D MK2 camera, I’ve always used an on camera Canon 580ex flash to fire my second 580ex flash, off camera. That makes it a very heavy and pretty expensive way to shoot pictures.

Sometime ago Canon came up with a solution. It was called the ST-E2 and effectively it’s a mini flash that only fires near infrared light, which can be seen by the 580ex (and other flashes) and maintains full ETTL. But there were problems with the ST-E2. First, it wasn’t exactly cheap, second, it used a non standard battery and third, it didn’t rotate and as the ST-E2 requires line of sight (outdoors) that rules out flashes being placed behind the camera.

Earlier this year Yongnuo produced a “copy” of the original ST-E2 which, they claim, address the failings of the Canon, so ordered one to see if they really had. Slightly confusingly, they also named their new trigger ST-E2.

ST-E2 (2)First Impressions.
Once I opened the shiny gold box I was very pleased with what I found inside. There’s an instruction manual that’s written in almost readable English, you get a handy soft carry pouch and a support foot that has a decent metal tripod thread.

The Yongnuo ST-E2 unit has an almost identical look to the Canon version it copies. The build quality is also almost identical and certainly good enough for me. The control panel on the back of the unit is slightly different to the Canon original, but everything you need is there.

Improvents
Yongnuo have changed and improved a few things that were a pain in the original Canon ST-E2. First off at around £80 it’s far cheaper then the Canon alternative. Yongnuo claim the range of their unit is greater then Canons, but I’ve not been able to test this yet.

Once you use the ST-E2, the first thing you notice is the batteries. The Yongnuo sticks to good old AA’s, which is handy as I always have these lying around the studio. The Canon used a CR5 battery I think.

Attach the ST-E2 to the camera hot shoe and it can be turned 135 degrees in either direction. No fiddly buttons to push, just a firm twist will do. To be honest it feels a bit weird just turning the unit and it requires the use of a little too much force for my liking, but it may loosen up in time.

Does it work?
Put simply… yes. The Yongnuo ST-E2 does exactly what it claims. The ETTL works like a charm. The high speed sync works right up to 1/8000th sec and the ratios settings do what you would expect. Press the depth of field preview button on the camera and the speedlite will buzz like a demented bee, producing a rather handy modelling light.

ST-E2 (3)The downside
OK, so it’s not all good news. There are several issues that may or may not be a deal breaker for you.

Let’s start with size. It’s hardly what you’d call discreet, but at least it’s light in weight. However if space is limited in your camera bag then it’s size is worth noting.

Recycle time is SLOW. Unless I’m missing something, I can’t get the Yongnuo ST-E2 to trigger the flashes more the once every 1.5 seconds (approximately) so it’s no use if you need to shoot with bursts of flash.

Finally the focus assist beam is truly terrible. When you’re shooting with flash you’re often in low light situations. To "help” lock focus, the ST-E2 will fire three thin beams of red light, but they’re only vertical lines and not one of them is anywhere near my focus points. It’s a major failure in my view and one that could make the unit unusable to SOME photographers.

ST-E2 (4)               ST-E2 (5)

On balance I’m actually loving the Yongnuo ST-E2 and will post back a long term review after further testing.

Flora Light ~ Review

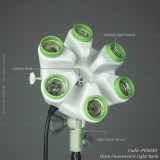
There are seems to be an endless choice of lighting options available to the modern photographer, but the choice often boils down to either flash or continuous light sources. Personally I like and use both on a regular basis, it all depends upon what subject matter I’m shooting.

For portraits I’ll usually use flash, but continuous lighting is perfect when I need a shallow depth of field or I’m shooting products which don’t move. I also use continuous lights for video work.

So when Linco offered to send me a set of their new continuous lights I jumped at the chance and jolly good they are to. Six lights and a quick erect octabox makes the a great choice on paper.

There’s a couple of things you need to know…

First Linco are a USA supplier and whilst they may well ship outside of the US the lighting units and bulbs are 110v. You’ll also need to add import duty fee to price, which can be a bit hefty.

Find out more about Flora Lighting products http://www.lincostore.com/search.php?keywords=flora%20light

Hasselblad H4D – Experience and thoughts

Let’s get something clear right from the word go… I love my Canon cameras and lenses and have no plans to buy a Hasselblad any time soon. OK with that out of the way I’ll briefly explain why I’m not using Canon for the photos in this post.

A few weeks back I received an email from Hasselblad offering me the chance to get hands on experience with their H4D medium format digital camera. A few emails and a brief meeting later, I’d arranged to shoot a couple of studio lighting videos at Hasselblads shiny new studios in London. They’re coming soon, but for now here’s my thoughts on the camera.

Dream camera?
Hasselblad is a name I’ve been familiar with since my earliest days in photography. It’s a brand that many photographers aspire to and comes with a price tag to match. But for some professional photographers the initial cost isn’t an issue when quality is all that counts and I tell you right now the H4D produces images with amazing sharpness and detail, far in excess of my usual Canon 5d Mark II.

For my day in the studio I’d lined up Delaney, an up and coming rapper, to be my model. Hasselblad had promised to loan me a H4D-31 for the shoot. It has the smallest sensor in the H4D range, but at 30 million pixels small is a relative term. However when I arrived the H4D-31 was unavailable, so instead used the midrange H4D-50 which packs a massive 50 million pixel sensor. Other then a bigger sensor the two cameras are identical.

If it’s heavy it must be good
First impressions of the H4D is that it’s a big, heavy camera, but surprisingly comfortable to hold. When I swapped the standard 80mm lens for a 35-90mm zoom, the H4D became very heavy indeed, which may explain why so many Hasselblad owners prefer to use a tripod.

In use the H4D was as easy to operate as any DSLR camera. All the usual shooting modes are there (Aperture, Shutter Priority and Manual). Half pressing the shutter button will lock focus and exposure just like my DSLR. Perhaps my favourite feature was the “True Focus” function, which allowed me to retain focus on a subject even after I’ve recomposed the shot. Believe me it was clever stuff.

Pressing the shutter button is a satisfying experience. A half press will focus, which isn’t fast, but it works just fine. Fully press the shutter button to take the shot and you’ll hear a very satisfying clunk. The image pops up on the cameras LCD almost immediately for review.

The drawbacks
So it’s good news all the way then? Well no. The 50 million pixel sensor produces a 75mb RAW file, so you’ll need lots of memory cards, lots of hard drive space and a fairly beefy computer to process them all. You’ll also need a spare battery for the camera as they drain surprisingly fast.

Such is the clarity and resolution of the camera that every little detail is visible. So for example on portraits, every minor pimple, dry skin patch or makeup mishap will need retouching. Don’t believe me? Take at look at this actual pixel view… Click to enlarge. The yellow square shows you the area I’ve enlarged. No sharpening has been added, this is straight from the RAW file.


So would I buy one… No. Good as the camera and lenses are, it’s really not going to suit by style of photography. However I’d definitly use one should the need arise, but I’d opt for the hire service that Hasselblad offer on their gear.

Would I recommend one? Well that depends on what sort of photography you do. If you shoot sports, wildlife, need high ISO or prefer to travel light then no, stick to a DSLR. If you shoot landscapes, portraites or still life work, and demand nothing but the best quality images, then this camera should be on you’re radar.

And Finally…
I recorded a couple of videos whilst at the studios. This shot of Sam is a test shot I snapped whilst I figured out one of the lighting set ups. We all loved the background which is made of large pieces of foam. It’s the stuff that’s usually used to sound proof music studios. I’m pretty sure most of it would have mysteriously disappeared had it not been firmly glued to the wall. Great idea that.