 It’s high time I made another Photoshop video tutorial. After a few minutes scratching my head thinking what I should do, I took a quick look back through your Quick Shot Questions. One Photoshop question kept coming up which was this… “How did you make that pop up image at the end of the abstract background tutorial?”
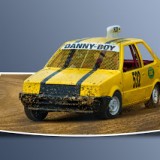
The technique is known as out of bounds and as the name suggests the idea is to make part of the image poke out from the frame.
Despite appearances the technique is fairly straight forward when it’s broken down into a few simple steps as you’ll see in this video.
Hey people! Does anyone know where I can get additional information on this topic?
Hi Gavin, I have been trying this project using Elements 8 for Windows but cant find a way to apply the layer mask as I cant find the tool to do it, hints and tips would be appreciated.
Stan Blundell
Gavin, thanks so much for this great tutorial on OOB. You make editing so easy and attainable. Also I love your 15 minute photo challenges. They have inspired me to get out there and enthuse me to photograph. Thanks from a U.S.A. fan.
Hi Gavin, always good watching your tips and tricks and how to do some stuff.
Got a couple images I can use this on.
Thanks again
Great tutorial… just found you on Youtube; and what a discovery!
Many thanks and please keep posting.
Hi Gavin! A really great tutorial. Thanks a lot for all your tips and tricks.
Regards from a Sweden fan 🙂
HI MR Gavin
when i saw your video i was very happy to see because i follow
all your videos i was very happy to see you with a new video
i hope i hear from you again
you the best MR Gavin
THANK YOU FROM YOUR FAN
GABRIEL
Another superb tutorial Gavin, you make working with Photoshop a pleasure .
Thanks so much