Kingston HyperX SSD Upgrade
 Recently I wrote about my two year old laptop which, compared to my main PC, is painfully slow when it comes to Photoshop. With maxed out RAM and Photoshop CS6 installed I thought my laptop was at the end of its life. However the people at Kingston Technology had other ideas and sent me one of their super fast, state of the art SSD upgrade kits to test.
If you’re new to the world of SSD’s (Solid State Drive) think of them as a giant camera memory card. With no moving parts they’re faster, use less power and are more durable then a traditional mechanical hard drive. All in all it sounds like a great idea, just so long as I can fit it.
How to upgrade
If the thought of upgrading a computer hard drive yourself fills you with dread than the Kingston SSD upgrade kit is worth a look. Everything needed to do the job is in the box as you can see in this video or read below.
What’s in the box?
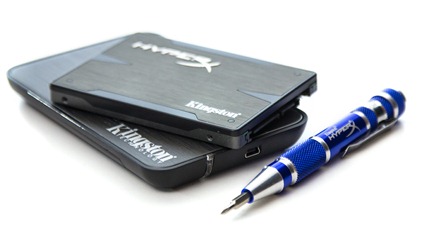
You get a Kingston 256GB SSD Extreme X drive, a USB enclosure for cloning purposes and a CD with all the cloning software and instructions. The thoughtful people at Kingston even throw in a nifty little small screwdriver and you’ll be glad they did.
Although I’m using the kit to upgrade a laptop, the Kingston kit also includes all the cables, screws and adaptors you’d need to mount the SSD in a desktop case if you’d prefer.
It’s worth noting that the instructions are a PDF file on the CD so you’ll either need to print them out, put them on a second PC or memorise them before you begin. Fortunately the whole upgrade process can be summed up in three steps.
Check the space
The Kingston Extreme X SSD is 256GB in size but it’s replacing a 500GB drive. Now it doesn’t take a genius to realise that they don’t fit. Fortunately I’ve used less then 200GB of space which is lucky as otherwise I’d have had to move some data off the drive and on to a back up disc of some sort.
 Replace the hard drive
After unplugging the power cable and removing the battery, I flipped open the cover that hides the laptops hard drive and removed the retaining screws. I then screwed in the new, empty Kingston SSD, replaced the screws and cover and reattached the power.
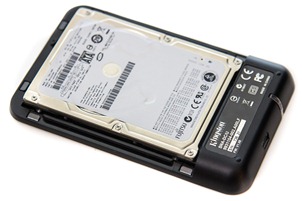
The old hard drive is then placed into the Kingston supplied hard drive housing and connected to the computer via the supplied USB cable.
Cloning the disc
The final step is the longest to do but also the easiest. Kingston supply a CD which has cloning software from Acronis which simplifies the disc cloning process to a couple of clicks. All I had to do was start the computer with the CD in the drive and it launches the Acronis software. There is an “Advanced” option but as suggested by Kingston, I selected the automatic option and away it went.
The cloning process took a little over 90 minutes to complete and once done I removed the CD, unplugged the USB cable and restarted the computer.
The results
From the very first time I started the laptop with the SSD installed I could see the improvement in speed. Where before I would have to wait a few minutes for windows to boot and “calm down” before I could do anything, now it’s ready to go within 60 seconds. Photoshop launches in 2 seconds flat and everything feels so much snappier.
Of course what I wanted was hard facts so I repeated my Photoshop speed test and the results were impressive.
With Kingston SSD: Photoshop CS5 = 105.5 sec Photoshop CS6 = 95.5 sec
With Original HDD: Photoshop CS5 =157.5 sec Photoshop CS6 = 139.5 sec
That means I’ve increased the performance of Photoshop by 1/3rd simply by changing the old hard drive for a new SSD. Now that’s impressive!
Geeky bit
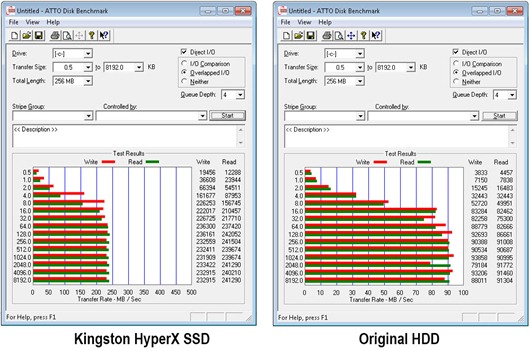
OK if you’ve made it down this far then lets talk about the technical stuff. The speed tests below show the Kingston HyperX SSD out performs the original hard drive in both read and write speeds by more then double.
 Yes SSD’s are fast and in theory the Kingston Hyper X is about as fast as they come but to make use of that speed I need a SATA3 6GB/s interface. Not surprisingly my two year old laptop isn’t SATA3 compatible it may not even be the older and slower SATA2 but none the less it’s still faster then the stock HDD which had a spin speed of 5600K
Of course I’m also getting the advantage of longer battery life and the risk of HDD head failure has gone.
Critics of SSD’s will point out their theoretical limited life expectancy and high cost compared to a mechanical HDD but others will tell you the limited life issue has largely been solved and I’ll tell you that my laptop feels like new.
Final Thoughts
The Kingston HyperX SSD upgrade kit may cost a little more then a bare drive but that higher price tag brings with it the confidence of a successful upgrade.
I’ve been thinking about doing a SSD upgrade of a while but have always been put off as I thought it would be time consuming and probably cause more problems then it solved… I was wrong.
The Kingston Hyper X upgrade kit had everything that I needed and more. The instructions were easy to understand although I’d have preferred a printed “quick start guide” over a PDF.
The 33% improvement in Photoshop speed is great but that’s only half the story because of course EVERYTHING is faster.
If you’re sitting on the SSD fence the Kingston kit makes a great choice and I highly recommend it.


WOW..I never knew it would be so simple!..I’m definitely considering this now. Thanks Gavin x
Amazingly helpful – if only Kingston did a 512gb. Alternatively, my old 250gb hard disc could become my photo repository disk.
Thanx again
Alexis
This defiantly sounds like a bonus. We all need the extra speed these days, file sizes getting larger by the day in new cameras and processing programmes needing more power to run. Could certainly make your lap top last longer. And with less moving parts to go wrong.
Brilliant Gavin, extremely helpful! My old Compaq could do with a bit of a boost, might just give this a go! Thanks.
Andy
Fantastic video, I’m very tempted, I shall look on amazon in a moment a see how much they cost
Wow
You deleted my post!
Fair enough, I guess it was a bit close to the bone and I regretted it this morning
I still stand by main point though…but PLEASE PLEASE could we have some more 15 minute photo challenges and please please can you do a quick vid on your deadwood panorama (8 photo’s I think)
I reckon it’s the best damn photo I’ve ever seen
Sorry for offense in last post
Jase
Remember there are some things to think about in terms of how Windows works with a SSD in order to prolong the life of your SSD. Here’s a good summary:
http://www.guru3d.com/article/corsair-force-gt-120gb-ssd-review/6
Great Video and clearly explained..as usual!
A warning on SSD drives, mine crashed without warning after only 9 months and the retailer actually told me I should be bragging about it as that is quite a lot compared to what he sees, and when they go it is usually without warning.
I was fortunate in that I has just finished doing an Acronis Image of the SSD so I just installed a new SSD and reinstalled the image in 10min. I am now doing Acronis incremental backups and storing ALL my data on several external HD and use the SSD only for programs as Photoshop really run fast with the SSD.
Hi Gavin, your speedtest action prompted me to make changes, after a 306 secs time on CS6 .By upgrading the ram from 6gb to 16gb, the max that windows can use on a 64bit os, the new test came in at 59secs. With extra help from the people at http://www.Crucial Memory.Wow what speed for a £59 investment. Thankyou for your advice, my computing experience is now so much better.
What a brilliant bit of adivice, so easy to do following your video and the results, well quite simply outstanding. Many thanks
hey Gavin so my hd crash today along with all my RAW files 🙁 my question is does 120gb ssd enough to run ps CS6, lightroom on windows 7?
And what’s the difference between SSD and SSHD (hybrid drive)?
Thanks!