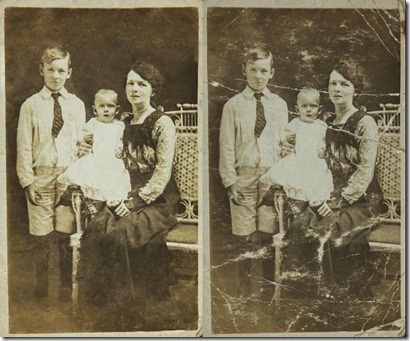
Photo Restoration ~ T+MGP 06
 When it comes to restoring old and damaged photos a flatbed scanner isn’t always the best option. Join me as I show you an easy two light setup that’s prefect for copying old photos. As always I’ll cover the Photoshop processing too 🙂
You might be wondering why I didn’t just use a scanner to copy the photo. It’s a good question that has many answers.
The first problem I have with using is a scanner is… I don’t have one. OK that’s not 100% true because I think I have one lurking at the back of a cupboard but it’s not something I’ve need for a very long time.
Handy as a scanner is, a camera offers many advantages. It has a higher resolution, it shoots RAW I can set and control the lighting and finally if I have lots of photos to shoot, it’s quicker to use this kind of set up.
You may also ask why I didn’t use flash. Well there’s no reason why I couldn’t use flash and the end result would have been just as good. The reason I love continuous lighting for restoration is simply that I can see exactly what the end result will be before I take the photo.
Equipment used in the video:
Flashpoint two light kit http://www.adorama.com/LTO2S.html?KBID=67338
Canon 5D Mark II http://www.adorama.com/ICA5DM2.html?KBID=67338
Canon 24-105mm L f/4 IS http://www.adorama.com/CA24105AFU.html?KBID=67338
Manfrotto 055 Pro http://www.adorama.com/BG055XPROB.html?KBID=67338
The Photo itself was brought into the studio by a local resident who was compiling a family history. This photo forms part of her family tree. At nearly 100 years old the photo and the album it was glued into were very fragile so careful handling was the order of the day. I’d like to thank the family for allowing me to use the photo in this video.


Excellent video. I particularly liked seeing the setup you used to take the photo.
Excellent video Gavin 🙂 thanks for sharing…
Very interesting video 🙂 Keep up with the good work
Thank you for this video, I’ve just used it to restore a friends wedding photo of his parents as his father has just died, he had tried scanning it but that highlighted some defects in original photo.
Excellent video, great to see the whole process from original to finished product. Really need to put some time aside to go through the old family albums.
Very helpfrul video.
why you are use your camera and don’t pass the photos from a scanner ?
i’m sorry. you have explain it already
Gavin,
I have everything that I need for this except for the 2 continuous lights. I do have a off camera flash that I can use with a Gary Fong lightsphere. Would that work?
Rob
Possibly. Shadowless, even light is the name of the game, how you get there is up to you 🙂
Gavin,
What would you recommend is an ideal focal length to use to in this instance to help prevent lens distortion or is it really not enough to worry about?
I tend to be around 80-100mm for this sort of work.